


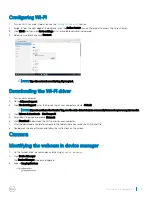


7
Scroll down the page, expand
Chipset
, and select your chipset driver.
8
Click
Download File
to download the latest version of the chipset driver for your computer.
9
After the download is complete, navigate to the folder where you saved the driver file.
10 Double-click the chipset driver file icon and follow the instructions on the screen.
Identifying chipset in Device Manager on Windows 7
1
Click
Start →
Control Panel →
Device Manager
.
2
Expand
System Devices
and search for the chipset.
Identifying the chipset in Device Manager on Windows 10
1
Click inside the
Cortana Search Box
and type
Control Panel
and then click or press
Enter
on the keyboard, for the appropriate search
result
2
From the
Control Panel
, select
Device Manager
.
3
Expand
System Devices
and search for the chipset.
Display options
Identifying the display adapters in Windows 7
1
Start the
Search Charm
and select
Settings
.
2
Type
Device Manager
in the search box, and tap
Device Manager
from the left pane.
3
Expand
Display adapters
.
Identifying the display adapters in Windows 10
1
Click
All Settings
on the Windows 10 Action bar.
2
Click
Control Panel
, select
Device Manager
, and expand
Display adapters
.
The installed adapters are listed under
Display adapters
.
Graphics options
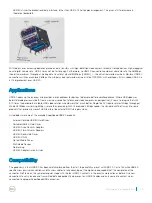
Your computer is shipped with one of the following Graphics chipsets depending on the configuration you order.
•
Discrete graphics:
•
AMD Radeon Pro WX 7100 with 8 GB GDDR5 dedicated memory
•
AMD Radeon Pro WX 4150 with 4 GB GDDR5 dedicated memory
•
Integrated graphics - Intel HD Graphics 530
Changing the screen resolution (Windows 7 and Windows 10)
1
Right click on the desktop and select
Display Settings
.
2
Tap or click
Advanced display settings
.
76
Technology and components
Summary of Contents for Inspiron 5720
Page 1: ...Precision 5720 All in One Owner s Manual Regulatory Model W13C Regulatory Type W13C001 ...
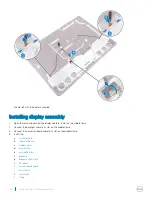
Page 69: ...2 Place the middle frame on the assembly Removing and installing components 69 ...
Page 86: ...86 Technology and components ...
Page 97: ...Software 97 ...
Page 100: ...100 Software ...
Page 106: ...106 Troubleshooting ...