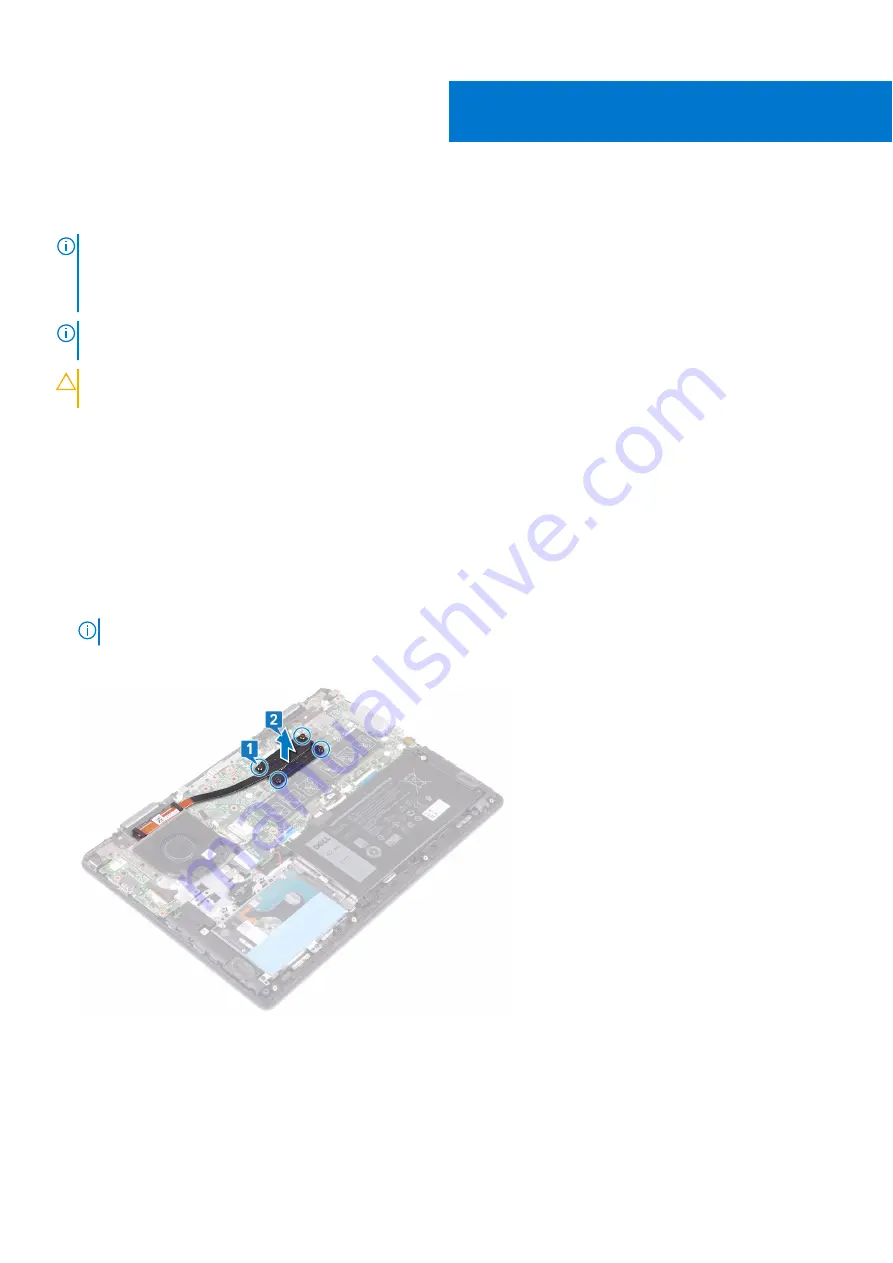
Removing the heat sink
NOTE:
Before working inside your computer, read the safety information that shipped with your computer and follow
the steps in
Before working inside your computer
. After working inside your computer, follow the instructions in
. For more safety best practices, see the Regulatory Compliance home page at
.
NOTE:
The heat sink may become hot during normal operation. Allow sufficient time for the heat sink to cool before you
touch it.
CAUTION:
For maximum cooling of the processor, do not touch the heat transfer areas on the heat sink. The oils
in your skin can reduce the heat transfer capability of the thermal grease.
Prerequisites
.
Procedure
1. In reverse order (as indicated on the heat-sink), loosen the four captive screws that secure the heat sink to the system
board.
NOTE:
The number of screws may vary depending on the configuration ordered.
2. Lift the heat sink off the system board.
18
Removing the heat sink
41
Summary of Contents for Inspiron 5481
Page 1: ...Inspiron 5481 Service Manual Regulatory Model P93G Regulatory Type P93G001 June 2022 Rev A02 ...
Page 21: ...Removing the battery 21 ...
Page 23: ...Post requisites Replace the base cover Replacing the battery 23 ...
Page 31: ...Post requisites Replace the base cover Replacing the memory modules 31 ...
Page 33: ...Removing the solid state drive Intel Optane 33 ...
Page 36: ...36 Replacing the solid state drive Intel Optane ...
Page 40: ...Post requisites 1 Replace the battery 2 Replace the base cover 40 Replacing the hard drive ...
Page 55: ...Removing the display assembly 55 ...
Page 59: ...Removing the display back cover and antenna assembly 59 ...
Page 72: ...72 Removing the system board ...
Page 77: ...Removing the touchpad 77 ...
Page 79: ...Post requisites 1 Replace the battery 2 Replace the base cover Replacing the touchpad 79 ...
Page 81: ...Removing the palm rest and keyboard assembly 81 ...


