Dell Latitude 5420/E5420/E5420m Owner's Manual
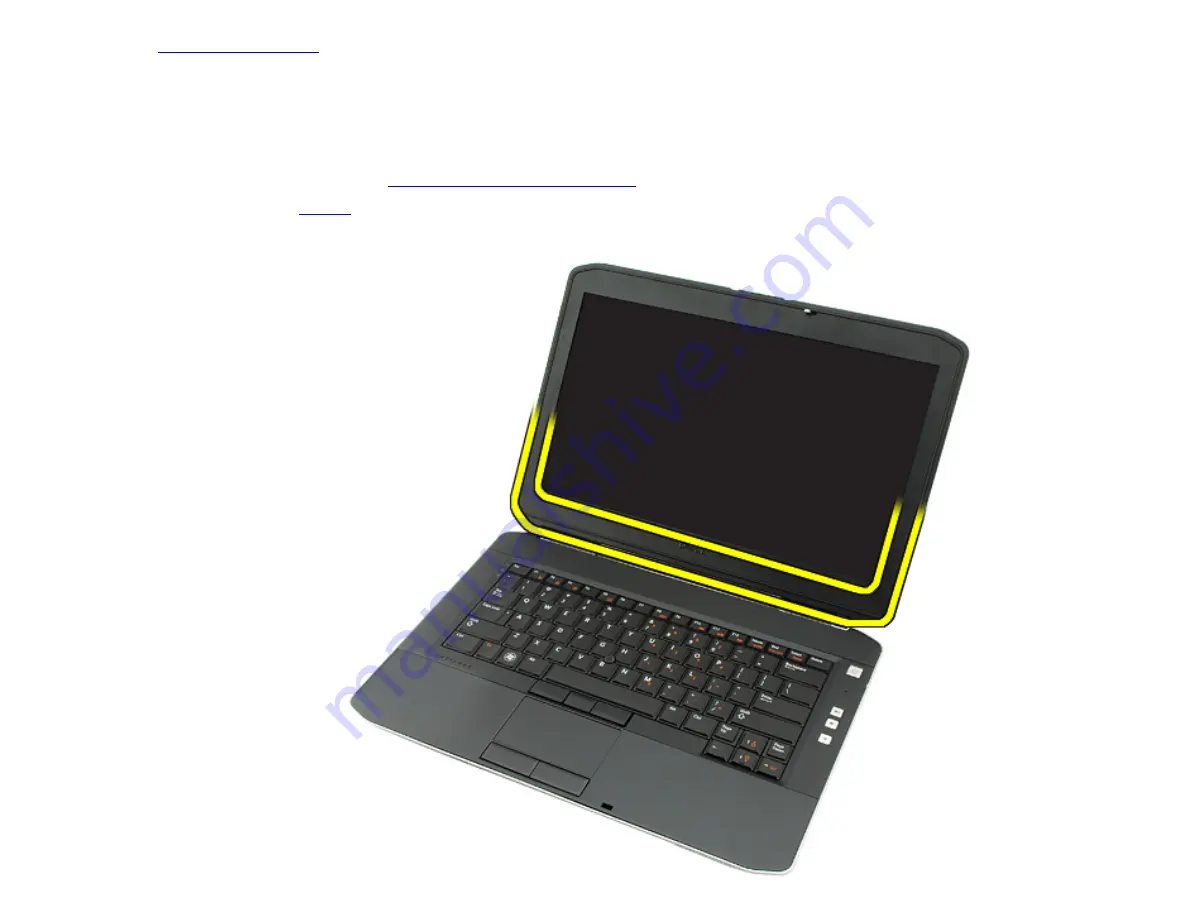
Removing the Display Bezel
Before Working On Your Computer
.
2. Remove the
3. Pry up the bottom edge of the display bezel.
4. Work your way around the sides and the top edge of the display bezel.
Summary of Contents for Inspiron 5420
Page 11: ...Related tasks Installing the Battery ...
Page 17: ...4 Slide the PC card out of the computer ...
Page 18: ...Related tasks Installing the PC Card ...
Page 22: ...Related tasks Installing The Secure Digital SD Card ...
Page 26: ...Related tasks Installing the Subscriber Identity Module SIM Card ...
Page 30: ...Related tasks Installing the ExpressCard ...
Page 34: ...Related tasks Installing the Back Panel ...
Page 38: ...5 Remove the keyboard trim from the computer ...
Page 39: ...Related tasks Installing the Keyboard Trim ...
Page 44: ...7 Disconnect the keyboard data cable from the computer ...
Page 45: ...8 Remove the keyboard from the computer ...
Page 46: ...9 Disconnect and remove the cable from the keyboard ...
Page 47: ...Related tasks Installing the Keyboard ...
Page 51: ...6 Remove the optical drive from the computer ...
Page 52: ...Related tasks Installing the Optical Drive ...
Page 57: ...7 Disconnect the bracket from the hard drive ...
Page 58: ...8 Disconnect the hard drive connector from the hard drive ...
Page 59: ...Related tasks Installing the Hard Drive Assembly ...
Page 63: ...5 Remove the screw that secures the WLAN card to system board 6 Remove the WLAN card ...
Page 64: ...Related tasks Installing the Wireless Local Area Network WLAN Card ...
Page 68: ...5 Remove the screw that secures the WWAN card to the system board 6 Remove the WWAN card ...
Page 69: ...Related tasks Installing the Wireless Wide Area Network WWAN card ...
Page 73: ...5 Remove the memory module from the computer Related tasks Installing The Memory Module ...
Page 77: ...5 Remove the CPU door Related tasks Installing the CPU Door ...
Page 81: ...6 Lift the heat sink and remove it from the computer Related tasks Installing The Heat Sink ...
Page 85: ...7 Remove the processor Related tasks Installing the Processor ...
Page 89: ...9 Flip the computer and remove the screws from the back of the computer ...
Page 91: ...11 Lift up the left edge of the palm rest assembly ...
Page 92: ...12 Release the tabs on the right edge of the palm rest assembly ...
Page 93: ...13 Remove the palm rest assembly from the computer ...
Page 94: ...Related tasks Installing the Palm Rest ...
Page 98: ...10 Disconnect the LED board cable from the system board connector ...
Page 99: ...11 Remove the LED board ...
Page 100: ...Related tasks Installing the LED Board ...
Page 104: ...10 Disconnect the cage from the system board connector ...
Page 105: ...11 Remove the ExpressCard Smart Card PCMCIA module ...
Page 106: ...Related tasks Installing the ExpressCard Smart Card PCMCIA Module ...
Page 110: ...10 Remove the screw that secures the Bluetooth card ...
Page 111: ...11 Remove the Bluetooth card ...
Page 112: ...12 Disconnect the Bluetooth cable from the Bluetooth card ...
Page 113: ...Related tasks Installing the Bluetooth Card ...
Page 117: ...11 Remove the antenna cables from the routing channels ...
Page 118: ...12 Disconnect the low voltage differential LVDS and the camera cables ...
Page 119: ...13 Remove the screws that secure the display assembly to the computer ...
Page 120: ...14 Remove the display assembly ...
Page 121: ...Related tasks Installing the Display Assembly ...
Page 125: ...11 Remove the right support bracket ...
Page 126: ...12 Remove the screws that secure the left support bracket ...
Page 127: ...13 Remove the left support bracket ...
Page 128: ...Related tasks Installing the Support Brackets ...
Page 132: ...13 Lift the modem card to disengage from the connector on the back of the card ...
Page 133: ...14 Disconnect the modem cable from the modem ...
Page 134: ...15 Remove the modem card ...
Page 135: ...Related tasks Installing the Modem Card ...
Page 139: ...11 Remove the screw that secures the audio board to the computer ...
Page 140: ...12 Remove the audio board ...
Page 141: ...Related tasks Installing the Audio Board ...
Page 146: ...23 Remove the screws that secure the system board ...
Page 147: ...24 Lift the edge of the system board to disconnect it from the input output I O panel ...
Page 148: ...25 Release the system board from the port connectors ...
Page 149: ...26 Remove the system board ...
Page 150: ...Related tasks Installing the System Board ...
Page 155: ...23 Pry and remove the coin cell battery ...
Page 156: ...Related tasks Installing the Coin Cell Battery ...
Page 160: ...23 Remove the I O panel ...
Page 161: ...Related tasks Installing The Input Output I O Panel ...
Page 165: ...23 Remove the power connector ...
Page 166: ...Related tasks Installing the Power Connector ...
Page 170: ...25 Remove the modem connector ...
Page 171: ...Related tasks Installing the Modem Connector ...
Page 175: ...23 Remove the screw that secures the thermal fan ...
Page 176: ...24 Remove the thermal fan ...
Page 177: ...Related tasks Installing the Thermal Fan ...
Page 179: ......
Page 182: ...25 Remove the speaker cables from the routing channels ...
Page 183: ...26 Remove the speakers ...
Page 184: ...Related tasks Installing the Speakers ...
Page 186: ...Related tasks Removing the Speakers ...
Page 189: ...5 Remove the display bezel ...
Page 190: ...Related tasks Installing the Display Bezel ...
Page 196: ...Related tasks Installing the Display Panel ...
Page 200: ...13 Remove the display hinges from the display assembly ...
Page 201: ...14 Separate the display hinge towers from the hinges ...
Page 202: ...15 Remove the hinge caps from the display hinges ...
Page 203: ...Related tasks Installing the Display Hinges ...
Page 207: ...6 Loosen the screw that secures the camera module 7 Lift and remove the camera module ...
Page 208: ...Related tasks Installing the Camera Module ...
Page 247: ...Back to Contents Page Dell Latitude 5420 E5420 E5420m Owner s Manual Diagnostics Diagnostics ...


