Identifier
GUID-FBA68EE4-1E13-4F28-9B84-362694B97060
Status
Released
Replacing the power-button board
WARNING:
Before working inside your computer, read the safety information that shipped with your computer and follow the
steps in
Before working inside your computer
. After working inside your computer, follow the instructions in
. For more safety best practices, see the Regulatory Compliance home page at
Identifier
GUID-2625A35B-7915-4836-9349-C655EF4F80AB
Status
Released
Procedure
1
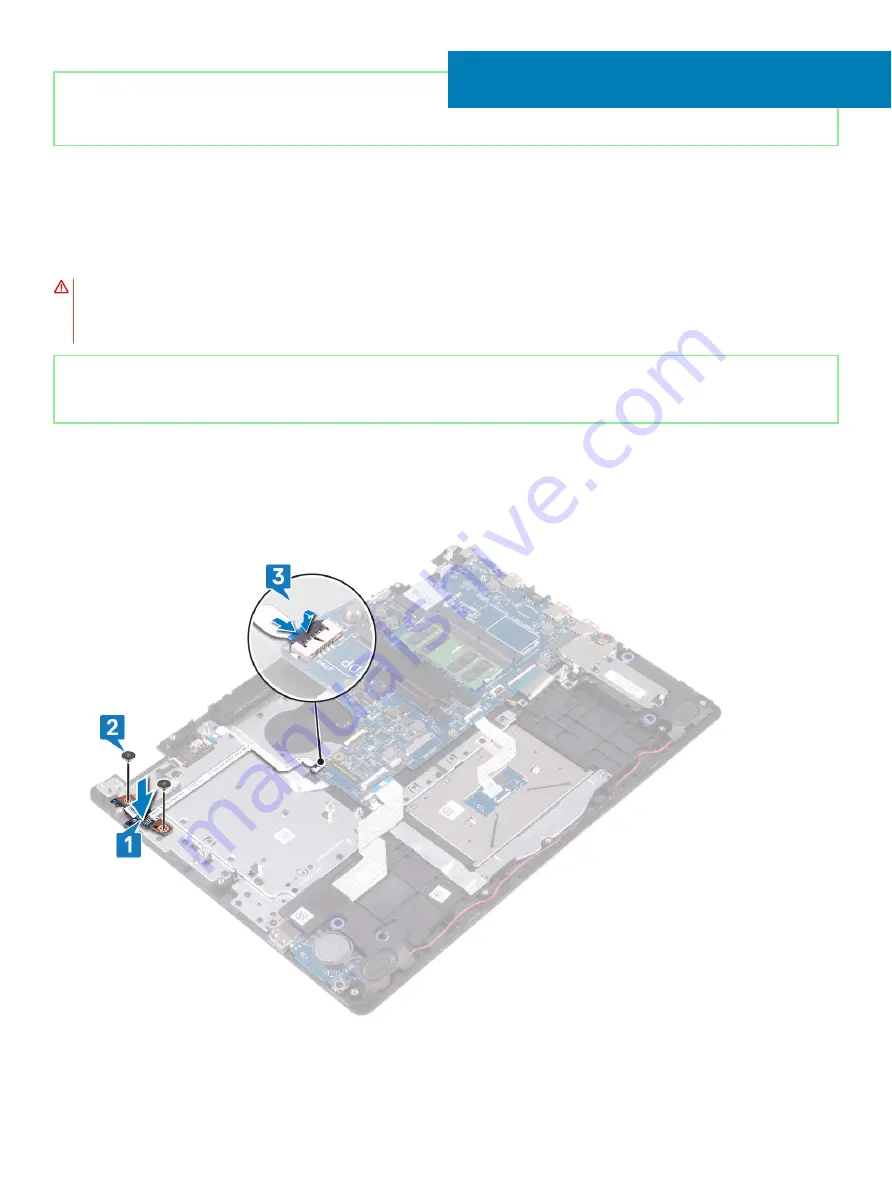
Place the power-button board into the slot on the palm rest and keyboard assembly.
2
Replace the two screws (M2x3) that secure the power-button board to the palm rest and keyboard assembly.
3
Slide the power-button cable to the system board and close the latch to secure the cable.
33
Replacing the power-button board
77
Summary of Contents for Inspiron 3480
Page 8: ...Flea power release 138 8 Contents ...
Page 21: ...Replacing the base cover 21 ...
Page 23: ...Removing the battery 23 ...
Page 31: ...Removing the wireless card 31 ...
Page 35: ...Removing the coin cell battery 35 ...
Page 39: ...Removing the fan 39 ...
Page 43: ...Removing the heat sink 43 ...
Page 52: ...52 Removing the hard drive ...
Page 57: ...Removing the touchpad 57 ...
Page 61: ...Removing the speakers 61 ...
Page 65: ...Removing the I O board 65 ...
Page 69: ...5 Lift the palm rest and keyboard assembly at an angle Removing the display assembly 69 ...
Page 72: ...72 Removing the display assembly ...
Page 76: ...76 Removing the power button board ...
Page 81: ...Removing the system board 81 ...
Page 87: ...Removing the power button with fingerprint reader 87 ...
Page 91: ...Removing the power adapter port 91 ...
Page 95: ...Removing the palm rest and keyboard assembly 95 ...
Page 100: ...100 Removing the display bezel ...
Page 104: ...104 Removing the camera ...
Page 113: ...Removing the display hinges 113 ...
Page 117: ...Removing the display cable 117 ...
Page 121: ...Removing the display back cover and antenna assembly 121 ...


