Before working inside your
computer
NOTE: The images in this document may differ from your computer
depending on the configuration you ordered.
Before you begin
1
Save and close all open files and exit all open applications.
2
Shut down your computer. Click
Start
→
Power
→
Shut down
.
NOTE: If you are using a different operating system, see the
documentation of your operating system for shut-down instructions.
3
Disconnect your computer and all attached devices from their electrical outlets.
4
Disconnect all attached network devices and peripherals, such as keyboard,
mouse, and monitor from your computer.
5
Remove any media card and optical disc from your computer, if applicable.
6
After the computer is unplugged, press and hold the power button for 5 seconds
to ground the system board.
Safety instructions
Use the following safety guidelines to protect your computer from potential damage
and ensure your personal safety.
WARNING: Before working inside your computer, read the safety
information that shipped with your computer. For more safety best
practices, see the Regulatory Compliance home page at
.
WARNING: Disconnect all power sources before opening the computer
cover or panels. After you finish working inside the computer, replace all
covers, panels, and screws before connecting to the electrical outlet.
8
Summary of Contents for Inspiron 3472
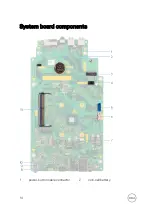
Page 14: ...System board components 1 power button cable connector 2 coin cell battery 14 ...
Page 28: ...2 Remove the two screws 6 32xL6 35 that secure the hard drive assembly to the drive cage 28 ...
Page 30: ...5 Slide the hard drive out of the hard drive bracket 30 ...
Page 41: ...2 Remove the coin cell battery from the socket 41 ...
Page 45: ...5 Slide and remove the wireless card from the wireless card slot 45 ...
Page 49: ...3 Remove the antenna modules along with the cables off the chassis 49 ...
Page 53: ...5 Remove the power button module along with its cable through the slot on the front panel 53 ...
Page 56: ...3 Lift the thermal cooling assembly off the system board 56 ...
Page 61: ...8 Slide and lift the system board off the chassis 61 ...


