background image

12  

    About your monitor

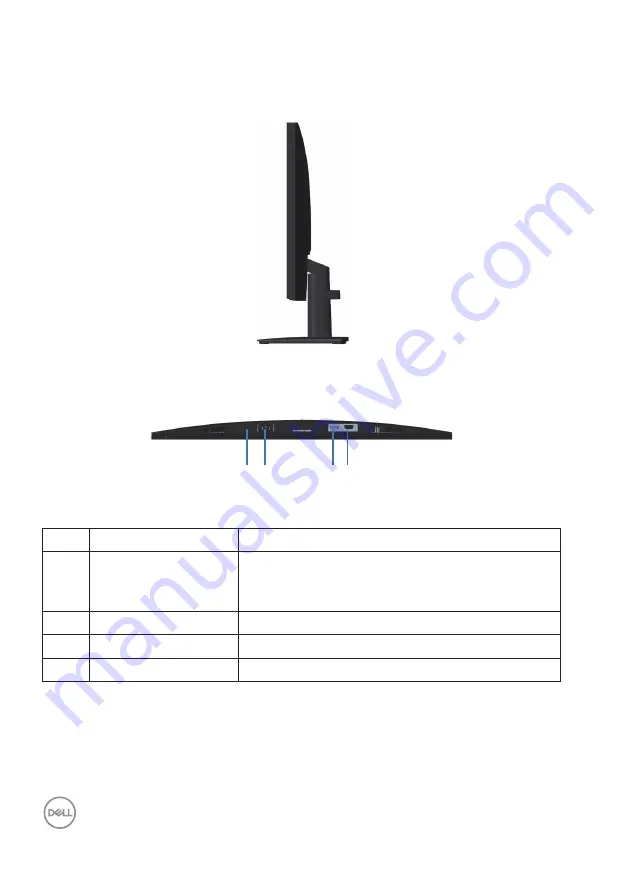
Side view

Bottom view

1

2

3

4

Bottom view without monitor stand

Label Description

Use

1

Security-lock slot

Secure your monitor using a security lock 
(purchased separately) to prevent unauthorized 
movement of your monitor. 

2

Power port

Connect the power cable 

3

HDMI port

Connect your computer with HDMI cable.

4

VGA port

Connect your computer with VGA cable 

Summary of Contents for E2723

Page 1: ...Monitor Model E2723HN Regulatory Model E2723HNc Dell E2723HN Monitor User s Guide ...

Page 2: ...or loss of data if instructions are not followed WARNING A WARNING indicates a potential for property damage personal injury or death Copyright 2022 Dell Inc or its subsidiaries All rights reserved Dell EMC and other trademarks are trademarks of Dell Inc or its subsidiaries Other trademarks may be trademarks of their respective owners 2022 02 Rev A00 ...

Page 3: ...ttom view 12 Monitor specifications 13 Resolution specifications 14 Preset display modes 15 Physical characteristics 18 Environmental characteristics 19 Plug and play capability 20 LCD monitor quality and pixel policy 20 Ergonomics 20 Handling and moving your display 22 Maintenance guidelines 23 Cleaning your monitor 23 Setting up the monitor 25 Attaching the stand 25 ...

Page 4: ...ting your monitor 33 Turning on the monitor 33 Using the control buttons 33 Control buttons 34 Using the OSD lock function 35 Use the Lock menu to lock the button s 35 Use the front panel control button to lock the button s 36 To unlock the button s 37 OSD controls 38 Using the On Screen Display OSD menu 39 Accessing the OSD menu 39 Setting the maximum resolution 52 Troubleshooting 53 Self Test 53...

Page 5: ... 5 Product specific problems 58 Regulatory information 59 FCC notices U S Only and other regulatory information59 EU product database for energy label and product information sheet 59 Contacting Dell 59 ...

Page 6: ...hat your monitor is electrically rated to operate with the AC power available in your location Keep the monitor in room temperature Excessive cold or hot conditions can have an adverse effect on the liquid crystal of the display Connect the power cable from the monitor to a wall outlet that is near and accessible See Connecting your monitor Do not place and use the monitor on a wet surface or near...

Page 7: ...table below If any component is missing contact Dell For more information see Contacting Dell NOTE Some items may be optional and may not ship with your monitor Some features or media may not be available in certain countries Component image Component description Display Stand riser Stand base VESA Screw Cover ...

Page 8: ...mage Component description HDMI 1 4 cable VGA cable EMEA and Japan region 5 Dell P N 9DW0F Rev A00 F41G78S1700 E2723HN 2022 02 2022 Dell Inc or its subsidiaries VGA VGA www dell com E2723HN 1 HDMI VGA Quick Setup Guide Safety Environmental and Regulatory Information ...

Page 9: ... Display OSD adjustments for ease of setup and screen optimization Removable stand and Video Electronics Standards Association VESA 100 mm mounting holes for flexible mounting solutions Security lock slot 0 3 W in Standby Mode Supports Dell Display Manager Optimize eye comfort with a TÜV certified flicker free screen TÜV certified ComfortView feature is designed to reduce the amount of blue light ...

Page 10: ...uttons To access the on screen display OSD menu For more information see Using the control buttons 2 Power On Off button with LED indicator To turn the monitor on or off Solid white light indicates that the monitor is turned on and functioning normally Blinking white light indicates that the monitor is in Standby Mode ...

Page 11: ...two conditions 1 this device may not cause harmful interference and 2 this device must accept any interference received including interference that may cause undesired operation R33037 RoHS IS 13252 Part 1 IEC 60950 1 R 41082465 www bis gov in ZU10104 xxxx R R E2K E2723HNc 신청인 DELL INC 제조자 L T Display Technology Fujian Ltd for Korea 080 200 3800 デル テクノロジーズ 入力 100V 1 5 A 50 60 Hz xxxxx X X X X X X ...

Page 12: ...abel Description Use 1 Security lock slot Secure your monitor using a security lock purchased separately to prevent unauthorized movement of your monitor 2 Power port Connect the power cable 3 HDMI port Connect your computer with HDMI cable 4 VGA port Connect your computer with VGA cable ...

Page 13: ...20x1080 at 60Hz HDMI1 4 VGA Pixel pitch 0 3114 mm x 0 3114 mm Pixel per inch PPI 81 Viewing angle Horizontal Vertical 178 typical 178 typical Luminance output 300 cd m typical Contrast ratio 1000 to 1 typical Faceplate coating Anti glare with 3H hardness Backlight LED edgelight system Response time Gray to Gray Normal mode 8ms Fast mode 5ms Color depth 16 7 million colors Color gamut NTSC CIE1976 ...

Page 14: ...es Security Security lock slot cable lock optional purchase Built in Speakers 2 x 1 W sound output No Resolution specifications Model E2723HN Horizontal scan range 30 kHz to 85 kHz automatic Vertical scan range 56 Hz to 75 Hz VGA 48 Hz to 75 Hz HDMI automatic Maximum preset resolution 1920 x 1080 at 60 Hz HDMI 1920 x 1080 at 60 Hz VGA ...

Page 15: ...480 37 50 75 00 31 50 VESA 640 x 480 31 47 59 94 25 18 IBM 720 x 400 31 47 70 08 28 32 VESA 800 x 600 37 88 60 32 40 00 VESA 800 x 600 46 88 75 00 49 50 VESA 1024 x 768 48 36 60 00 65 00 VESA 1024 x 768 60 02 75 03 78 75 VESA 1152 x 864 67 50 75 00 108 00 VESA 1280 x 1024 63 98 60 02 108 00 VESA 1280 x1024 79 98 75 02 135 00 VESA 1600 x 900 60 00 60 00 108 00 CTA 1920 x 1080 67 50 60 00 148 50 ...

Page 16: ...Wh TEC 3 1 As defined in EU 2019 2021 and EU 2019 2013 2 Max brightness and contrast setting 3 Pon Power consumption of On mode as defined in Energy Star 8 0 version TEC Total energy consumption in kWh as defined in Energy Star 8 0 version This document is informational only and reflects laboratory performance Your product may perform differently depending on the software components and peripheral...

Page 17: ...ct qualifies for ENERGY STAR in the factory default settings and this is the setting in which power savings will be achieved Changing the factory default picture settings or enabling other features will increase power consumption that could exceed the limits necessary to qualify for ENERGY STAR rating For more information on the ENERGY STAR program refer to energystar gov ...

Page 18: ...1 in Dimensions without stand Height 370 87 mm 14 60 in Width 623 30 mm 24 54 in Depth 50 41 mm 1 98 in Stand dimensions Height 189 86 mm 7 47 in Width 245 19 mm 9 65 in Depth 188 29 mm 7 41 in Weight Weight with packaging 6 81 kg 15 01 lb Weight with stand assembly and cables 4 86 kg 10 71 lb Weight without stand assembly no cables 3 80 kg 8 38 lb Weight of stand assembly 0 73 kg 1 61 lb Front fr...

Page 19: ...m BFR PVC free laminates Arsenic free glass and Mercury free for the panel only Meets NFPA 99 leakage current requirement Temperature Operating 0 C to 40 C 32 F to 104 F Non operating Storage 20 C to 60 C 4 F to 140 F Shipping 20 C to 60 C 4 F to 140 F Humidity Operating 10 to 80 non condensing Non operating Storage 5 to 90 non condensing Shipping 5 to 90 non condensing Altitude Operating maximum ...

Page 20: ...rgonomics CAUTION Improper or prolonged usage of keyboard may result in in jury CAUTION Viewing the monitor screen for extended periods of time may result in eye strain For comfort and efficiency observe the following guidelines when setting up and using your computer workstation Position your computer so that the monitor and keyboard are directly in front of you as you work Special shelves are co...

Page 21: ...keyboard or mouse Let your upper arms rest naturally on both sides Ensure that your feet are resting flat on the floor When sitting ensure that the weight of your legs is on your feet and not on the front portion of your seat Adjust your chair s height or use a footrest if necessary to maintain a proper posture Vary your work activities Try to organize your work so that you do not have to sit and ...

Page 22: ...erials Hold the bottom edge and the side of the monitor firmly without applying excessive pressure when lifting or moving the monitor When lifting or moving the monitor ensure that the screen is facing away from you Do not press on the display area to avoid any scratches or damage When transporting the monitor avoid any sudden shock or vibration to it When lifting or moving the monitor do not turn...

Page 23: ...he monitor such as color fading milky film on the monitor deformation uneven dark shade and screen surface peeling Maintenance guidelines Cleaning your monitor WARNING Before cleaning the monitor unplug the monitor power cable from the electrical outlet CAUTION Read and follow the Safety instructions before cleaning the monitor WARNING Before cleaning the monitor unplug the monitor power cable fro...

Page 24: ...age CID CID is not covered under the standard Dell warranty If you notice white powder when you unpack your monitor wipe it off with a cloth Handle your monitor with care as a dark colored monitor may get scratched and show white scuff marks more than a light colored monitor To help maintain the best image quality on your monitor use a dynamically changing screen saver and turn off your monitor wh...

Page 25: ... included with the stand To attach the monitor stand 1 Assemble the stand riser to stand base a Place the monitor stand base on a stable table top b Slide the monitor stand body in the correct direction down onto the stand base c Tighten thumbscrew clockwise till it s securely fastened 2 Attach the stand assembly to the monitor a Place the monitor on a soft cloth or cushion near the edge of desk b...

Page 26: ...e cables through the cable management slot before connecting them NOTE Do not connect all cables to the computer at the same time NOTE The images are for the purpose of illustration only The appearance of the computer may vary To connect your monitor to the computer 1 Turn off your computer and disconnect the power cable 2 Connect the VGA cable or HDMI cable from your monitor to the computer Conne...

Page 27: ...About your monitor 27 Organizing cables Use cable management clip on stand assembly to route the cables connected to your monitor 4 Turn on the Monitor ...

Page 28: ...ttom of the monitor see Security lock slot Secure your monitor to a table using the Kensington security lock For more information on using the Kensington lock sold separately see the docu mentation that is shipped with the lock NOTE The image is for the purpose of illustration only The appear ance of the lock may vary ...

Page 29: ...carefully NOTE The following steps are specifically for removing the stand that is shipped with your monitor If you are removing a stand that you pur chased from any other source follow the setup instructions that are included with the stand To remove the stand 1 Place the monitor on a soft cloth or cushion at the edge of the desk 2 Using a long screwdriver press the release button ...

Page 30: ...30 About your monitor 3 While keeping the release button pressed pull the stand out To remove the VESA cover Press the dimple on the VESA cover to release it from the back of the display ...

Page 31: ...rick Ireland for EU Only CAN ICES 003 B NMB 003 B For UK only Cain Road Bracknell RG12 1LF This device complies with part 15 of the FCC Rules Operation is subject to the following two conditions 1 this device may not cause harmful interference and 2 this device must accept any interference received including interference that may cause undesired operation R33037 RoHS IS 13252 Part 1 IEC 60950 1 R ...

Page 32: ...32 About your monitor Using tilt You can tilt the monitor for the most comfortable viewing angle NOTE The stand is not attached when the monitor is shipped from the factory 5 21 ...

Page 33: ...or 33 Operating your monitor Turning on the monitor Press the button to turn on the monitor Using the control buttons Use the control buttons at the bottom edge of the monitor to adjust the image being displayed 2 5 3 4 1 ...

Page 34: ...e Brightness and Contrast menu 3 Menu To launch the On Screen Display OSD menu or to access the list of items options of a menu item For more information see Accessing the OSD menu 4 Exit To exit or return to the OSD main menu 5 Power button with power status light To turn the monitor on or off Solid white light indicates the monitor is turned on and functioning normally Blinking white light indic...

Page 35: ...nalize Color Display B Auto Adjust rightness Contrast Dell 27 Monitor Input Source Menu Language Transparency Power Button Timer Lock Menu Buttons Menu Power buttons Reset Menu Disable 2 The following message appears Dell 27 Monitor Are you sure you want to lock the Power Buttons To unlock the Buttons refer to the User s Guide Yes No E2723HN 3 Select Yes to lock the buttons Once locked pressing an...

Page 36: ... Select option 2 Select one of the following options Control Buttons Description 1 Menu Buttons lock Select this option to lock OSD menu function 2 Power Button lock Use this option to lock power button This will prevent the user to turn off the monitor using the power button 3 Menu and Power Buttons lock Use this option to lock OSD menu and power button to turn off the monitor ...

Page 37: ...o unlock the front panel control buttons Dell 27 Monitor Select Option Dell 27 Monitor Select Option Dell 27 Monitor Select Option Control Buttons Description 1 Menu Buttons unlock Select this option to unlock OSD menu function 2 Power Button unlock Use this option to unlock power button to turn off the monitor 3 Menu and Power But tons unlock Use this option to unlock OSD menu and power button 4 ...

Page 38: ...e image settings 2 3 4 1 Control Buttons Description 1 Up Use the Up button to increase values or move up in a menu 2 Down Use the Down button to decrease values or move down in a menu 3 OK Use the OK button to confirm your selection in a menu 4 Back Use the Back button to go back to the previous menu ...

Page 39: ...thers Personalize Menu Color Display B Auto Adjust rightness Contrast Dell 27 Monitor 2 Press the and buttons to move between the setting options As you move from one icon to another the option is highlighted 3 Press the or or button once to activate the highlighted option 4 Press and button to select the desired parameter 5 Press and then use the and buttons according to the indicators on the men...

Page 40: ...ghtness adjusts the luminance of the backlight Press the button to increase the brightness and press the button to decrease the brightness min 0 max 100 Contrast Adjust the brightness first and then adjust the contrast only if further adjustment is necessary Press the button to increase the contrast and press the button to decrease the contrast min 0 max 100 The contrast function adjusts the degre...

Page 41: ... on a black screen as the monitor self adjusts to the current input Auto Adjust allows the monitor to self adjust to the incoming video signal After using Auto Adjustment you can further tune your monitor by using the Pixel Clock Coarse and Phase Fine controls under Display NOTE Auto Adjust does not occur if you press the button while there are no active video input signals or attached cables This...

Page 42: ...lect Select Auto Select to scan for available input signals Reset Input Source Select this option to restore default Input Source Color Use color to adjust the color setting mode Others Personalize Menu Color Display B Auto Adjust rightness Contrast Dell 27 Monitor Present Mode Input Color Format Reset Color Standard RGB Input Source Preset Modes When you select preset modes you can choose Stand a...

Page 43: ...conds during the breaks Perform stretches to relieve tension in the neck arm back shoulders during the breaks Warm Increases the color temperature The screen appears warmer with a red yellow tint Cool Decreases the color temperature The screen appears cooler with a blue tint Custom Color Allows you to manually adjust the color settings Press the and buttons to adjust the three colors R G B values ...

Page 44: ... color settings to the factory default Display Use the display to adjust image Input Source Others Personalize Menu Color Display B Auto Adjust rightness Contrast Dell 27 Monitor Phase Pixel Clock Response Time Reset Display Sharpness Aspect Ratio Vertical Position Horizontal Position 16 9 4 3 5 4 Aspect Ratio Adjusts the image ratio to 16 9 4 3 and 5 4 Horizontal Position VGA input only Use or to...

Page 45: ...ings of the OSD such as the languages of the OSD the amount of time the menu remains on screen and so on Others Personalize Color Display B Auto Adjust rightness Contrast Dell 27 Monitor Input Source Language Transparency 20 Timer Lock English 20 s Reset Menu Disable Menu Language Language options set the OSD display to one of the eight languages English Spanish French German Brazilian Portuguese ...

Page 46: ...Transparency Power Button Timer Lock Menu Buttons Menu Power buttons Reset Menu Disable Menu Buttons Through OSD to lock the Menu buttons Power Button Through OSD to lock the Power button Menu Power Buttons Through OSD to lock both the Menu and Power buttons Disable Press and hold the button on the left of the power button for 4 second Reset Menu Reset all OSD settings to the factory preset values...

Page 47: ...ct Ratio to set the shortcut key 2 Power Button LED Allows you to set the power LED indicator On in On Mode or Off in On Mode to save energy Reset Per sonalization Restores shortcut keys to factory defaults Others Input Source Others Personalize Menu Color Display B Auto Adjust rightness Contrast Dell 27 Monitor Display Info DDC CI LCD Conditioning Service Tag Reset Others On Factory Reset ABCDEFG...

Page 48: ... Color Display B Auto Adjust rightness Contrast Dell 27 Monitor Reset Others Factory Reset LCD Conditioning Display Info DDC CI Service Tag On Off LCD Condi tioning Helps to reduce minor cases of image retention Depending on the degree of image retention the program may take some time to run To start LCD conditioning select on Input Source Others Personalize Menu Color Display B Auto Adjust rightn...

Page 49: ... Auto Adjust rightness Contrast Dell 27 Monitor Display Info DDC CI LCD Conditioning Reset Others Service Tag Factory Reset On ABCDEFG ENERGY STAR Reset Others Reset all settings under the Others setting menu to the factory default Factory Reset Reset all settings to the factory default These are also the settings for ENERGY STAR tests ...

Page 50: ...ion of adjusting display setting using PC application will be disabled Do you wish to disable DDC CI function Yes No Dell 27 Monitor E2723HN When the monitor enters Standby Mode the following message appears Dell P2418HZ Dell 27 Monitor Going into Standby mode E2723HN or Dell P2418HZ Dell 27 Monitor Going into Standby mode E2723HN ...

Page 51: ...e after 4 minutes if left at this state Dell P2418HZ Dell 27 Monitor No HDMI Cable The display will go into Standby mode in 4 minutes www dell com E2723HN E2723HN or Dell P2418HZ Dell 27 Monitor No VGA Cable The display will go into Standby mode in 4 minutes www dell com E2723HN E2723HN See Troubleshooting Troubleshooting for more information ...

Page 52: ...esktop and click Display settings 2 If you have more than one monitor connected ensure to select E2723HN 3 Click the Display Resolution dropdown list and select 1920 x 1080 4 Click Keep changes If you do not see 1920 x 1080 as an option you must update your graphics driver to the latest version Depending on your computer complete one of the following procedures If you have a Dell desktop or portab...

Page 53: ...tor 2 Disconnect all video cables from the monitor This way the computer doesn t have to be involved 3 Turn on the monitor If the monitor is working correctly it detects that there is no signal and one of the following message appears While in self test mode the power LED remains white Dell P2418HZ Dell 27 Monitor No VGA Cable The display will go into Standby mode in 4 minutes www dell com E2723HN...

Page 54: ...an inherent problem with your monitor or with your computer and video card NOTE You can run the built in diagnostics only when the video cable is unplugged and the monitor is in self test mode 1 5 2 3 4 To run the built in diagnostics 1 Ensure that the screen is clean no dust particles on the surface of the screen 2 Unplug the video cable s from the back of the computer or monitor The monitor then...

Page 55: ...screen changes to grey 7 Inspect the display for any abnormalties 8 Repeat step 6 and 7 to inspect the display in red green blue black white and text pattern screens The test is complete when the text pattern screen appears To exit press the Up button button 1 again If you do not detect any screen abnormalties upon using the built in diagnostic tool the monitor is functioning properly Check the vi...

Page 56: ...and contrast controls using the OSD Perform monitor self test feature check Check for bent or broken pins in the video cable connector Run the built in diagnostics Ensure that the correct input source is selected via the Input Source menu Poor Focus Eliminate video extension cables Reset the monitor to Factory Settings Factory Reset Change the video resolution to the correct aspect ratio Shaky Jit...

Page 57: ...ble connector Run the built in diagnostics Synchronization Problems Reset the monitor to Factory Settings Factory Reset Perform monitor self test feature check to determine if the scrambled screen appears in self test mode Check for bent or broken pins in the video cable connector Restart the computer in the safe mode Safety Related Issues Do not perform any troubleshooting steps Contact Dell imme...

Page 58: ...ptoms Possible Solutions Screen image is too small Check the Aspect Ratio setting in the Display settings OSD Reset the monitor to Factory Settings Factory Reset Cannot adjust the monitor with the buttons on the bottom of the panel Turn Off the monitor unplug the power cord plug it back and then turn On the monitor Check if the OSD menu is locked If yes press and hold the Exit button button 4 for ...

Page 59: ... energy label and product information sheet E2723HN https eprel ec europa eu qr 1004223 Contacting Dell To contact Dell for sales technical support or customer service issues see www dell com contactdell NOTE Availability varies by country and product and some services may not be available in your country NOTE If you do not have an active Internet connection you can find contact information on you...

Reviews: