background image

Software

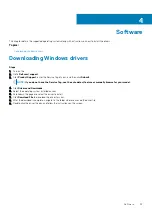
This chapter details the supported operating systems along with instructions on how to install the drivers.

Topics:

Downloading Windows drivers

Downloading Windows drivers

Steps

1. Turn on the .
2. Go to 

Dell.com/support

.

3. Click 

Product Support

, enter the Service Tag of your , and then click 

Submit

.

NOTE:

 If you do not have the Service Tag, use the auto detect feature or manually browse for your model.

4. Click 

Drivers and Downloads

.

5. Select the operating system installed on your .
6. Scroll down the page and select the driver to install.
7. Click 

Download File

 to download the driver for your .

8. After the download is complete, navigate to the folder where you saved the driver file.
9. Double-click the driver file icon and follow the instructions on the screen.

4

Software

23

Summary of Contents for D15S

Page 1: ...OptiPlex 7080 Small Form Factor Setup and specifications guide Regulatory Model D15S Regulatory Type D15S001 May 2020 Rev A00 ...

Page 2: ...ential damage to hardware or loss of data and tells you how to avoid the problem WARNING A WARNING indicates a potential for property damage personal injury or death 2020 Dell Inc or its subsidiaries All rights reserved Dell EMC and other trademarks are trademarks of Dell Inc or its subsidiaries Other trademarks may be trademarks of their respective owners ...

Page 3: ...peaker 18 Storage 18 Power ratings 19 Add in cards 20 Security 20 Environmental 21 Energy Star and Trusted Platform Module TPM 21 Computer environment 21 Service and support 22 4 Software 23 Downloading Windows drivers 23 5 System setup 24 Boot menu 24 Boot Sequence 24 Navigation keys 25 System setup options 25 General options 25 System information 26 Video screen options 27 Security 27 Secure boo...

Page 4: ...st System Resolution 33 Updating the BIOS in Windows 33 Updating BIOS on systems with BitLocker enabled 34 Updating your system BIOS using a USB flash drive 34 System and setup password 35 Assigning a system setup password 35 Deleting or changing an existing system setup password 35 6 Getting help 37 Contacting Dell 37 4 Contents ...

Page 5: ...Set up your computer Steps 1 Connect the keyboard and mouse 2 Connect to your network using a cable or connect to a wireless network 1 Set up your computer 5 ...

Page 6: ...3 Connect the display 4 Connect the power cable 6 Set up your computer ...

Page 7: ...5 Press the power button Set up your computer 7 ...

Page 8: ...rnet sign in with or create a Microsoft account If not connected to the internet create an offline account On the Support and Protection screen enter your contact details 7 Locate and use Dell apps from the Windows Start menu Recommended Table 1 Locate Dell apps Dell apps Details Dell Product Registration Register your computer with Dell Dell Help Support Access help and support for your computer ...

Page 9: ... the warranty expiry date in SupportAssist Dell Update Updates your computer with critical fixes and important device drivers as they become available Dell Digital Delivery Download software applications including software that is purchased but not preinstalled on your computer Set up your computer 9 ...

Page 10: ...ew Back view Small Form Factor System board layout Front view 1 Power button and power light 2 SD card reader Optional 3 Hard drive activity light 4 Universal audio jack port 5 USB 2 0 Type A port with PowerShare 6 USB 2 0 Type A port 7 USB 3 2 Gen 2 Type C port with PowerDelivery 8 USB 3 2 Gen2 Type A port with PowerShare 9 Optical disk drive 2 10 Chassis ...

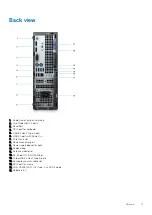
Page 11: ...t 6 USB 2 0 ports with Power On 7 PCIe Gen 3 slot 8 Power connector port 9 Power supply diagnostics light 10 Padlock loop 11 Antenna module slot 12 RJ 45 port 10 100 1000 Mbps 13 Three USB 3 2 Gen 1 Type A ports 14 Kensington security cable slot 15 PS 2 port for mouse 16 VGA HDMI2 0 DP 1 4 Type C w DP Alt mode 17 Release latch Chassis 11 ...

Page 12: ...11 Internal USB connector 12 Two SATA1 2 connector black 13 SATA3 connector white 14 SATA power cable connector 15 JDEG1 connector 16 M 2 WLAN connector 17 ATX system power connector 18 Intrusion speaker connector 19 CMOS_CLR Password Service_Mode jumper 20 M 2 PCIe SSD connector 21 JESPI1 connector 22 JDEG1 connector 23 PCIe x1 Slot4 24 PCIex32 Slot3 25 PCIe x16 Slot2 26 PCIe x1 Slot1 27 Coin cel...

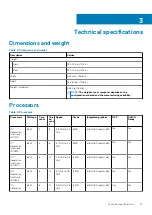
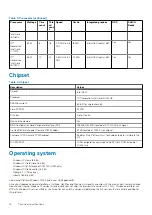
Page 13: ... Core count Thre ad coun t Speed Cache Integrated graphics GSP DG CG Ready 10th Generation Intel Core i3 10100 65 W 4 8 3 6 GHz to 4 3 GHz 6 MB Intel UHD Graphics 630 No Yes 10th Generation Intel Core i3 10300 65 W 4 8 3 7 GHz to 4 4 GHz 8 MB Intel UHD Graphics 630 No Yes 10th Generation Intel Core i5 10400 65 W 6 12 2 9 GHz to 4 3 GHz 12 MB Intel UHD Graphics 630 No Yes 10th Generation Intel Core...

Page 14: ...located at TPM 2 0 on chipset Firmware TPM Discrete TPM Disabled By default the Platform Trust Technology feature is visible to the OS NIC EEPROM LOM configuration contained within SPI flash ROM instead of LOM e fuse Operating system Windows 10 Home 64 bit Windows 10 Professional 64 bit Windows 10 IoT Enterprise 2019 LTSC OEM only Windows 10 Pro Education 64 bit NeoKylin 7 0 China only Ubuntu 18 0...

Page 15: ...cription Values Slots Four DIMM slots Type DDR4 Speed 2666 2933 MHz Maximum memory 128 GB Minimum memory 4 GB Memory size per slot 4 GB 8 GB 16 GB 32 GB Configurations supported 4 GB 1 x 4 GB 2666 MHz for Intel Core i3 i5 processors 2933 MHz for Intel Core i7 i9 processors 8 GB 1 x 8 GB 2666 MHz for Intel Core i3 i5 processors 2933 MHz for Intel Core i7 i9 processors 8 GB 2 x 4 GB 2666 MHz for Int...

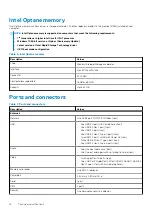
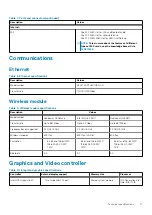
Page 16: ...B and 32 GB Capacity Up to 32 GB Ports and connectors Table 7 Ports and connectors Description Values External Network One RJ 45 port 10 100 1000 Mbps rear USB One USB 2 0 port with PowerShare front One USB 3 2 Gen 1 port front One USB 2 0 port front One USB 3 2 Gen 2 Type C port front Two USB 2 0 ports with Smart Power On rear Three USB 3 2 Gen 1 Type A port rear One USB 3 2 Gen 2 Type A ports re...

Page 17: ...ns Description Values Model number Qualcomm QCA61x4a Intel Wi Fi 6 AX201 Qualcomm QCA9377 Transfer rate Up to 867 Mbps Up to 2 4 Gbps Up to 867 Mbps Frequency bands supported 2 4 GHz 5 GHz 2 4 GHz 5 GHz 2 4 GHz 5 GHz Wireless standards 802 11ac 802 11ax Wi Fi 6 802 11ac Encryption 64 bit and 128 bit WEP 128 bit AES CCMP TKIP 64 bit and 128 bit WEP 128 bit AES CCMP TKIP 64 bit and 128 bit WEP 128 b...

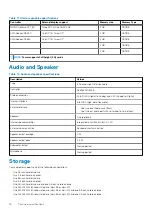
Page 18: ...io Jack front One Line out audio port with re tasking to Line in rear Speakers One optional Internal speaker amplifier Integrated in ALC3246 Class D 2 W External volume controls Keyboard shortcut controls Speaker output average 2 W Speaker output peak 2 5 W Subwoofer output Not supported Microphone Not supported Storage Your computer supports one of the following configurations One 2 5 inch hard d...

Page 19: ...e Interface type Capacity 2 5 inch 5400 RPM hard disk drive SATA 3 0 Up to 2 TB 2 5 inch 7200 RPM hard disk drive SATA 3 0 Up to 1 TB 2 5 inch 7200 RPM FIPS Self Encrypting Opal 2 0 hard disk drive SATA 3 0 Up to 500 GB 3 5 inch 5400 RPM hard disk drive SATA 3 0 4 TB 3 5 inch 7200 RPM hard disk drive SATA 3 0 Up to 2 TB M 2 2230 solid state drive PCIe 3 Gen x4 NVMe Class 35 Up to 512 GB M 2 2280 s...

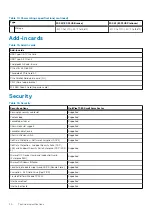
Page 20: ...sington security cable slot Supported Padlock loop Supported Lockable port cover Supported Chassis lock slot support Supported Lockable Cable Covers Supported Chassis intrusion switch Supported Dell Data Protection Software Encryption DDPE Supported Dell Data Protection Endpoint Security Suite DDP ESS and Endpoint Security Suite Enterprise DDP ESS E Supported Microsoft 10 Device Guard and Credenti...

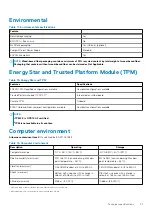
Page 21: ...e Compliant configurations available NOTE 1TPM 2 0 is FIPS 140 2 certified 2TPM is not available in all countries Computer environment Airborne contaminant level G1 as defined by ISA S71 04 1985 Table 19 Computer environment Description Operating Storage Temperature range 10 C 35 C 50 F 95 F 40 C 65 C 40 F 149 F Relative humidity maximum 20 to 80 non condensing Max dew point temperature 26 C 5 to ...

Page 22: ...Service and support NOTE For more details on Dell Service Plans see https www dell com learn us en 19 services warranty support services 22 Technical specifications ...

Page 23: ...en click Submit NOTE If you do not have the Service Tag use the auto detect feature or manually browse for your model 4 Click Drivers and Downloads 5 Select the operating system installed on your 6 Scroll down the page and select the driver to install 7 Click Download File to download the driver for your 8 After the download is complete navigate to the folder where you saved the driver file 9 Doub...

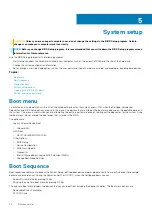
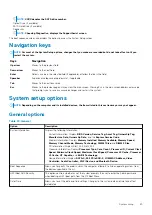
Page 24: ...is displayed Diagnostics and BIOS Setup options are also in this menu The devices that are listed on the boot menu depend on the bootable devices in the system This menu is useful when you are attempting to boot to a particular device or to bring up the diagnostics for the system Using the boot menu do not change the boot order that is stored in the BIOS The options are Legacy External Device Boot...

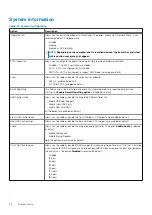
Page 25: ...ons Table 20 General Option Description System Information Displays the following information System Information Displays BIOS Version Service Tag Asset Tag Ownership Tag Manufacture Date Ownership Date and the Express Service Code Memory Information Displays Memory Installed Memory Available Memory Speed Memory Channel Mode Memory Technology DIMM 1 Size and DIMM 2 Size PCI Information Displays Sl...

Page 26: ... startup The Enable Smart Reporting option is disabled by default USB Configuration Allows you to enable or disable the integrated USB controller for Enable USB Boot Support Enable Front USB Ports Enable Rear USB Ports All the options are enabled by default Front USB Configuration Allows you to enable or disable the front USB ports All the ports are enabled by default Rear USB Configuration Allows...

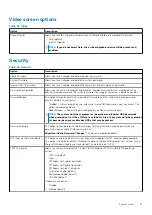
Page 27: ... are set This option is disabled by default Reboot Bypass Bypass the password prompts on Restarts warm boots NOTE The system will always prompt for the system and internal HDD passwords when powered on from the off state a cold boot Also the system will always prompt for passwords on any module bay HDDs that may be present Password Change This option lets you determine whether changes to the Syste...

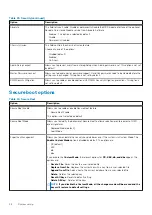
Page 28: ...tions Table 24 Secure Boot Option Description Secure Boot Enable Allows you to enable or disable Secure Boot feature Secure Boot Enable This option is not selected by default Secure Boot Mode Allows you to modify the behavior of Secure Boot to allow evaluation or enforcement of UEFI driver signatures Deployed Mode default Audit Mode Expert key Management Allows you to manipulate the security key d...

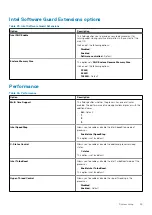
Page 29: ...ulti Core Support This field specifies whether the process has one or all cores enabled The performance of some applications improves with the additional cores All Default 1 2 3 Intel SpeedStep Allows you to enable or disable the Intel SpeedStep mode of processor Enable Intel SpeedStep This option is set by default C States Control Allows you to enable or disable the additional processor sleep sta...

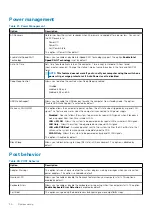
Page 30: ... special LAN signal This feature only works when the computer is connected to AC power supply Disabled Does not allows the system to power on by special LAN signals when it receives a wake up signal from the LAN or wireless LAN LAN or WLAN Allows the system to be powered on by special LAN or wireless LAN signals LAN Only Allows the system to be powered on by special LAN signals LAN with PXE Boot A...

Page 31: ...one of the option Prompt on Warnings and Errors default Continue on Warnings Continue on Warnings and Errors Manageability Table 29 Manageability Option Description Intel AMT Capability This option enables you to enable or disable Intel AMT capability The options are Disabled Enabled enabled by default Restrict MEBx Access USB provision This option is disabled by default MEBx Hotkey This option is...

Page 32: ...Downgrade Allows you to flash previous revisions of the system firmware Allow BIOS Downgrade This option is set by default Data Wipe Allows you to securely erase data from all internal storage devices Wipe on Next Boot This option is not set by default BIOS Recovery BIOS Recovery from Hard Drive This option is set by default Allows you to recover the corrupted BIOS from a recovery file on the HDD ...

Page 33: ...tem board or if an update is available About this task NOTE If BitLocker is enabled it must be suspended prior to updating the system BIOS and then re enabled after the BIOS update is completed Steps 1 Restart the computer 2 Go to Dell com support Enter the Service Tag or Express Service Code and click Submit Click Detect Product and follow the instructions on screen 3 If you are unable to detect ...

Page 34: ...ad into Windows but there is still a need to update the BIOS download the BIOS file using another system and save it to a bootable USB Flash Drive NOTE You will need to use a bootable USB Flash drive Please refer to the following article for further details https www dell com support article sln143196 Steps 1 Download the BIOS update EXE file to another system 2 Copy the file e g O9010A12 EXE onto...

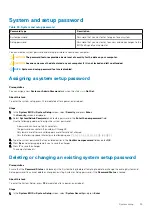
Page 35: ...urity screen is displayed 2 Select System Admin Password and create a password in the Enter the new password field Use the following guidelines to assign the system password A password can have up to 32 characters The password can contain the numbers 0 through 9 Only lower case letters are valid upper case letters are not allowed Only the following special characters are allowed space 3 Type the s...

Page 36: ...lect Setup Password alter or delete the existing setup password and press Enter or Tab NOTE If you change the System and or Setup password re enter the new password when prompted If you delete the System and Setup password confirm the deletion when prompted 5 Press Esc and a message prompts you to save the changes 6 Press Y to save the changes and exit from System Setup The computer restarts 36 Sy...

Page 37: ... and telephone based support and service options Availability varies by country and product and some services may not be available in your area To contact Dell for sales technical support or customer service issues Steps 1 Go to Dell com support 2 Select your support category 3 Verify your country or region in the Choose a Country Region drop down list at the bottom of the page 4 Select the approp...

Reviews: