background image

4. Remove the 

base cover

.

About this task

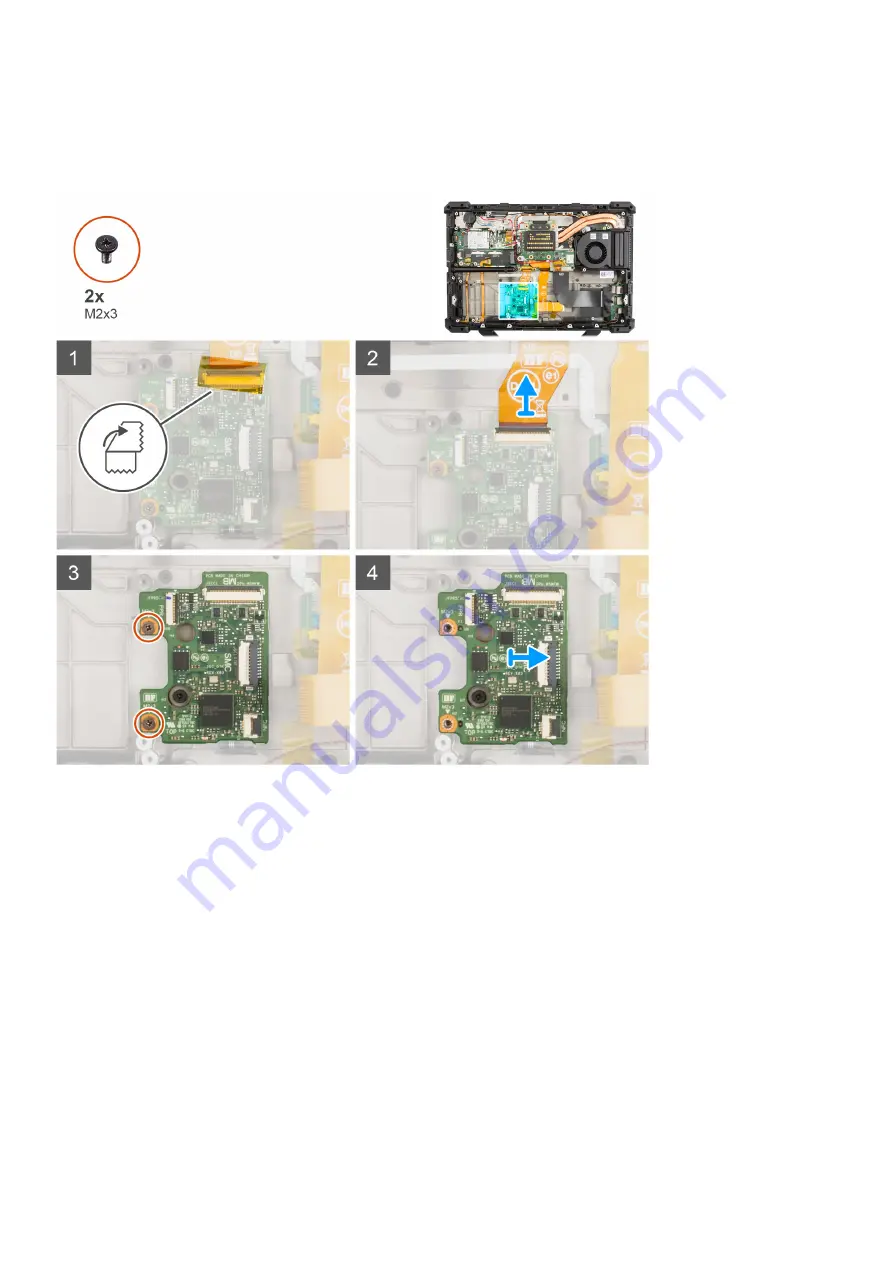
The following images indicate the location of the USH board and provide a visual representation of the removal procedure.

Steps

1. Peel the adhesive tape and disconnect the smart card reader I/O board flat printed cable from the connector on the USH

board.

2. Remove the two (M2x3) screws that secure the USH board to the system chassis.
3. Lift and remove the USH board from the system chassis.

Installing the USH board

Prerequisites

If you are replacing a component, remove the existing component before performing the installation procedure.

About this task

The following image indicates the location of the USH board and provides a visual representation of the installation procedure.

56

Removing and installing components

Summary of Contents for 7330

Page 1: ...Latitude 7330 Rugged Extreme Service Manual Regulatory Model P149G Regulatory Type P149G001 May 2022 Rev A01 ...

Page 2: ...mage to hardware or loss of data and tells you how to avoid the problem WARNING A WARNING indicates a potential for property damage personal injury or death 2021 2022 Dell Inc or its subsidiaries All rights reserved Dell Technologies Dell and other trademarks are trademarks of Dell Inc or its subsidiaries Other trademarks may be trademarks of their respective owners ...

Page 3: ...id state drive 17 Removing the M 2 2280 solid state drive 19 Installing the M 2 2280 solid state drive 21 Battery 24 Lithium ion battery precautions 24 Removing the batteries 24 Installing the batteries 25 Stylus 26 Removing the stylus 26 Installing the stylus 27 Handle 28 Removing the handle 28 Installing the handle 28 Keyboard 29 Removing the keyboard 29 Installing the keyboard 31 Base cover 32 ...

Page 4: ...H board 55 Installing the USH board 56 Inner frame 57 Removing the inner frame 57 Installing the inner frame 58 Heat sink 60 Removing the heat sink for computers with integrated graphics card 60 Installing the heat sink for computers with integrated graphics card 60 Rear I O board 61 Removing the rear I O board 61 Installing the rear I O board 62 Right Type C daughterboard 63 Removing the right Ty...

Page 5: ... 4 BIOS setup 105 Entering BIOS setup program 105 Navigation keys 105 One time boot menu 105 System setup options 106 Updating the BIOS 117 Updating the BIOS in Windows 117 Updating the BIOS in Linux and Ubuntu 117 Updating the BIOS using the USB drive in Windows 118 Updating the BIOS from the F12 One Time boot menu 118 System and setup password 119 Assigning a system setup password 119 Deleting o...

Page 6: ...Recovering the operating system 124 Real Time Clock RTC Reset 124 Backup media and recovery options 124 WiFi power cycle 125 Drain residual flea power perform hard reset 125 Chapter 6 Getting help and contacting Dell 126 6 Contents ...

Page 7: ...touching anything inside your computer ground yourself by touching an unpainted metal surface such as the metal at the back of the computer While you work periodically touch an unpainted metal surface to dissipate static electricity which could harm internal components CAUTION When you disconnect a cable pull it by its connector or its pull tab not the cable itself Some cables have connectors with...

Page 8: ...t strap should be secure and in full contact with your skin and ensure that you remove all jewelry such as watches bracelets or rings prior to bonding yourself and the equipment Electrostatic discharge ESD protection ESD is a major concern when you handle electronic components especially sensitive components such as expansion cards processors memory DIMMs and system boards Very slight charges can ...

Page 9: ...t once per week A wrist strap tester is the best method for doing this test If you do not have your own wrist strap tester check with your regional office to find out if they have one To perform the test plug the wrist strap s bonding wire into the tester while it is strapped to your wrist and push the button to test A green LED is lit if the test is successful a red LED is lit and an alarm sounds...

Page 10: ...ts that you removed before working on your computer 4 Connect your computer and all attached devices to their electrical outlets 5 Turn on your computer BitLocker CAUTION If BitLocker is not suspended before updating the BIOS the next time you reboot the system it will not recognize the BitLocker key You will then be prompted to enter the recovery key to progress and the system will ask for this o...

Page 11: ...rew type the quantity of screws and then place them in a screw storage box This is to ensure that the correct number of screws and correct screw type is restored when the component is replaced NOTE Some computers have magnetic surfaces Ensure that the screws are not left attached to such surfaces when replacing a component NOTE Screw color may vary with the configuration ordered Table 1 Screw list...

Page 12: ...5x5 captive screws 3 RF switch board M2 5x5 2 WLAN card M2x3 1 WWAN card M2x3 1 GPS M2x5 5 2 Smart card M2x3 4 USH board M2x3 2 Inner frame M2x5 4 Left I O board M2x3 2 Near Field Communication NFC M2x3 5 Heat sink M2x5 captive screws 4 Rear I O board M2x3 2 System board M2x5 M2x4 5 M2 5x5 5 11 2 2 12 Removing and installing components ...

Page 13: ... 4 Power button board with finger print reader M2x5 3 Display assembly M3x6 T8 M2 5x5 8 2 Display bezel M2 5x6 T8 M2 5x6 T8 8 blue 8 yellow Display hinges M3x6 T8 M3x8 T8 4 4 Camera M2x5 2 Major components of Latitude 7330 Rugged Extreme The following image shows the major components of Latitude 7330 Rugged Extreme Removing and installing components 13 ...

Page 14: ...14 Removing and installing components ...

Page 15: ...4 Battery NOTE Dell provides a list of components and their part numbers for the original system configuration purchased These parts are available according to warranty coverages purchased by the customer Contact your Dell sales representative for purchase options Primary solid state drive Removing the M 2 2230 solid state drive Prerequisites 1 Follow the procedure in before working inside your co...

Page 16: ...16 Removing and installing components ...

Page 17: ...2x2 screw that secures the M 2 2230 solid state drive to the SSD carrier cover 8 Lift and remove the M2 2230 solid state drive 9 Lift and remove the SSD extender of the SSD carrier Installing the M 2 2230 solid state drive Prerequisites If you are replacing a component remove the existing component before performing the installation procedure About this task The following image indicates the locat...

Page 18: ...18 Removing and installing components ...

Page 19: ...w the procedure in after working inside your computer 3 Verify if the storage device is installed correctly a Turn on or restart your computer b Press F2 when the Dell logo is displayed on the screen to enter the system setup BIOS program NOTE A list of storage devices are displayed under the System Information in the General group c If you have replaced the primary storage device that had the ope...

Page 20: ...About this task The following images indicate the location of the solid state drive and provide a visual representation of the removal procedure 20 Removing and installing components ...

Page 21: ...2x5 screw 6 Pull the mylar tape and lift the SSD carrier cover 7 Remove the M 2 2280 solid state drive Installing the M 2 2280 solid state drive Prerequisites If you are replacing a component remove the existing component before performing the installation procedure About this task The following image indicates the location of the solid state drive and provides a visual representation of the insta...

Page 22: ...22 Removing and installing components ...

Page 23: ...r 7 Place the SSD door on the SSD carrier 8 Replace the M2x3 screw on the SSD door latch cover Next steps 1 Install the battery 2 Follow the procedure in after working inside your computer 3 Verify if the storage device is installed correctly a Turn on or restart your computer b Press F2 when the Dell logo is displayed on the screen to enter the system setup BIOS program NOTE A list of storage dev...

Page 24: ...are not lost or misplaced to prevent accidental puncture or damage to the battery and other system components If the battery gets stuck inside your computer as a result of swelling do not try to release it as puncturing bending or crushing a lithium ion battery can be dangerous In such an instance contact Dell technical support for assistance See www dell com contactdell Always purchase genuine ba...

Page 25: ...fore performing the installation procedure About this task NOTE Latitude 7330 Rugged Extreme can accommodate two hot swap capable batteries Primary and optional The installation procedure of the primary and optional battery are identical NOTE BIOS displays a Battery error when non Latitude 7330 Rugged Extreme batteries are used The following image indicates the location of the battery and provides...

Page 26: ...h to the locked state 4 Ensure that the battery release latch is in the locked state Next steps 1 Follow the procedure in after working inside your computer Stylus Removing the stylus Prerequisites 1 Follow the procedure in before working inside your computer About this task The following images indicate the location of the stylus and provide a visual representation of the removal procedure 26 Rem...

Page 27: ...omponent remove the existing component before performing the installation procedure About this task The following image indicates the location of the stylus and provides a visual representation of the installation procedure Steps Insert the stylus into the slot on the system Removing and installing components 27 ...

Page 28: ...representation of the removal procedure Steps 1 Remove the two M3 5x9 screws that secure the handle to the system 2 Remove the handle from the system Installing the handle Prerequisites NOTE The handle screw is part of the handle assembly and cannot be ordered separately If you are replacing a component remove the existing component before performing the installation procedure About this task The ...

Page 29: ... procedure in after working inside your computer Keyboard Removing the keyboard Prerequisites 1 Follow the procedure in before working inside your computer 2 Remove the battery About this task The following images indicate the location of the keyboard and provide a visual representation of the removal procedure Removing and installing components 29 ...

Page 30: ...30 Removing and installing components ...

Page 31: ...he system chassis 4 Disconnect the keyboard and backlight flexible printed cables from the connectors on the system board 5 Lift the keyboard from the system Installing the keyboard Prerequisites If you are replacing a component remove the existing component before performing the installation procedure About this task The following image indicates the location of the keyboard and provides a visual...

Page 32: ...the display to align with the screw holes 5 Replace the six M2 5x4 screws to secure the keyboard Next steps 1 Install the battery 2 Follow the procedure in after working inside your computer Base cover Removing the base cover Prerequisites 1 Follow the procedure in before working inside your computer 2 Remove the battery 3 Remove the primary M 2 2280 solid state drive or primary M 2 2230 solid sta...

Page 33: ...battery cables from the connectors on the system board 4 Lift the base cover from the system chassis Installing the base cover Prerequisites If you are replacing a component remove the existing component before performing the installation procedure About this task The following image indicates the location of the base cover and provides a visual representation of the installation procedure Removin...

Page 34: ...ry M 2 2230 solid state drive 2 Install the battery 3 Follow the procedure in after working inside your computer Coin cell battery Removing the coin cell battery Prerequisites 1 Follow the procedure in before working inside your computer 2 Remove the battery 3 Remove the primary M 2 2280 solid state drive or primary M 2 2230 solid state drive 4 Remove the base cover NOTE Removing the coin cell bat...

Page 35: ...tem board 2 Peel the coin cell battery off the system chassis Installing the coin cell battery Prerequisites If you are replacing a component remove the existing component before performing the installation procedure About this task The following image indicates the location of the coin cell battery and provides a visual representation of the installation procedure Removing and installing componen...

Page 36: ...ow the procedure in after working inside your computer ExpressCard Reader Removing the express card reader Prerequisites 1 Follow the procedure in before working inside your computer 2 Remove the primary M 2 2280 solid state drive or primary M 2 2230 solid state drive 3 Remove the battery 4 Remove the base cover About this task The following images indicate the location of the express card reader ...

Page 37: ...t secure the express card reader bracket to the system chassis 4 Lift and remove the express card reader bracket from the system chassis Installing the express card reader Prerequisites If you are replacing a component remove the existing component before performing the installation procedure About this task The following image indicates the location of the express card reader and provides a visua...

Page 38: ...M 2 2280 solid state drive or primary M 2 2230 solid state drive 4 Follow the procedure in after working inside your computer Fan Removing the fan Prerequisites 1 Follow the procedure in before working inside your computer 2 Remove the battery 3 Remove the primary M 2 2280 solid state drive or primary M 2 2230 solid state drive 4 Remove the base cover About this task The following images indicate ...

Page 39: ...em chassis Next steps 1 Install the base cover 2 Install the primary M 2 2280 solid state drive or primary M 2 2230 solid state drive 3 Install the battery 4 Follow the procedure in after working inside your computer RF switch board Removing the RF switch board Prerequisites 1 Follow the procedure in before working inside your computer 2 Remove the battery 3 Remove the primary M 2 2280 solid state...

Page 40: ...h board 2 Peel the adhesive tape and disconnect the flexible printed cable from the RF switch board 3 Remove the two M2 5x5 screws that secure the RF switch board to the system board 4 Lift the RF switch board from the system board 40 Removing and installing components ...

Page 41: ...omponent remove the existing component before performing the installation procedure About this task The following image indicates the location of the RF switch board and provides a visual representation of the installation procedure Removing and installing components 41 ...

Page 42: ... the primary M 2 2280 solid state drive or primary M 2 2230 solid state drive 3 Install the battery 4 Follow the procedure in after working inside your computer WLAN card Removing the WLAN card Prerequisites 1 Follow the procedure in before working inside your computer 2 Remove the battery 3 Remove the primary M 2 2280 solid state drive or primary M 2 2230 solid state drive 4 Remove the base cover...

Page 43: ...ite triangle White Auxiliary black triangle Black 4 Slide and remove the WLAN card from the WLAN card slot Installing the WLAN card Prerequisites If you are replacing a component remove the existing component before performing the installation procedure About this task The following image indicates the location of the WLAN card and provides a visual representation of the installation procedure Rem...

Page 44: ... Cable Color Main white triangle White Auxiliary black triangle Black 3 Place the WLAN card holder on the WLAN card 4 Replace the M2x3 screw to secure the WLAN card holder to the WLAN card Next steps 1 Install the RF switch board 2 Install the base cover 3 Install the primary M 2 2280 solid state drive or primary M 2 2230 solid state drive 4 Install the battery 5 Follow the procedure in after work...

Page 45: ... state drive 4 Remove the base cover 5 Remove the RF switch board About this task The following images indicate the location of the WWAN card and provide a visual representation of the removal procedure Steps 1 Remove the M2x3 screw that secures the WWAN card holder to the system board 2 Remove the WWAN card holder 3 Disconnect the antenna cables from the WWAN card Removing and installing componen...

Page 46: ...remove the WWAN card from the WWAN card slot Installing the WWAN card Prerequisites If you are replacing a component remove the existing component before performing the installation procedure About this task The following image indicates the location of the WWAN card and provides a visual representation of the installation procedure Steps 1 Slide the WWAN card at an angle into the WWAN card slot 2...

Page 47: ... at https www dell com support Next steps 1 Install the RF switch board 2 Install the base cover 3 Install the primary M 2 2280 solid state drive or primary M 2 2230 solid state drive 4 Install the battery 5 Follow the procedure in after working inside your computer Dock I O board Removing the dock I O board Prerequisites 1 Follow the procedure in before working inside your computer 2 Remove the b...

Page 48: ...ystem board Installing the dock I O board Prerequisites If you are replacing a component remove the existing component before performing the installation procedure About this task The following image indicates the location of the dock I O board and provides a visual representation of the installation procedure 48 Removing and installing components ...

Page 49: ...itioning System GPS Removing the GPS board Prerequisites 1 Follow the procedure in before working inside your computer 2 Remove the primary M 2 2280 solid state drive or primary M 2 2230 solid state drive 3 Remove the battery 4 Remove the base cover About this task The following images indicate the location of the Global Positioning System GPS board and provide a visual representation of the remov...

Page 50: ...the connectors on the Wi Fi board and GPS board Next steps 1 Install the base cover 2 Install the battery 3 Install the primary M 2 2280 solid state drive or primary M 2 2230 solid state drive 4 Follow the procedure in after working inside your computer Left I O board Removing the left I O board Prerequisites 1 Follow the procedure in before working inside your computer 2 Remove the battery 3 Remo...

Page 51: ...emove the left I O board Installing the left I O board Prerequisites If you are replacing a component remove the existing component before performing the installation procedure About this task The following image indicates the location of the left I O board and provides a visual representation of the installation procedure Removing and installing components 51 ...

Page 52: ...re in before working inside your computer 2 Remove the primary M 2 2280 solid state drive or primary M 2 2230 solid state drive 3 Remove the battery 4 Remove the base cover About this task The following images indicate the location of the near field communication nfc and provide a visual representation of the removal procedure Steps 1 Remove the two M2x3 screws that secure the left I O board to th...

Page 53: ...cure the nfc holder to the system chassis 3 Place the left I O board on the system chassis 4 Replace the two M2x3 screws that secure the left I O board to the system chassis Next steps 1 Install the base cover 2 Install the battery 3 Install the primary M 2 2280 solid state drive or primary M 2 2230 solid state drive 4 Follow the procedure in after working inside your computer Smart Card Removing ...

Page 54: ... the four M2x3 screws that secure the smart card reader to the system chassis 3 Lift and remove the smart card reader from the system chassis Installing the smart card Prerequisites If you are replacing a component remove the existing component before performing the installation procedure About this task The following image indicates the location of the smart card and provides a visual representat...

Page 55: ... the express card 2 Install the base cover 3 Install the battery 4 Install the primary M 2 2280 solid state drive or primary M 2 2230 solid state drive 5 Follow the procedure in after working inside your computer USH board Removing the USH board Prerequisites 1 Follow the procedure in before working inside your computer 2 Remove the primary M 2 2280 solid state drive or primary M 2 2230 solid stat...

Page 56: ... on the USH board 2 Remove the two M2x3 screws that secure the USH board to the system chassis 3 Lift and remove the USH board from the system chassis Installing the USH board Prerequisites If you are replacing a component remove the existing component before performing the installation procedure About this task The following image indicates the location of the USH board and provides a visual repr...

Page 57: ... the base cover 2 Install the battery 3 Install the primary M 2 2280 solid state drive or primary M 2 2230 solid state drive 4 Follow the procedure in after working inside your computer Inner frame Removing the inner frame Prerequisites 1 Follow the procedure in before working inside your computer 2 Remove the primary M 2 2280 solid state drive or primary M 2 2230 solid state drive 3 Remove the ba...

Page 58: ...from their routing guides on the system chassis 2 Remove the four M2x5 screws that secure the inner frame to the system board 3 Lift and remove the inner frame from the system board Installing the inner frame Prerequisites If you are replacing a component remove the existing component before performing the installation procedure About this task The following image indicates the location of the inn...

Page 59: ...ting guides on the system chassis Next steps 1 Install the GPS board 2 Install the dock I O board 3 Install the WWAN card 4 Install the WLAN card 5 Install the RF switch board 6 Install the base cover 7 Install the battery 8 Install the primary M 2 2280 solid state drive or primary M 2 2230 solid state drive 9 Follow the procedure in after working inside your computer Removing and installing compo...

Page 60: ... O board 8 Remove the inner frame About this task The following images indicate the location of the heat sink and provide a visual representation of the removal procedure Steps 1 Remove the four M2x5 screws in reverse order 4 3 2 1 that secure the heat sink to the system board 2 Lift the heat sink from the system chassis Installing the heat sink for computers with integrated graphics card Prerequi...

Page 61: ...nner frame 2 Install the dock I O board 3 Install the WLAN 4 Install the RF switch board 5 Install the base cover 6 Install the primary M 2 2280 solid state drive or primary M 2 2230 solid state drive 7 Install the battery 8 Follow the procedure in after working inside your computer Rear I O board Removing the rear I O board Prerequisites 1 Follow the procedure in before working inside your comput...

Page 62: ...e 2 Remove the two M2x3 screws that secure the rear I O board to the system board Installing the rear I O board Prerequisites If you are replacing a component remove the existing component before performing the installation procedure About this task The following image indicates the location of the rear I O board and provides a visual representation of the installation procedure 62 Removing and in...

Page 63: ... 1 Install the base cover 2 Install the primary M 2 2280 solid state drive or primary M 2 2230 solid state drive 3 Install the battery 4 Follow the procedure in after working inside your computer Right Type C daughterboard Removing the right Type C daughterboard Prerequisites 1 Follow the procedure in before working inside your computer 2 Remove the battery 3 Remove the primary M 2 2280 solid stat...

Page 64: ...a visual representation of the removal procedure Steps 1 Remove the M2x5 screw that secures the flat printed cable holder to the right Type C daughterboard 2 Disconnect the flat printed cable from its connector on the right Type C daughterboard 3 Disconnect the flat printed cable from its connector on the right Type C daughterboard 4 Remove the four M2x3 5 screws that secure the right Type C daugh...

Page 65: ...n the system chassis 2 Remove the four M2x3 5 screws that secure the right Type C daughterboard to the system chassis 3 Connect the flat printed cable to its connector on the right Type C daughterboard 4 Connect the flat printed cable to its connector on the right Type C daughterboard 5 Replace the M2x5 screw that secures the flat printed cable holder to the right Type C daughterboard Next steps 1...

Page 66: ... battery 3 Remove the primary M 2 2280 solid state drive or primary M 2 2230 solid state drive 4 Remove the keyboard 5 Remove the base cover 6 Remove the RF switch board 7 Remove the WLAN card 8 Remove the WWAN card 9 Remove the dock I O board 10 Remove the rear I O board 11 Remove the express card reader 12 Remove the inner frame 13 Remove the GPS board 14 Remove the smart card reader 15 Remove t...

Page 67: ...I O flat printed cable connector 9 Right Type C flat printed cable connector 10 Fan cable connector 11 Left Type C flat printed cable connector 12 eDP cable connector 13 Left I O board flat printed cable connector 14 Express card daughter board connector 15 USH board connector 16 GPS connector 17 M 2 2230 2280 solid state drive connector 18 LED board connector 19 Hall sensor Removing and installin...

Page 68: ...2 Backlight flat printed cable connector 3 Keyboard cable connector The following images indicate the location of the system board and provide a visual representation of the removal procedure 68 Removing and installing components ...

Page 69: ...Removing and installing components 69 ...

Page 70: ...70 Removing and installing components ...

Page 71: ... system board 6 Peel the adhesive and disconnect the right and left Type C cables from their connectors on the system board 7 Disconnect the eDP cable from its connector on the system board 8 Disconnect the RF switch board cable from its connector on the system board 9 Disconnect the Dock I O flat printed cable from its connector on the system board 10 Disconnect the flat printed cable from its co...

Page 72: ...card connector 5 Rear I O daughter board connector 6 Left Type C cable connector 7 RF switch board connector 8 Dock I O flat printed cable connector 9 Right Type C flat printed cable connector 10 Fan cable connector 11 Left Type C flat printed cable connector 12 eDP cable connector 13 Left I O board flat printed cable connector 14 Express card daughter board connector 15 USH board connector 16 GPS...

Page 73: ...2 Backlight flat printed cable connector 3 Keyboard cable connector The following images indicate the location of the system board and provide a visual representation of the removal procedure Removing and installing components 73 ...

Page 74: ...74 Removing and installing components ...

Page 75: ...Removing and installing components 75 ...

Page 76: ...flat printed cable to its connector on the system board 7 Connect the Dock I O flat printed cable to its connector on the system board 8 Connect the touchpad flat printed cable to its connector on the system board 9 Connect the right Type C and left Type C flat printed cables to their connectors on the system board 10 Replace the two M2x4 5 screws that secure the Type C flat printed cable holders ...

Page 77: ... working inside your computer Left Type C daughterboard Removing the left Type C daughterboard Prerequisites 1 Follow the procedure in before working inside your computer 2 Remove the battery 3 Remove the primary M 2 2280 solid state drive or primary M 2 2230 solid state drive 4 Remove the keyboard 5 Remove the base cover 6 Remove the fan 7 Remove the heat sink UMA 8 Remove the RF switch board 9 R...

Page 78: ...nd three M2x5 screws that secure the left Type C daughterboard to the system chassis 5 Lift the left Type C daughterboard from the system chassis Installing the left Type C daughterboard Prerequisites If you are replacing a component remove the existing component before performing the installation procedure About this task The following image indicates the location of the left Type C daughterboard...

Page 79: ...lace the M2x5 screw that secures the flat printed cable holder to the left Type C daughterboard Next steps 1 Install the rear I O board 2 Install the dock I O board 3 Install the WWAN card 4 Install the WLAN card 5 Install the RF switch board 6 Install the heat sink UMA 7 Install the fan 8 Install the base cover 9 Install the keyboard 10 Install the primary M 2 2280 solid state drive or primary M ...

Page 80: ...ocedure Steps 1 Disconnect the fingerprint reader cable from its connector on the power button board 2 Remove the three M2x5 screws that secure the power button with fingerprint reader bracket to the system chassis 3 Lift the power button with fingerprint reader board from the system chassis Installing the power button board with fingerprint reader Prerequisites If you are replacing a component re...

Page 81: ...cedure in after working inside your computer Display assembly Removing the display assembly Prerequisites 1 Follow the procedure in before working inside your computer 2 Remove the battery 3 Remove the primary M 2 2280 solid state drive or primary M 2 2230 solid state drive 4 Remove the keyboard 5 Remove the base cover 6 Remove the RF switch board 7 Remove the WLAN card 8 Remove the WWAN card 9 Re...

Page 82: ...t sink UMA 18 Remove the system board About this task The following images indicate the location of the display assembly and provide a visual representation of the removal procedure 82 Removing and installing components ...

Page 83: ...to the system chassis 2 Remove the left right hinge covers from the system chassis 3 Remove the eight M3x6 T8 epoxy screws that secure the display assembly to the system chassis 4 Lift and remove the display assembly from the system chassis Removing and installing components 83 ...

Page 84: ...omponent remove the existing component before performing the installation procedure About this task The following image indicates the location of the display assembly and provides a visual representation of the installation procedure 84 Removing and installing components ...

Page 85: ...t M3x6 T8 epoxy screws that secure the display assembly to the system chassis 3 Replace the left right hinge covers to the system chassis and close the lid 4 Replace the two M2 5x5 screws that secure the left right hinge covers to the system chassis Removing and installing components 85 ...

Page 86: ...ving the display bezel Prerequisites 1 Follow the procedure in before working inside your computer 2 Remove the battery 3 Remove the primary M 2 2280 solid state drive or primary M 2 2230 solid state drive 4 Remove the keyboard 5 Remove the base cover 6 Remove the RF switch board 7 Remove the WLAN card 8 Remove the WWAN card 9 Remove the dock I O board 10 Remove the rear I O board 11 Remove the ex...

Page 87: ...Removing and installing components 87 ...

Page 88: ...bezel using your hand or a plastic scribe Using a screw driver or any sharp object may damage the display cover 4 Flip the display bezel and disconnect the eDP cable from its connector on the LCD module 5 Disconnect the touch cable from its connector on the touch screen board Installing the display bezel Prerequisites If you are replacing a component remove the existing component before performing...

Page 89: ...Removing and installing components 89 ...

Page 90: ...kgf cm 5 Replace the 4 M2 5x6 T8 epoxy screws to secure the display bezel to the display assembly Next steps 1 Install the display assembly 2 Install the system board 3 Install the heat sink UMA 4 Install the fan 5 Install the smart card reader I O board 6 Install the smart card reader 7 Install the GPS board 8 Install the inner frame 9 Install the express card reader 10 Install the rear I O board...

Page 91: ...r I O board 13 Remove the system board 14 Remove the display assembly 15 Remove the display bezel About this task The following images indicate the location of the camera and provide a visual representation of the removal procedure Steps 1 Peel the tape and disconnect the eDP cable on the camera module 2 Remove the two M2x5 screws that secure the camera module to the display panel 3 Lift and remov...

Page 92: ...d 6 Install the WWAN card 7 Install the WLAN card 8 Install the RF switch board 9 Install the heat sink UMA 10 Install the fan 11 Install the base cover 12 Install the keyboard 13 Install the primary M 2 2280 solid state drive or primary M 2 2230 solid state drive 14 Install the battery 15 Follow the procedure in after working inside your computer Display hinges Removing the display hinges Prerequ...

Page 93: ...cedure Steps 1 Remove the four M3x6 T8 epoxy screws that secure the left hinge to the display assembly 2 Remove the four M3x8 T8 epoxy screws that secure the right hinge to the display assembly 3 Lift to remove the left and right hinges from the display assembly Installing the display hinges Prerequisites If you are replacing a component remove the existing component before performing the installa...

Page 94: ...AN card 8 Install the RF switch board 9 Install the heat sink UMA 10 Install the fan 11 Install the base cover 12 Install the keyboard 13 Install the primary M 2 2280 solid state drive or primary M 2 2230 solid state drive 14 Install the battery 15 Follow the procedure in after working inside your computer Display cable Removing the display cable Prerequisites 1 Follow the procedure in before work...

Page 95: ...ng images indicate the location of the display cable and provide a visual representation of the removal procedure Steps Peel the adhesive tape off the eDP cable adhered to the display cover Installing the display cable Prerequisites If you are replacing a component remove the existing component before performing the installation procedure About this task The following image indicates the location ...

Page 96: ...switch board 11 Install the heat sink UMA 12 Install the fan 13 Install the base cover 14 Install the keyboard 15 Install the primary M 2 2280 solid state drive or primary M 2 2230 solid state drive 16 Install the battery 17 Follow the procedure in after working inside your computer Display panel Removing the display panel Prerequisites 1 Follow the procedure in before working inside your computer...

Page 97: ...ve the heat sink UMA 18 Remove the system board 19 Remove the display bezel 20 Remove the camera 21 Remove the display hinges 22 Remove the display cable About this task The following images indicate the location of the display panel and provide a visual representation of the removal procedure Steps After performing the preceding steps you are left with the display panel Installing the display pan...

Page 98: ...nstall the heat sink UMA 8 Install the fan 9 Install the smart card reader I O board 10 Install the smart card reader 11 Install the GPS board 12 Install the inner frame 13 Install the express card reader 14 Install the rear I O board 15 Install the dock I O board 16 Install the WWAN card 17 Install the WLAN card 18 Install the RF switch board 19 Install the base cover 20 Install the keyboard 21 I...

Page 99: ...d 10 Remove the rear I O board 11 Remove the express card reader 12 Remove the inner frame 13 Remove the GPS board 14 Remove the smart card reader 15 Remove the smart card reader I O board 16 Remove the fan 17 Remove the heat sink UMA 18 Remove the system board 19 Remove the display assembly 20 Remove the display bezel 21 Remove the camera 22 Remove the display hinges 23 Remove the display cable A...

Page 100: ... Steps After performing the succeeding steps you are left with the display back cover Next steps 1 Install the display cable 2 Install the display hinges 3 Install the camera 4 Install the display bezel 5 Install the display assembly 6 Install the system board 7 Install the heat sink UMA 8 Install the fan 9 Install the smart card reader I O board 10 Install the smart card reader 11 Install the GPS...

Page 101: ...primary M 2 2230 solid state drive Remove the keyboard Remove the base cover Remove the RF switch board Remove the WLAN card Remove the WWAN card Remove the dock I O board Remove the rear I O board Remove the express card reader Remove the inner frame Remove the GPS board Remove the smart card reader Remove the smart card reader I O board Remove the fan Remove the heat sink UMA Remove the system b...

Page 102: ...ly Prerequisites If you are replacing a component remove the existing component before performing the installation procedure About this task The following image indicates the location of the palmrest assembly and provides a visual representation of the installation procedure 102 Removing and installing components ...

Page 103: ... the smart card reader 8 Install the GPS board 9 Install the inner frame 10 Install the express card reader 11 Install the rear I O board 12 Install the dock I O board 13 Install the WWAN card 14 Install the WLAN card 15 Install the RF switch board 16 Install the base cover 17 Install the keyboard 18 Install the primary M 2 2280 solid state drive or primary M 2 2230 solid state drive 19 Install th...

Page 104: ...ivers and downloads When troubleshooting downloading or installing drivers it is recommended that you read the Dell Knowledge Based article Drivers and Downloads FAQ 000123347 3 104 Drivers and downloads ...

Page 105: ...ing base devices Entering BIOS setup program About this task Turn on or restart your computer and press F2 immediately Navigation keys NOTE For most of the System Setup options changes that you make are recorded but do not take effect until you restart the system Table 6 Navigation keys Keys Navigation Up arrow Moves to the previous field Down arrow Moves to the next field Enter Selects a value in...

Page 106: ...stem Ownership Tag Displays the Ownership Tag of the system Signed Firmware Update Displays whether the Signed Firmware Update is enabled on your system Battery Information Battery 1 Type Displays that battery 1 is primary Battery 1 Level Displays the battery 1 level of the system Battery 1 State Displays the battery 1 state of the system Battery 1 Health Displays the battery 1 health of the syste...

Page 107: ...deo BIOS Version Displays the video BIOS version of the system Audio Controller Displays the audio controller information of the system Bluetooth Device Displays the Bluetooth device information of the system LOM MAC Address Displays the LAN On Motherboard LOM MAC address of the system Pass Through MAC Address Displays the pass through MAC address of the system Cellular Device Displays the cellula...

Page 108: ... used during BIOS Pre boot By default the Enable Thunderbolt Boot Support option is disabled Enable Thunderbolt and PCIe behind TBT pre boot modules Enable or disable the PCIe devices that are connected through a Thunderbolt adapter to execute the PCIe devices UEFI Option ROM if present during pre boot By default the Enable Thunderbolt and PCIe behind TBT pre boot modules option is disabled Disabl...

Page 109: ...e system Device Displays the M 2 PCIe SSD 0 device information of the system Enable MediaCard Secure Digital SD Card Enable or disable the SD card By default the Secure Digital SD Card option is enabled Secure Digital SD Card Read Only Mode Enable or disable the SD card read only mode By default the Secure Digital SD Card Read Only Mode option is not enabled Table 11 System setup options Display m...

Page 110: ...ard LAN Controller By default the Auto Enabled option is selected Wireless Radio Control Control WLAN radio Sense the connection of the system to a wired network and subsequently disable the selected wireless radios WLAN By default the option is disabled Control WWAN radio Sense the connection of the system to a wired network and subsequently disable the selected wireless radios WWAN By default th...

Page 111: ... the fan and processor heat management to adjust the system performance noise and temperature By default the Optimized option is enabled USB Wake Support Wake on Dell USB C Dock When enabled connecting a Dell USB C Dock will wake the system from Standby Hibernate and Power Off By default the Wake on Dell USB C Dock option is enabled Block Sleep Enables to block entering sleep S3 mode in the operat...

Page 112: ...ions By default the option is enabled Data Wipe on Next Boot Start Data Wipe Enable or disable the data wipe on next boot By default the Start Data Wipe option is disabled Absolute Enable or disable or permanently disable the BIOS module interface of the optional Absolute Persistence Module service from Absolute software By default the option is enabled WARNING The Permanently Disabled option can ...

Page 113: ...the option is enabled Admin Setup Lockout Enable Admin Setup Lockout Enables administrators control over how their users can or cannot access BIOS setup By default the option is disabled Master Password Lockout Enable Master Password Lockout When enabled this disables the master password support By default the option is disabled Allow Non Admin PSID Revert Enable Allow Non Admin PSID Revert Contro...

Page 114: ...up options System Management menu System Management Service Tag Displays the Service Tag of the system Asset Tag Create a system Asset Tag AC Behavior Wake on AC Enable or disable the wake on AC option By default the option is disabled Wake on LAN Wake on LAN Enable or disable the system to power on by special LAN signals when it receives a wakeup signal from the WLAN By default the Disabled optio...

Page 115: ...Behavior menu Pre boot Behavior Adapter Warnings Enable Adapter Warnings Enable or disable the warning messages during boot when the adapters with less power capacity are detected By default the option is enabled Warning and Errors Enable or disable the action to be done when a warning or error is encountered By default the Prompt on Warnings and Errors option is enabled USB C Warnings Enable Dock...

Page 116: ...tage and core frequency decreasing average power consumption and heat production By default the option is enabled C States Control Enable C State Control Enable the ability of the CPU to enter and exit low power state When disabled it disabled all C states When enabled it enabled all C states that the chipset or platform allows By default the option is enabled Intel Turbo Boost Technology Enable I...

Page 117: ...ect see Knowledge Article https www dell com support kbdoc 000134415 Steps 1 Go to www dell com support 2 Click Product support In the Search support box enter the Service Tag of your computer and then click Search NOTE If you do not have the Service Tag use the SupportAssist feature to automatically identify your computer You can also use the product ID or manually browse for your computer model ...

Page 118: ...ore updating the BIOS the next time you reboot the system it will not recognize the BitLocker key You will then be prompted to enter the recovery key to progress and the system will ask for this on each reboot If the recovery key is not known this can result in data loss or an unnecessary operating system re install For more information on this subject see Knowledge Article https www dell com supp...

Page 119: ...features provide a basic level of security for the data on your computer CAUTION Anyone can access the data that is stored on your computer if it is not locked and left unattended NOTE System and setup password feature is disabled Assigning a system setup password Prerequisites You can assign a new System or Admin Password only when the status is in Not Set About this task To enter the system setu...

Page 120: ... NOTE If you change the System and or Setup password reenter the new password when prompted If you delete the System and or Setup password confirm the deletion when prompted 5 Press Esc and a message prompts you to save the changes 6 Press Y to save the changes and exit from System Setup The computer restarts Clearing BIOS System Setup and System passwords About this task To clear the system or BI...

Page 121: ...ot bend the battery Do not use tools of any type to pry on or against the battery If a battery gets stuck in a device as a result of swelling do not try to free it as puncturing bending or crushing a battery can be dangerous Do not attempt to reassemble a damaged or swollen battery into a laptop Swollen batteries that are covered under warranty should be returned to Dell in an approved shipping co...

Page 122: ...sues error codes are displayed Note the error code and validation number and contact Dell Built in self test BIST M BIST M BIST Built In Self Test is the system board s built in self test diagnostics tool that improves the diagnostics accuracy of system board embedded controller EC failures NOTE M BIST can be manually initiated before POST Power On Self Test How to run M BIST NOTE M BIST must be i...

Page 123: ...lickering distortion clarity issues fuzzy or blurry image horizontal or vertical lines color fade etc it is always a good practice to isolate the LCD screen by running the Built In Self Test BIST How to invoke LCD BIST Test 1 Power off the Dell laptop 2 Disconnect any peripherals that are connected to the laptop Connect only the AC adapter charger to the laptop 3 Ensure that the LCD screen is clea...

Page 124: ...ardware issues repair your computer back up your files or restore your computer to its factory state You can also download it from the Dell Support website to troubleshoot and fix your computer when it fails to boot into their primary operating system due to software or hardware failures For more information about the Dell SupportAssist OS Recovery see Dell SupportAssist OS Recovery User s Guide a...

Page 125: ...or your safety and to protect the sensitive electronic components in your computer you are requested to drain residual flea power before removing or replacing any components in your computer Draining residual flea power also known as a performing a hard reset is also a common troubleshooting step if your computer does not power on or boot into the operating system To drain residual flea power perf...

Page 126: ...Service Tag or Express Service Code at www dell com support For more information on how to find the Service Tag for your computer see Locate the Service Tag on your computer Dell knowledge base articles for a variety of computer concerns 1 Go to www dell com support 2 On the menu bar at the top of the Support page select Support Knowledge Base 3 In the Search field on the Knowledge Base page type ...

Reviews: