


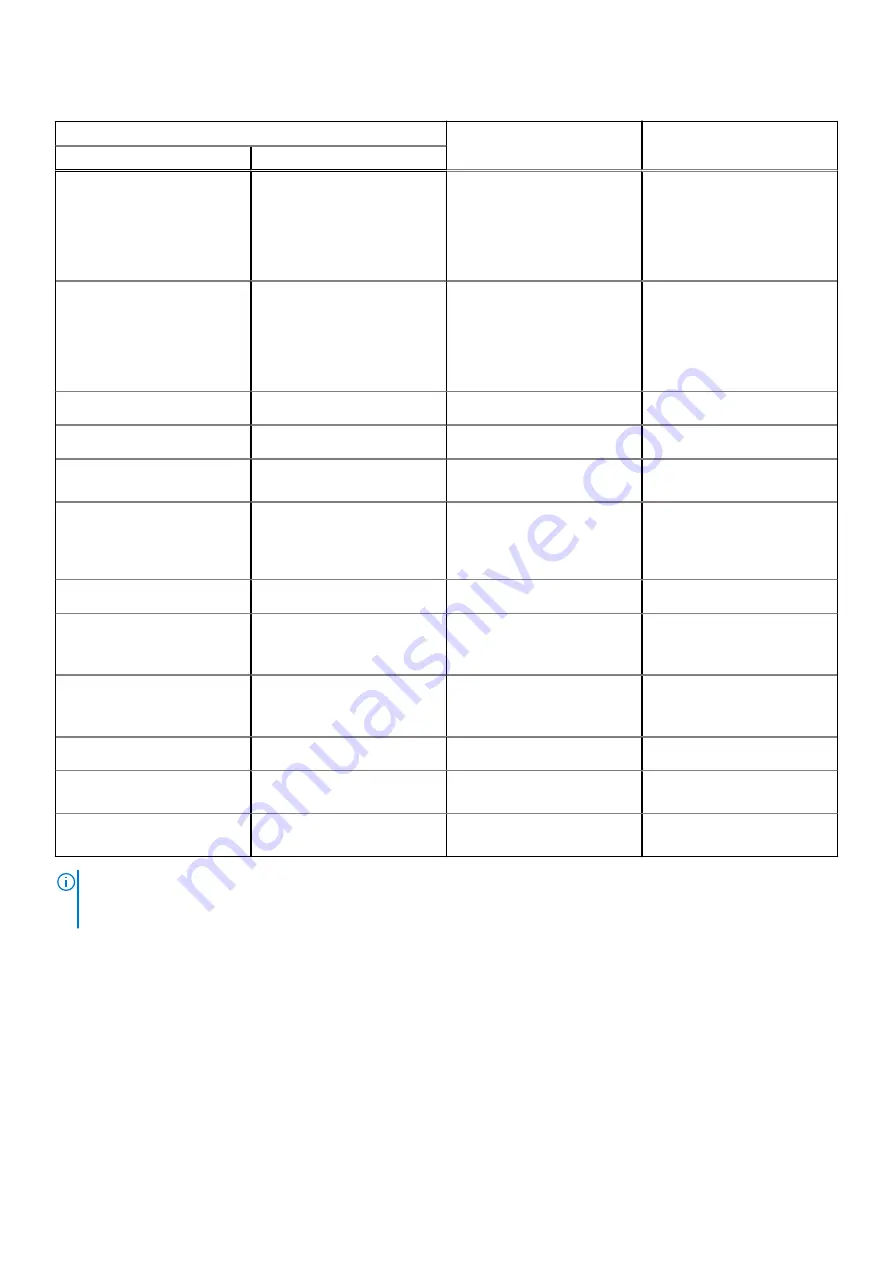
Table 19. Diagnostic LED behavior (continued)
Blinking pattern
Problem description
Suggested resolution
Amber
White
2
4
Memory/RAM failure
●
Reset and swap memory
modules amongst the
slots.
●
If problem persists,
replace the memory
module.
2
5
Invalid memory installed
●
Reset and swap memory
modules amongst the
slots.
●
If problem persists,
replace the memory
module.
2
6
System board/Chipset Error
Replace the system board.
2
7
LCD failure (SBIOS message)
Replace the LCD module.
2
8
LCD failure (EC detection of
power rail failure)
Replace the system board.
3
1
CMOS battery failure
●
Reset the CMOS battery
connection.
●
If problem persists,
replace the RTS battery.
3
2
PCI or Video card/chip failure
Replace the system board.
3
3
BIOS Recovery image not
found
●
Flash latest BIOS version
●
If problem persists,
replace the system board.
3
4
BIOS Recovery image found
but invalid
●
Flash latest BIOS version
●
If problem persists,
replace the system board.
3
5
Power rail failure
Replace the system board.
3
6
Flash corruption detected by
SBIOS.
Replace the system board.
3
7
Timeout waiting on ME to
reply to HECI message.
Replace the system board.
NOTE:
Blinking 3-3-3 LEDs on Lock LED (Caps-Lock or Nums-Lock), Power button LED (without Fingerprint reader), and
Diagnostic LED indicates failure to provide input during LCD panel test on Dell SupportAssist Pre-boot System Performance
Check diagnostics.
Real-Time Clock (RTC Reset)
The Real Time Clock (RTC) reset function allows you or the service technician to recover Dell Latitude, systems from No
POST/No Power/No Boot situations. The legacy jumper enabled RTC reset has been retired on these models.
Start the RTC reset with the system powered off and connected to AC power. Press and hold the power button for thirty (30)
seconds. The system RTC Reset occurs after you release the power button.
Troubleshooting
91
Summary of Contents for Latitude 7520
Page 14: ...Major components of your system 1 Base cover 14 Removing and installing components ...
Page 18: ...About this task 18 Removing and installing components ...
Page 37: ...Figure 2 Display assembly with WLAN antenna Removing and installing components 37 ...
Page 38: ...Figure 3 Display assembly with WLAN and WWAN antenna 38 Removing and installing components ...
Page 43: ...Removing and installing components 43 ...
Page 61: ...Removing and installing components 61 ...