


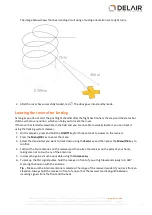


Transferring the images
Note –
If you already transferred the images from the camera to an external storage device in the field,
then transfer the images from that device to a location on the computer running the Aerial Imaging
Desktop software, or to a network location.
If you have not already transferred the images from the camera:
1. When you return to the office, remove the SD card from the camera.
2. Insert the SD card into an office computer and then transfer the images from the SD card to a location
on the computer or a network location.
3. Delete the images from the SD card.
4. Replace the SD card in the camera.
Note –
Because the Sony camera has no electronic communication with the external lens, the properties
for images captured using a Sony camera (exif data) show a value 0 (zero) for the properties linked to the
lens. These properties are: F-stop, focal length and max. aperture.
Returning the project to the Aerial Imaging Desktop
software
Although you can use the Aerial Imaging software on the tablet to analyze and export the flight data for
processing, it will typically be done in the office using the Aerial Imaging Desktop software. To be able to do
this you must export the project from the Aerial Imaging software on the tablet and import it to the Aerial
Imaging Desktop software.
To export the project from the Aerial Imaging software on the tablet:
1. In the
Projects
screen, select the project to export.
2. Click
. The
Export
wizard appears.
3. Select the GWT format. Tap
.
4. Navigate to the folder where you want to save the project. If the tablet cannot access a network folder,
then insert a USB stick and then navigate to a folder on the USB stick.
5. Enter the file name and then click
Export
.
The exported project is saved as a GWT file in the folder you selected.
6. Tap
to close the
Export
wizard.
To import the project to the Aerial Imaging Desktop software:
1. Start the Aerial Imaging Desktop software.
2. In the
Aerial Imaging Home
screen or
Projects
screen, click
.
3. Navigate to the location of the GWT file, select it and then click
Import
.
The project you imported is listed in the
Projects
screen and the project thumbnail appears.
99
Delair-Tech
|
676, Rue Max Planck – 31670 Toulouse-Labège, France
|
Tel: +33 (0) 5 82 95 44 06
|
Capital: 238 110,30 € - APE: 3030Z – Intra-Community VAT number: FR90 53 09 69 781 – 530 969 781 R.C.S. Toulouse
This document is the sole property of Delair-Tech and cannot be used or reproduced without the written authorization of Delair-Tech
.


