background image

5  Settings

5.1 

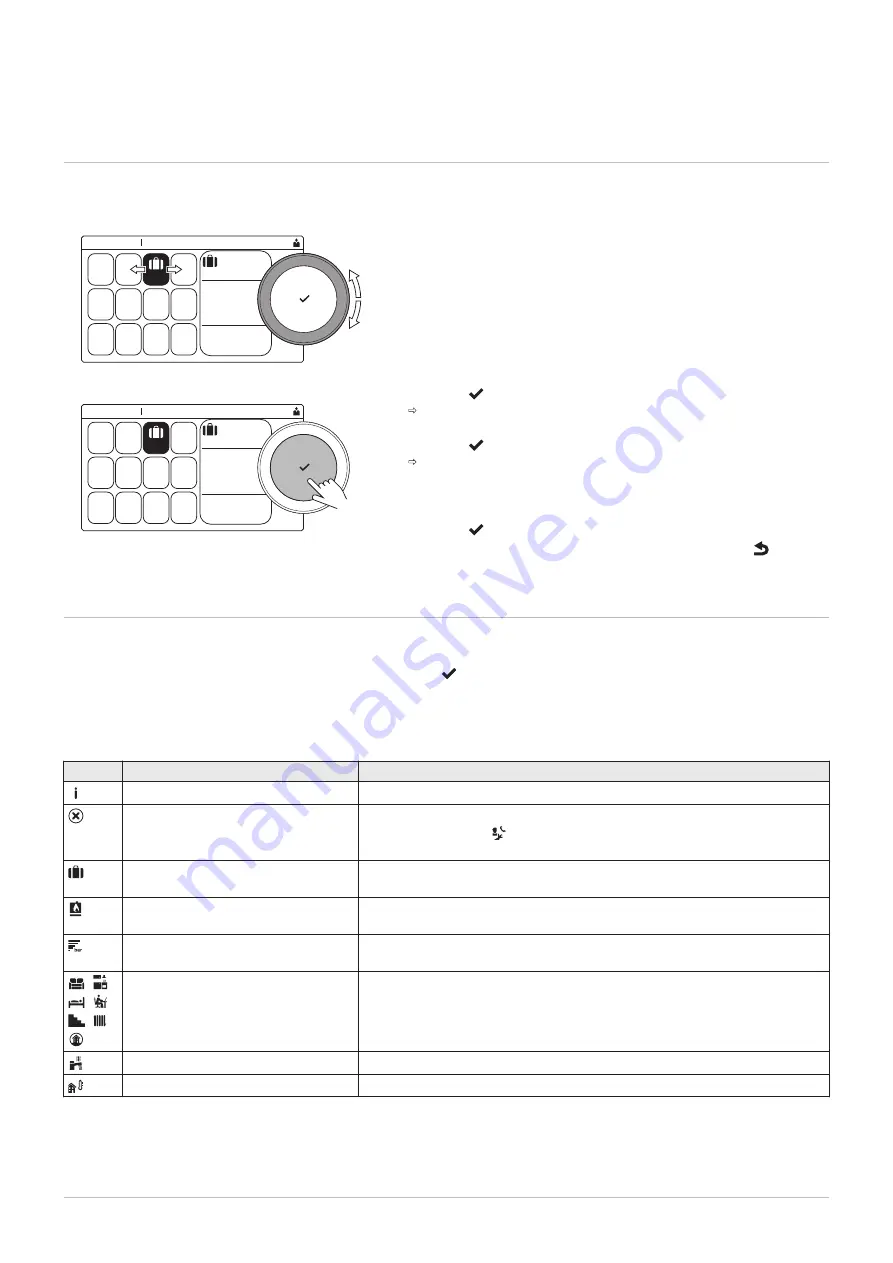
Accessing the user level menus

The tiles on the home screen provide quick access for the user to the 

corresponding menus.

1. Use the rotary knob to select the required menu.

2. Press the   button to confirm the selection.

The available settings of this selected menu appear in the display.

3. Use the rotary knob to select the desired setting.
4. Press the   button to confirm the selection.

All options for change will appear in the display (if a setting cannot 

be changed, Cannot edit read-only datapoint will appear in the 

display).

5. Use the rotary knob to change the setting.
6. Press the   button to confirm the selection.
7. Use the rotary knob to select the next setting or press the   button to 

return to the home screen.

5.2 

Home screen

The tiles on the home screen provide quick access to the corresponding 

menus. Use the rotary knob to navigate to the menu of your choice and 
press the   button to confirm the selection. All options for change will 

appear in the display (Cannot edit read-only datapoint will appear in the 

display if a setting cannot be changed).

Tab.4

Selectable tiles for the user

Tile

Menu

Function

Information menu.

Read out various current values.

Error indicator.

Read out details about the current error.
With some errors the   icon will appear with installer contact details (when 

filled in).

Holiday mode.

Set the start and end date of your holiday to lower the room and domestic hot 

water temperatures of all zones.

Gas boiler indicator.

Read out burning details of the boiler and switch the heating function of the 

boiler on or off.

Water pressure indicator.

Shows the water pressure. Top up the installation when the water pressure is 

too low.

,  , 
,  , 
,  , 

Heating circuit set-up.

Configure the settings per heating circuit.

DHW setup.

Configure the domestic hot water temperatures.

Outdoor sensor setup.

Configure the temperature regulation using the outdoor sensor.

Fig.6

Menu selection

AD-3001387-01

Not set

Home Screen

22/02/2018 11:20

... ...

........  .......

........  .......

......

Fig.7

Confirm menu selection

AD-3001388-01

... ...

........  .......

........  .......

......

Not set

Home Screen

22/02/2018 11:20

5  Settings

7745361 - v02 - 15062020

DIEMATIC Evolution - C140

15

Summary of Contents for LN1GBQ41

Page 1: ...ADVANCE SUSTAINABLE COMFORT MW 2000880 2 en User Guide control box equipped with a DIEMATIC Evolution for C140 boiler LN1GBQ41 C140 45 LN1GBQ62 C140 65 LN1GBQ86 C140 90...

Page 2: ...sing the product and keep it in a safe place for later reference In order to ensure continued safe and efficient operation we recommend that the product is serviced regularly Our service and customer...

Page 3: ...t configuration 16 5 5 Changing the room temperature of a zone 17 5 5 1 Definition of zone 17 5 5 2 Changing the name and symbol of a zone 17 5 5 3 Changing the operating mode of a zone 18 5 5 4 Timer...

Page 4: ...cal data 29 9 Appendix 31 9 1 Product fiche 31 9 2 Product fiche Temperature Controls 31 9 3 Package fiche Boilers 32 9 4 EC Declaration of Conformity 33 Contents 4 DIEMATIC Evolution C140 7745361 v02...

Page 5: ...1 Do not use a naked flame do not smoke do not operate electrical contacts or switches doorbell light motor lift etc 2 Shut off the gas supply 3 Open the windows 4 Locate the probable leak and seal i...

Page 6: ...ettings the domestic hot water temperature may exceed 65 C 1 1 2 Safety instructions for the user Danger If you smell gas 1 Do not use a naked flame do not smoke do not operate electrical contacts or...

Page 7: ...it turns out to be damaged it must be replaced by the manufacturer its after sales service or persons with similar qualifications in order to obviate any danger Caution A disconnection device must be...

Page 8: ...quirements of the various Directives applicable They are therefore delivered with the marking and any documents necessary In the interests of the quality of our products we strive constantly to improv...

Page 9: ...result in minor personal injury Caution Risk of material damage Important Please note important information See Reference to other manuals or pages in this manual 2 1 2 Symbols used on the appliance 1...

Page 10: ...3 Control panel description 3 3 1 Control panel components 1 Rotary knob to select a tile menu or setting 2 Confirm button to confirm the selection 3 Back button Short button press Return to the previ...

Page 11: ...screen actual position in the menu B Available menus C Brief explanation of the selected menu Tab 1 Available menus for the user Description Icon System Settings Version Information Meaning of the ic...

Page 12: ...etting Temporary overwrite of the timer program is enabled The room temperature is changed temporarily The holiday program including frost protection is active The room temperature is reduced during y...

Page 13: ...hey request heat 4 Check the hydraulic pressure in the installation shown on the control panel display Recommended hydraulic pressure between 0 15 and 0 2 MPa 1 5 and 2 0 bar Important In the event of...

Page 14: ...example to 10 C If the temperature of the central heating water in the boiler drops too low the built in boiler protection system is activated This system works as follows If the water temperature is...

Page 15: ...change will appear in the display Cannot edit read only datapoint will appear in the display if a setting cannot be changed Tab 4 Selectable tiles for the user Tile Menu Function Information menu Read...

Page 16: ...able Select the heating circuit you want to configure by selecting the tile or Tab 5 Menu to configure a heating circuit Icon Menu Function Scheduling Set the scheduling mode and choose a timer progra...

Page 17: ...actory symbol and factory name You can change the name and symbol of a zone 1 Select the tile of the zone you want to change 2 Press the button to confirm the selection 3 Use the rotary knob to select...

Page 18: ...confirm the selection 5 5 4 Timer program to control the room temperature Creating a timer program A timer program allows you to vary the room temperature per hour and per day The room temperature is...

Page 19: ...rt of the activity Activity Temperature setpoint 1 6 30 Morning 20 C 2 9 00 Away 19 C 3 17 00 Home 20 C 4 20 00 Evening 22 C 5 23 00 Sleep 16 C Changing the name of an activity You can change the name...

Page 20: ...erature 8 Press the button to confirm the selection 5 5 6 Changing the room temperature temporarily Regardless of the operating mode selected for a zone it is possible to change the room temperature f...

Page 21: ...lect the timer program you want to modify Schedule 1 Schedule 2 or Schedule 3 7 Press the button to confirm the selection Activities scheduled for Monday are displayed The last scheduled activity of a...

Page 22: ...ot water sensor is installed 1 Select the tile 2 Press the button to confirm the selection 3 Use the rotary knob to select Hot water boost 4 Press the button to confirm the selection 5 Set the duratio...

Page 23: ...ble daylight saving time Installer Details Read out the name and phone number of the installer Set Heating Activity Names Create the names for the activities of the timer program Set Screen Brightness...

Page 24: ...than 0 08 MPa 0 8 bar the bar symbol flashes 2 Top up the heating system with water to increase the hydraulic pressure Important The recommended hydraulic pressure when cold is between 0 15 MPa 1 5 ba...

Page 25: ...filling draining valve Leave the hose on the filling draining valve until the central heating system has been vented Important Topping up the water will add air to the central heating system Vent the...

Page 26: ...k from the lowest to the highest 7 Open the venting valve with the bleed key keeping a cloth pressed against the vent Warning The water may still be hot 8 Wait until water comes out of the venting val...

Page 27: ...point Place the end of the hose in a drain or at a place where drained pipe water will not cause any damage 5 Open the central heating system filling draining valve Drain the installation Warning The...

Page 28: ...ontrol panel shows 1 The display will show a corresponding code and message 2 The status LED of the control panel will show Continuous green Normal operation Flashing green Warning Continuous red Bloc...

Page 29: ...C 110 6 110 4 108 1 Part load heating mode efficiency GB20665 2015 return temperature 30 C 108 0 107 8 107 9 1 Factory setting Tab 14 Gas and flue gas values C140 C140 45 C140 65 C140 90 G20 gas cons...

Page 30: ...lectrical data C140 C140 45 C140 65 C140 90 Supply voltage AC V 220 220 220 Power consumption full load max W 68 92 124 Power consumption low load max W 17 25 24 Power consumption standby max W 5 6 5...

Page 31: ...nsumption GJ 124 190 Sound power level LWA indoors dB 55 55 61 1 No ErP information needs to be provided for heating boilers above 70 kW See For specific precautions about assembling installing and ma...

Page 32: ...e products in relation to building size and characteristics Boiler and supplementary heat pump installed with low temperature heat emitters at 35 C Seasonal space heating energy efficiency class of pa...

Page 33: ...orage tank II package with hot water storage tank 0 0 0 0 1 0 3 0 37 0 2 0 55 0 70 0 3 0 75 0 85 0 4 0 85 0 94 0 5 0 95 0 98 0 6 0 98 1 00 0 7 1 00 1 00 1 The intermediate values are calculated by lin...

Page 34: ...9 Appendix 34 DIEMATIC Evolution C140 7745361 v02 15062020...

Page 35: ...al and technological information contained in these technical instructions as well as any drawings and technical descriptions supplied remain our property and shall not be multiplied without our prior...

Page 36: ...46 801 080 881 Infocentrala NEUBERG S A LU DE DIETRICH SERVICE AT DE DIETRICH CN www neuberg lu www dedietrich heating com www dedietrich heiztechnik com 352 0 2 401 401 0800 201608 freecall 39 rue Ja...

Reviews: