background image

Colby 4-in-1 Convertible Mini Crib with Trundle                Assembly Instructions

Petit lit à barreaux Colby 4 en 1 avec tiroir gigogne     Manuel d’assemblage

Item# 11981

revised 25MAR2020

1

* Read all instructions BEFORE assembly and USE of product.  

KEEP INSTRUCTIONS FOR FUTURE USE.

* Lire toutes les instructions AVANT l’assemblage du lit. 

GARDER LE MANUEL POUR UN USAGE ULTERIEUR.

Summary of Contents for Carter's Colby 11981

Page 1: ... à barreaux Colby 4 en 1 avec tiroir gigogne Manuel d assemblage Item 11981 revised 25MAR2020 1 Read all instructions BEFORE assembly and USE of product KEEP INSTRUCTIONS FOR FUTURE USE Lire toutes les instructions AVANT l assemblage du lit GARDER LE MANUEL POUR UN USAGE ULTERIEUR ...

Page 2: ... texture is to be expected We hope you and your growing family enjoy our product With thanks Carter s by DaVinci Nous vous remercions de votre achat d un produit pour tout petits Carter s Pour assurer une utilisation sans risque du produit veuillez suivre attentivement ces directives d assemblage Si des pièces manquent ou si vous avez des questions veuillez visiter notre site Web à l adresse www c...

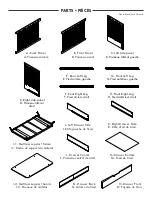
Page 3: ...K Right Drawer Side K Côté droit de tiroir M Drawer Bottom M Fond de tiroir J Left Drawer Side J Côté gauche de tiroir A Back Panel A Panneau arrière B Front Panel B Panneau avant C Left side panel C Panneau latéral gauche I 2 Mattress support board I 2 Panneau de matelas I 1 Mattress support frame I 1 Cadre du support du matelas L Drawer Center L Panneau central de tiroir N Drawer Back N Arrière ...

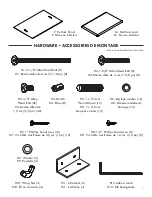
Page 4: ...ts in Actual Size Boulons taille réelle H7 1 Phillips headscrew 12 H7 Vis à tête cruciforme de 2 5 cm 1 po 12 P Bottom Panel P Panneau inférieur Q Mattress pad Q Couvre matelas H1 3 1 8 Allen Head Bolt 8 H1 Boulon Allen de 8 cm 3 1 8 po 8 H2 1 5 8 Allen Head Bolt 8 H2 Boulon Allen de 4 cm 1 5 8 po 8 H9 Washer 4 H9 Rondelle 4 H8 1 2 Phillips headscrew 8 H8 Vis à tête cruciforme de 1 2 cm 1 2 po 8 H...

Page 5: ...1 ASSEMBLY INSTRUCTIONS INSTRUCTIONS D ASSEMBLAGE H5 X8 B A X8 H5 5 ...

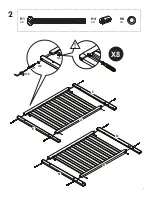
Page 6: ...2 H1 X8 H4 X8 H6 X8 E F G H X8 H6 H1 H12 H4 A B 6 ...

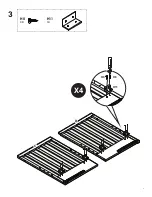
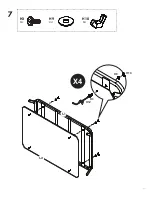
Page 7: ...3 C D X4 H8 X8 H11 X4 H8 H11 H8 7 ...

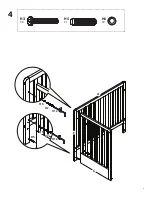
Page 8: ...4 H6 X2 H5 X1 H2 X2 H2 H6 H12 H2 H6 H12 H5 A C E 8 ...

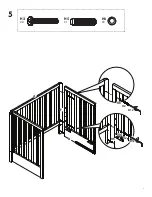
Page 9: ...5 H6 X2 H5 X1 H2 X2 H2 H6 H12 H2 H6 H12 H5 D A F 9 ...

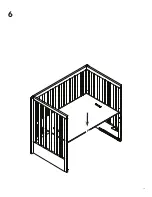
Page 10: ...6 P 10 ...

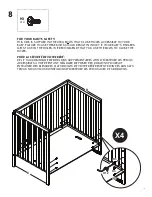
Page 11: ...11 7 H3 X4 H10 X4 H9 X4 I 1 X4 H3 I 2 H12 H10 H9 ...

Page 12: ...RS GET STUCK IN THE HOLES WE RECOMMEND THAT YOU USE THE BOLTS TO CLOSE THE HOLES POUR LA SÉCURITÉ DE VOTRE BÉBÉ CE LIT S ACCOMPAGNE DE BOULONS SUPPLÉMENTAIRES AFIN D OBSTRUER LES TROUS ACCESSIBLES À VOTRE ENFANT NÉGLIGER DE POSER CES BOULONS POURRAIT ENTRAÎNER DES BLESSURES SI LES DOIGTS DE VOTRE BÉBÉ RESTENT COINCÉS DANS LES TROUS NOUS VOUS CONSEILLONS D OBSTRUER LES TROUS AVEC CES BOULONS C D 12...

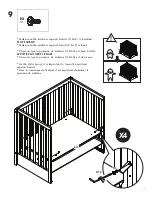
Page 13: ...abaisser le panneau de matelas H3 X4 X4 Make sure the mattress support board I 1 I 2 is installed FLAT SIDE UP Make sure the mattress support board I 1 I 2 is level S assurer que le panneau de matelas I 1 I 2 est bien installé LE CÔTÉ PLAT VERS LE HAUT S assurer que le panneau de matelas I 1 I 2 est de niveau H12 H3 I 2 13 ...

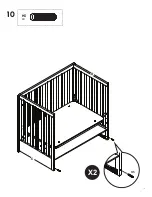
Page 14: ...10 X2 H5 X2 H5 C D 14 ...

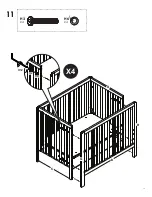
Page 15: ...11 X4 H6 X4 H2 X4 H6 H2 H12 B H G C D 15 ...

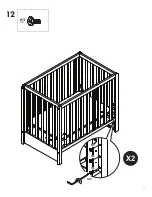
Page 16: ...H3 X6 12 H12 H3 H3 H3 X2 16 ...

Page 17: ...DRAWER ASSEMBLY INSTRUCTIONS INSTRUCTIONS D ASSEMBLAGE DES TIROIRS 13 13a 13b 17 H7 X6 M M K L J O X3 H7 H7 ...

Page 18: ...l screws and bolts to be certain they are all securely tightened Do not overtighten Refaire une vérification pour vous assurer de la bonne fixation des vis et des boulons Ne pas trop serrer 14 18 H7 X6 N X3 H7 H7 K J ...

Page 19: ...NG INFANTS CAN SUFFOCATE In gaps between a mattress too small or too thick and product sides On soft bedding NEVER add a mattress pillow comforter or padding READ ALL INSTRUCTIONS BEFORE ASSEMBLING CRIB KEEP THIS MANUAL IN A SAFE PLACE FOR FUTURE REFERENCE LIRE TOUTES LES INSTRUCTIONS AVANT D ASSEMBLER LE LIT GARDER CE MANUEL EN LIEU SÛR POUR UN USAGE ULTÉRIEUR Finish Terminé DO NOT OVERTIGHTEN NE...

Page 20: ...r le fabricant qui doit mesurer au moins 93 cm 36 75 po de longueur par 59 cm 23 25 po de largeur et pas plus de 12 5 cm 5 po d épaisseur Please read the Caution and Warning Statements insert before using your crib SAMPLE LABEL www themdbfamily com CAUTION Use ONLY mattress pad provided by manufacturer which must be at least 36 75 in long by 23 25 in wide and not more than 5 in thick Please refer ...

Page 21: ...s after raising side make sure latches are secure For cribs with drop sides DO NOT leave child in crib with side lowered Be sure side is in raised and locked position whenever child is in crib When a child is able to climb out reaches the height of 35 inches 890 mm the child should be placed in a youth or regular bed and the crib shall no longer be used Check this product for damaged hardware loos...

Page 22: ...squ un enfant est capable de sortir du lit ou atteint la hauteur de 35 pouces 89 cm il doit être placé dans un lit de jeune ou un lit normal L utilisation du lit n est plus nécessaire Procéder à une vérification du produit pour la recherche de matériel endommagé jointures desserrées des pièces manquantes ou des bords coupants avant et après l assemblage et fréquemment pendant l utilisation Ne pas ...

Page 23: ...nts Si vous entreprenez de refinir ce meuble sa garantie sera annulée ONE YEAR LIMITED WARRANTY We will replace any missing parts at the time of purchase or any defective item within a one year period from the date of original purchase Please keep your receipt so that we may process your warranty request This warranty only covers new units with original packaging and ownership and is not transfera...

Page 24: ...etit M20399 n est pas fourni Il est vendu séparément Veuillez contacter votre détaillant ou les acheter sur www cartersbydavinci com Mini Toddler Bed Conversion Kit 20399 Sold Separately Ensemble de conversion en 20399 vendues séparément petit lit pour tout petit Item 20399 Keep the front panel for twin sized bed conversion Garder le panneau avant pour la conversion en lit de jumeau M20399 24 ...

Page 25: ...LY INSTRUCTIONS INSTRUCTIONS D ASSEMBLAGE X4 B H6 H2 Make sure the mattress support I 1 I 2 locates at the lowest level Assurez vous que le support de matelas I 1 I 2 se trouve au niveau le plus bas H12 H G 25 ...

Page 26: ...2 Finish Terminé DO NOT OVERTIGHTEN NE PAS TROP SERRER M20399 X2 H G 26 ...

Page 27: ...ible to a twin sized bed M5789 Full Size Conversion Rail is recommended please contact your retailer or purchase on www cartersbydavinci com Ce lit peut être converti en un lit de jumeau Il est recommandé d utiliser les traverses de conversion M5789 Veuillez contacter votre détaillant ou les acheter sur www cartersbydavinci com ...

Page 28: ...S BY MAIL CARTER S BY DAVINCI 8700 REX RD PICO RIVERA CA 90660 323 768 0183 www cartersbydavinci com L enregistrement de votre produit est plus facile que jamais Veuillez l enregistrer sur notre site Web à www cartersbydavinci com registrations POUR COMMANDER DES PIÈCES DE RECHANGE OU MANQUANTES VISITEZ NOUS À WWW CARTERSBYDAVINCI COM PARTS OU CONTACTEZ NOUS PAR LA POSTE CARTER S BY DAVINCI 8700 R...

Reviews: