background image


iboot-poe-p_v190422w 

iBoot-PoE-P 

Page 28 


10.  DxP Protocol 

iBoot-PoE-P  supports  the  Dataprobe  Exchange  Protocol  (DxP)  for  inter  device  communications  and  to 
allow  software  developers  to  integrate  Dataprobe  product  into  custom  applications.    Through  the  DxP 
protocol, the developer can: 


Turn on and off power to the Outlet 


Pulse the Power On or Off for a specified amount of time. 


Read the status of the Outlet 
 
The  DxP  Protocol,  as  well  as  example  code  and  scripts  in  a  variety  of  languages  are  available  at 

dataprobe.com/support-iboot-poe/


11.  Firmware Upgrades 

The  iBoot-PoE-P  can  be  field  upgraded.    Find  the  latest  version  or  special  purpose  versions  at 

dataprobe.com/support-iboot-poe/


Upgrading  the  firmware  with  a  minor  upgrade  (i.e.  1.01.xx    to  1.01.yy)  will  not  alter  the  user 
defined  settings.    Major  upgrades  may  or  may  not  reset  the  iBoot-PoE-P  to  factory  defaults.  
Check the release notes for the upgrade before making changes to you iBoot-PoE-P. 


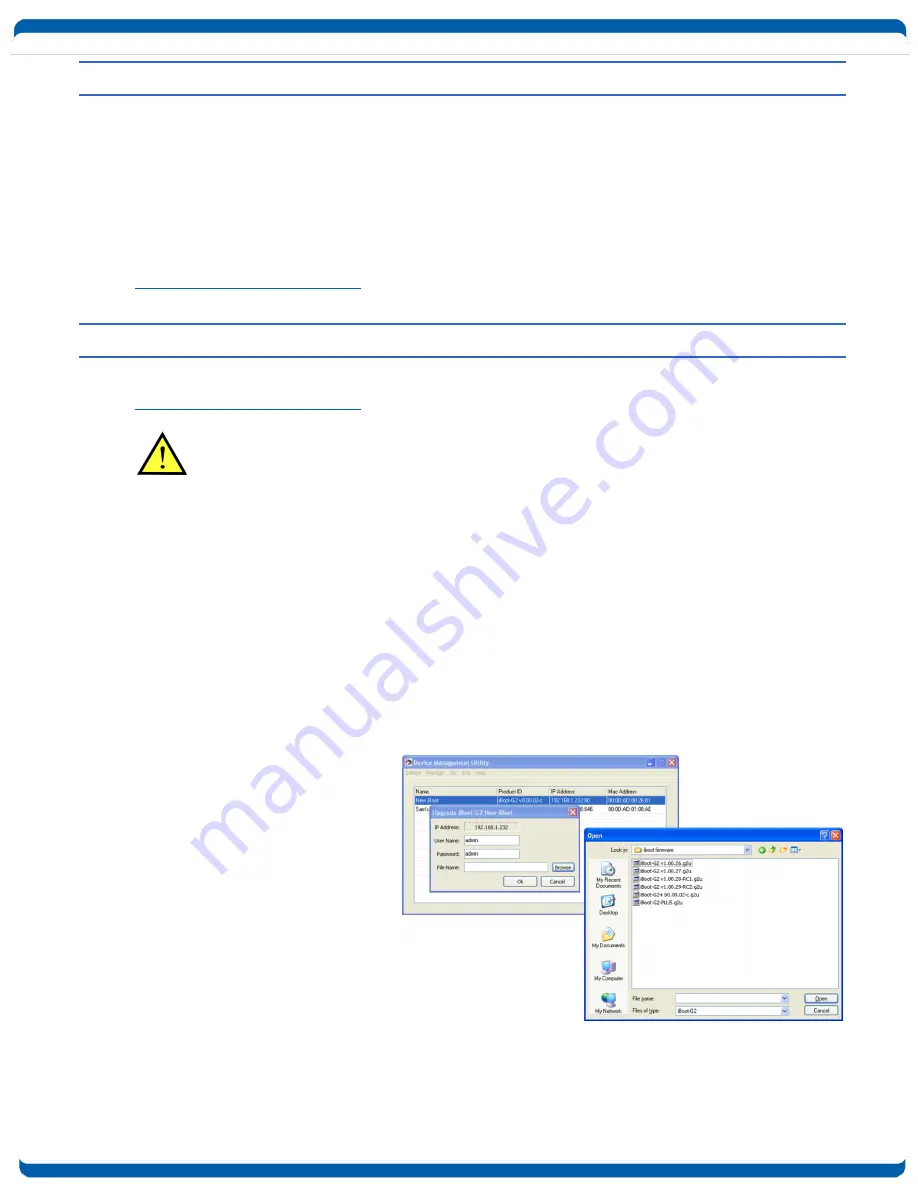
1)  Insure that the Upgrade Enable checkbox is checked in the Network Setup web page of the iBoot-PoE-P 


2)  Run  the  Device  Management  Utility,  available  at  the  link  above.    If  the  iBoot-PoE-P  you  would  like  to 

upgrade is not visible in the list box, either 


Select Device | Discover from the menu to locate iBoot-PoE-P units on the local network, or 


Select Device | Add from the menu to add the IP address of the iBoot-PoE-P. 


Once the device is displayed in the list, highlight it 
 

3)  Select Manage | Upgrade Firmware 


Enter User Name admin and the Password for the Administrator.   
 
Enter the filename of the firmware, 
or  click  Browse  and  find  the  file  of 
the firmware file to be used.  iBoot-
PoE-P 

firmware 

uses 

the 

extension 

.g2u


If  you  don’t  see 

any  files  of  that  type,  make  sure 
the  ‘Files  of  type’  box  is  set  for 
iBoot-PoE-P or All Files. 
 
Click  OK  when  all  the  details  are 
entered. 
 

4)  The  upload  will  begin,  and  a 

progress bar will be displayed. 

 
5)  When  the  firmware  upload  is 

completed,  the  iBoot-PoE-P  will 
automatically  reset  and  be  ready 
for use. 


Summary of Contents for iBoot PoE-P

Page 1: ...ty 31 Congratulations on purchasing the best network controlled power switch available The iBoot PoE P provides you the ability to reboot crashed devices automatically or with the click of a mouse Be...

Page 2: ...Reboot iBoot PoE P has a web server built in as well as the ability to be managed through the iBoot Cloud Service A simple Web browser interface makes it easy to control power from anywhere in the wo...

Page 3: ...it is also possible to turn ON or OFF the PD when the trigger conditions are met See Section 5 5 On AutoPing Setup Traffic Monitor Traffic Monitor measures the bandwidth utilization and reboots the PD...

Page 4: ...mputer control URL Control You can send a single URL to the iBoot PoE P containing all the information necessary to query or change the power status This makes it easy to create a single button on you...

Page 5: ...ctor Auto Configuration can also be initiated via the web page setup See Section 5 5 2 2 Hardware Connections iBoot PoE P supports 10 100 1000 Ethernet using the cable supplied or other suitable unshi...

Page 6: ...Voltage on all pins 1 DC DC 2 DC DC 3 DC DC 4 DC DC 5 DC DC 6 DC DC 7 DC DC 8 DC DC Power Output on the PoE OUT connector will be identical to whatever mode is used on the NET IN connector 2 4 Mountin...

Page 7: ...he iBoot PoE P Obtain and use the DMU 1 Download the latest version of the DMU at dataprobe com support iboot poe Run DMUSetup exe 2 Run the DMU Note The IP address can only be set within the first tw...

Page 8: ...utton Get all the details on the DMU at http dataprobe com support dmu 3 3 Other ways to set the IP Address 1 Web Browser via the Set up Page See Section 5 2 Command Line Interface See Section 9 3 4 A...

Page 9: ...setup or Command Line Interface See Section 5 5 for an explanation of these settings AutoPing Setting Address IP Address of Powered Device Frequency 10 Seconds Fail Count 3 Mode Single Action Cycle Re...

Page 10: ...tes Setting to zero disables the timeout feature When there is no activity for the set time in minutes the user is automatically logged out and the username and password will need to be entered again...

Page 11: ...ded If the iBoot PoE P is connected to a time server see Section 5 4 The Home page will also show the five most recent history events including the Outlet Action User and Time Date of each event The i...

Page 12: ...not significant The user and password are not required when Auto Login feature is enabled see Section 5 7 for security options Examples http 192 168 1 254 s 1 u user p user Turn the outlet on for the...

Page 13: ...emote firmware upgrades of the iBoot PoE P When this box is unchecked firmware upgrades will not be allowed Auto Logout This setting sets the automatic logout for inactivity on both the web and telnet...

Page 14: ...able Cloud Services This setting enables the iBoot PoE P for iBoot Cloud Services iBCS iBCS allows the iBoot PoE P to be monitored and controlled from a web portal from any browser It allows multiple...

Page 15: ...oth AutoPings need to exceed their fail count to trigger the Action With OR the Action will be triggered if either AutoPing fails Action Select from None AutoPing is paused No Ping tests will be perfo...

Page 16: ...fic Subsequent reboots will occur when the time equals the Restart Time plus the Fail Time Number of Cycles Set the number of reboots to attempt for a single failure event Minimum Traffic Sets the min...

Page 17: ...de supports both User and Admin users Each user has a settable password Auto Login This mode does not require a username of password for the User level operation No login challenge will be required fo...

Page 18: ...will not allow programming for On Follow Off Latch or Off Follow If a Schedule Settings event has action for Off it will be reprogrammed for On Schedule Settings will not allow programming for action...

Page 19: ...ice name when on the local network By default the name is iBoot PoE P xxxx where the xxxx is the last 4 segments of the MAC address for your iBoot PoE P When you reprogram the name of the device a reb...

Page 20: ...Boot firmware may be made available and necessary to keep current with the cloud development The full Terms of Service of the iBoot Cloud Service is available here While the Cloud Service is in Beta s...

Page 21: ...click on Add Device and enter the activation code in the field provided Congratulations You are now on the cloud d iBCS Main Page The iBCS main web page provides the ability to control your iBoot PoE...

Page 22: ...to Password Enter the admin or user password and press Enter The prompt will change to iBoot This indicates successful login Enter commands as needed When done enter the logout command Note The telnet...

Page 23: ...etwork This command will return all the network settings as shown below Mode DHCP IP Address 192 168 1 254 Subnet 255 255 255 0 Gateway 192 168 1 1 DNS 8 8 8 8 HTTP Port 80 Linkback URL Telnet Port 23...

Page 24: ...decimal or name This command is used to set the address of AutoPing 1 or AutoPing 2 Use IP Address or domain name set autoping 1 2 frequency 1 999 This command is used to set the frequency how often t...

Page 25: ...the stop disable time 00 00 get traffic monitor Traffic Monitor Enabled or Disabled Fail Time in seconds Restar Time in seconds Number of Cycles Minimum Bandwidth as programmed Maximum Test enabled d...

Page 26: ...d to set the Address of a network time server ip or FQDN time nist gov get time Displays the current time and time server settings Current Time 07 30 2015 10 41 05 Timezone 5 DST Enabled Starts the 2n...

Page 27: ...at the user is presented with Password This prompts the user to enter his password iBoot This is the prompt that will be displayed after the user has successfully logged in iBoot Reboot Required This...

Page 28: ...es for the upgrade before making changes to you iBoot PoE P 1 Insure that the Upgrade Enable checkbox is checked in the Network Setup web page of the iBoot PoE P 2 Run the Device Management Utility av...

Page 29: ...e output status 5 Seconds push Reset to Factory Defaults Hold the button in until the Outlet LED is blinking then release Hold in while and Power up the iBoot Recovery Mode Allows upload of new firmwa...

Page 30: ...ce FCC Part 15 Class B CE Emission EN 55032 2012 AC 2013 CISPR 32 2012 Class B AS NZS CISPR 32 2013 EN 61000 3 2 2014 and EN 61000 3 3 2013 Immunity EN 55024 2010 A1 2015 IEC 61000 4 2 2008 IEC 61000...

Page 31: ...r this Warranty is obtained by contacting your Authorized Dataprobe Reseller THIS WARRANTY DOES NOT APPLY TO NORMAL WEAR OR TO DAMAGE RESULTING FROM ACCIDENT MISUSE ABUSE OR NEGLECT SELLER MAKES NO EX...

Reviews: