background image

TIMING DIAGRAMS

USER MANUAL   

49

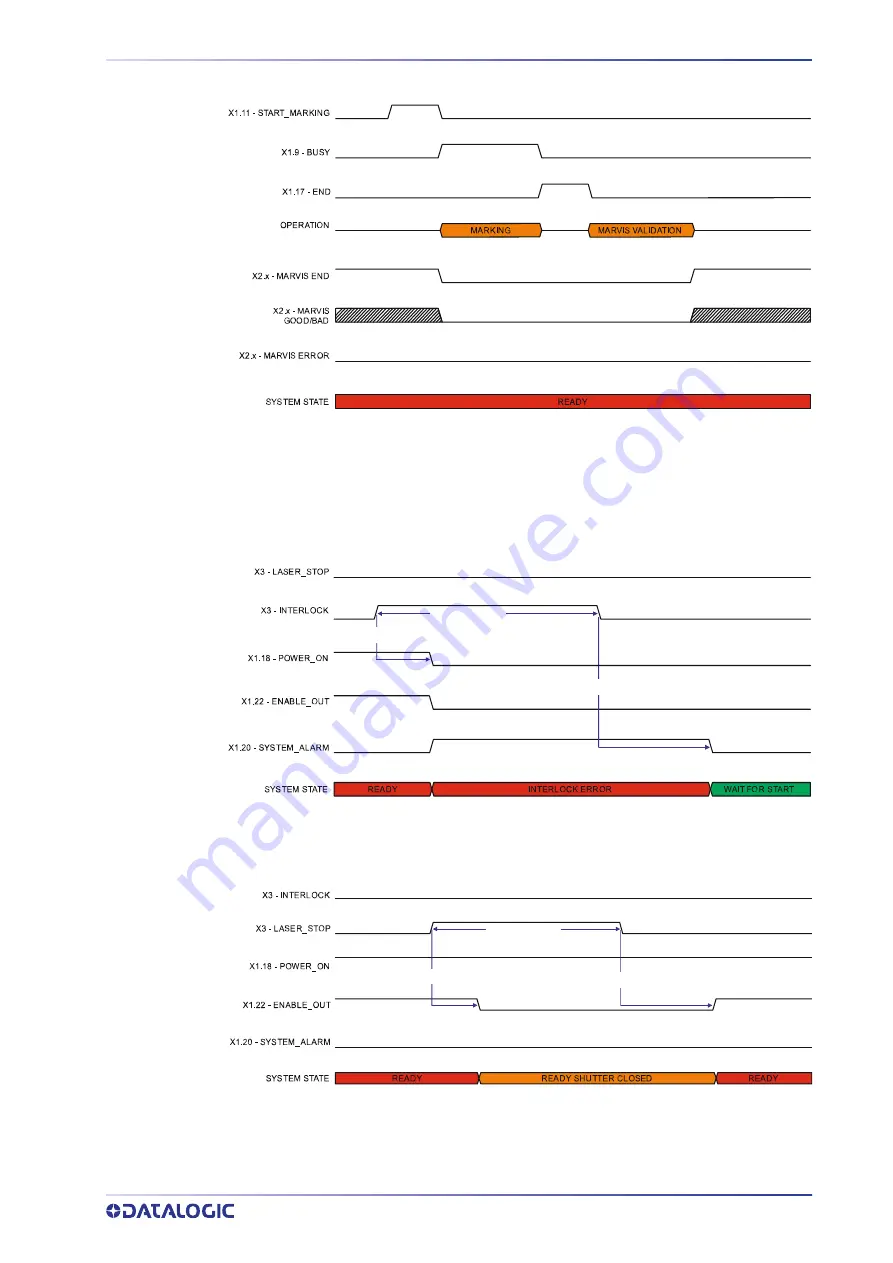
MARVIS™ I/O signals behavior

Figure 38: MARVIS™ I/O signals behavior

Safety functions behavior

INTERLOCK behavior

within 50ms

user defined

within 600ms

Figure 39: INTERLOCK behavior

LASER_STOP behavior

user defined

within 50ms

within 600ms

Figure 40: LASER_STOP behavior

Summary of Contents for AREX 401

Page 1: ...AREX 401 USER MANUAL InfraRed Fiber Laser Marker...

Page 2: ...roductions of the documentation Electronic versions of this document may be downloaded from the Datalogic website www datalogic com If you visit our website and would like to make comments or suggesti...

Page 3: ...ER 2 INSTALLATION 8 Unpacking 8 Contents of the packaging 10 On moisture condensation 11 Note on moisture condensation 11 If moisture condensation occurs 11 How to avoid moisture condensation 11 Fixin...

Page 4: ...cations 41 Digital Input 41 Digital Output 42 NPN Configuration default 42 Laser Marker States 43 Normal Operation States 43 Error States 43 Warning State 44 Control the Laser Marker States 45 Key Sel...

Page 5: ...M and L lenses 83 Micrometric distance sensor kit 83 F Theta protective cap for M lenses 84 Rack Handles 84 Fume Extractor 84 CHAPTER 8 TECHNICAL SUPPORT 85 Seals 85 Maintenance 86 F Theta scan lens c...

Page 6: ...d O D of protection goggles 111 EN207 and EN208 112 Eyes and skin risks 113 General safety regulations 113 Other risks 113 APPENDIX D USING MARKING SOFTWARE 114 How to create and edit graphics layout...

Page 7: ...SUPPORT Support Through the Website Datalogic provides several services as well as technical support through its website Log on to www datalogic com For quick access from the home page click on the s...

Page 8: ...unit consumable items 7 use of counterfeit or replacement parts that are neither manufactured nor approved by Datalogic for use in Datalogic manufactured Products 8 any damage or malfunctioning cause...

Page 9: ...4 Laser Product In addition to being professionally trained in their role personnel assigned to work with laser marker must be informed and made acquainted with the risks inherent to invisible and vis...

Page 10: ...tions are available For a com plete list of combinations see the Models tab on the Product page of the website LASER MARKING MACHINE E499316 DATALOGIC S r l via S Vitalino 13 40012 Calderara di Reno B...

Page 11: ...he permission to use the equipment This laser marker complies with PART 15 of the FCC Rules Operation is subject to the following two conditions 1 this laser marker may not cause harmful interference...

Page 12: ...NTRODUCTION 4 AREX 401 UL COMPLIANCE Reading this manual prevents the operator from carrying out operations that could cause damage to himself or others Follow Up Service Procedure issued on 2019 03 2...

Page 13: ...essing system The final system manufacturer MUST ensure the safety of the laser processing machine according to its standards including the risk analysis implementation of safety mea sures certificati...

Page 14: ...cs pattern to be reproduced Operation of a laser marker with galvanometric scanning During the marking the laser generates an invisible high energy infrared beam In order to obtain a more accurate foc...

Page 15: ...ing surfaces to laser radiation The reflected laser beam may cause damage to laser marker CAUTION Laser marking interacts with materials through for example a thermal carbonization process which may l...

Page 16: ...emely careful to not damage the connection cable between scan head and control rack CAUTION To avoid damaging or breaking the optical fiber never subject the Head Cable to a bending radius below the l...

Page 17: ...efully remove the laser marker from the packaging using both hands Figure 1 Unpacking Keep all packing materials until the laser has been inspected for completeness and dam age If something is missing...

Page 18: ...HE PACKAGING 3x Control Rack Scan Head Power Supply cables Rack Fixing Brackets Command Box MUTING DEVICE SLO External Connector Safety labels USB Drive Selector Keys Quick Reference Guide EULA Window...

Page 19: ...dense when you bring the laser marker from a cold place into a warm place or vice versa and when you use the laser marker in a humid place If moisture condensation occurs Turn off the laser marker and...

Page 20: ...e CAUTION Introduction of optical or mechanical surfaces such as mechani cal shutters or additional protective glass between F Theta scan lens out put and marking surface may case optical feedback int...

Page 21: ...talled on a standard 19 rack cabinet using the fixing brack ets Rack handles for an easier installation are available as an accessory see Rack Han dles on page 84 The figure below shows the fixing poi...

Page 22: ...the fixing brackets are aligned with the frontal grid panel Figure 5 Control rack fixing brackets mounting position 2 Use this position if you want to use a pre existing integration for AREX 3 and it...

Page 23: ...positioning Figure 8 Control rack fixing points for vertical installation NOTE The feet must be removed from the bottom of the control rack and installed on the left side of the control rack using the...

Page 24: ...the length of the mounting screws consider the thickness of the mount ing plate and the thickness of the washer Control rack 7 mm Mounting plate thickness Washer thickness M4 screw Figure 9 Length of...

Page 25: ...an head can be installed in any orientation and must be fixed to a suitable base not supplied by Datalogic using the dedicated threaded holes and the high precision slotted seats Figure 10 Fixing poin...

Page 26: ...INSTALLATION 18 AREX 401 It is also possible to mount the scan head sideways using dedicated threaded holes Figure 11 Fixing points on scan head side NOTE All dimensions are in millimeters...

Page 27: ...ermine the length of the mounting screws consider the thickness of the mount ing plate and the thickness of the washer Scan Head 4 mm Mounting plate thickness Washer thickness M5 screw Figure 12 Lengt...

Page 28: ...cted Moreover do not install it near a heat source Clean the air filter when it is dirty If the air filter is dirty insufficient air flow might not ensure correct cooling and might stop the marking op...

Page 29: ...fume may be produced It is important to use an adequate fume dust extractor and or air filtration see Fume Extractor on page 84 CAUTION If not enough space is provided the temperature inside the scan...

Page 30: ...al Average Power W 100 Pulse Energy max mJ 1 Peak Power max kW 10 Central Emission Wavelength nm 1064 Typical Nominal Pulse Width ns 100 Repetition Rate kHz 5 to 500 Laser Aiming Beam Focus Beam Class...

Page 31: ...lation 3 15 fixed installation 4 33 mobile installation Head Cable length mm in 2885 113 5 Beam deflection High speed galvanometer scanning system OTHER SPECIFICATIONS Marking speed5 mm s Up to 10000...

Page 32: ...and back panels view Front panel 1 Status LED 2 Start Marking button 3 Key Selector 4 2x USB 2 0 ports Back panel 5 Main Power Supply connection 6 X3 SLO connector 7 VGA port 8 Encoder connector 9 Ph...

Page 33: ...s of the scan head unit is provided here below Figure 16 Scan head overview front rear and bottom view 1 Status LED 2 F Theta Scan Lens 3 External Focus Beam connector 4 Head Cable 5 Focusing Beam out...

Page 34: ...atisfied by the currently available F Theta scan lens configurations please contact Data logic for a solution The use of other F Theta scan lenses or operation out side the specified marking field for...

Page 35: ...CAN LENS Working Distance WD Fixing Distance FD Marking Area MA NOTE Working Distance is defined as the distance between the center of the marking area defined in the focal plane and the closest mecha...

Page 36: ...The Green Spot indicator turns ON at the end of the marking pro cess and stay active for a configurable range of time from 0 1s to 5s This is available only if MARVIS feature is enabled The Green Spot...

Page 37: ...Isolated Ground reference X3 7 RESERVED DO NOT CONNECT X3 8 GND Ground Isolated Ground reference X3 9 INTERLOCK_A PNP Digital Input INTERLOCK_A positive signal to be connected to VCC X3 10 RESERVED D...

Page 38: ...ctor electric diagram Input Optocoupler 24 V DC 15 mA 24 V DC 1ms debounce MIN TYP MAX 0 0 V DC 0 0 V DC 2 0 V DC 20 0 V DC 24 0 V DC 28 0 V DC Table 2 Input specification Output Opto Relay 7 to 36VDC...

Page 39: ...CLOSED NO ON CONTACT OPEN CONTACT CLOSED CONTACT OPEN NO ON CONTACT CLOSED CONTACT OPEN CONTACT OPEN NO ON CONTACT CLOSED CONTACT CLOSED CONTACT OPEN YES SYSTEM LASER_STOP_A X3 12 LASER_STOP_B X3 14 S...

Page 40: ...NTERLOCK_B LASER_STOP_B Figure 22 SLO Muting Device NOTE The laser marker is not equipped with a SLO Muting Device CAUTION Do not use the SLO Muting Device for external devices since this will result...

Page 41: ...A X1 6 EXT_24V Output power supply Auxiliary 24V DC power supply available for drive input logical HIGH max 125mA X1 7 24V_ENABLE_A Output power supply Auxiliary 24V DC power supply available for EXT_...

Page 42: ...error X1 21 GND Ground Ground reference X1 22 ENABLE_OUT Digital Output PNP NPN configurable This signal is used to know if the laser marker is ready to emit laser radiation ON when the laser marker...

Page 43: ...ing Device provided Internal electric diagram 8 7 10 4 2 1 12 5 EXT_ENABLE_A 24V_ENABLE_A CONNECTOR_PRESENCE EXT_24V EXT_ENABLE_B 24V_ENABLE_B EXT_KEY EXT_24V Figure 25 Command Box Muting Device elect...

Page 44: ...ch is stopped when this signal goes HIGH X2 8 INPUT_1 or ZERO Y Digital Input Generic input or Y Axis home sensor input The home search is stopped when this signal goes HIGH X2 9 INPUT_2 or ZERO Z Dig...

Page 45: ...eric output or X Axis drive direction signal X2 19 INPUT 9 Digital Input Generic Input X2 20 INPUT 8 Digital Input Generic Input X2 21 INPUT_7 or ZERO R Digital Input Generic input or R Axis home sens...

Page 46: ...e 28 Photocell connector female panel socket front view Table 8 Photocell connector pinout see Input Output specifications on page 41 PIN SIGNAL TYPE DESCRIPTION 1 GND Ground Ground reference 2 VCC Po...

Page 47: ...T_TRIG_ 1 Digital Output Reserved output for MARVIS 4 EXT_INPUT_ 1 Digital Input Reserved input for MARVIS 5 RESERVED DO NOT CONNECT 6 INT_RS232_RX Digital Input Reserved RS232 for micrometric distanc...

Page 48: ...t Focus connector pinout PIN SIGNAL TYPE DESCRIPTION 1 DCD Input Data Carrier Detect 2 RXD Input Receive Data 3 TXD Output Transmit Data 4 DTR Output Data Terminal Ready 5 GND Ground Ground reference...

Page 49: ...AUXILIARY POWER SUPPLY USER SIDE USER SIDE LASER MARKER SIDE LASER MARKER SIDE Optocoupler 28 V DC 10 mA 24 V DC 1ms debounce MIN TYP MAX 0 0 V DC 0 0 V DC 2 0 V DC 10 0 V DC 24 0 V DC 28 0 V DC Tabl...

Page 50: ...SUPPLY PNP Configuration X1 16 OUTPUT X1 19 OUTPUT External reference 10 28V DC X1 19 X1 16 X1 4 PNP NPN configurable output 10 to 28VDC 24V nominal 50 mA1 1 Max current for each output if all are us...

Page 51: ...turning on sequence This error occurs if the CONNECTOR_PRESENCE signal pin X1 10 Command Box connector is LOW or not connected To reset the error set CONNECTOR_PRESENCE signal to HIGH value and repea...

Page 52: ...laser source To reset the error a Laser marker restart is required This error occurs if the laser source detects an internal failure To reset the error a Laser marker restart is required TECHNICAL SPE...

Page 53: ...EXT_KEY EXT_ENABLE_A EXT_ENABLE_B HIGH HIGH HIGH Steady LASER_STOP safety function not active Command Box mode Controlling the laser marker states using the X1 Command Box connector on the con trol r...

Page 54: ...eam allowed SAFETY LEVEL according to proper use of safety inputs 1 ENABLED ENABLED 2 DISABLED ENABLED 2 ENABLED ENABLED PC running Marking allowed Aiming beam allowed smart aiming Focusing beam not a...

Page 55: ...accepted as a valid START_MARKING event T2 Start Delay Delay between the acceptance of the START_MARKING signal and the rising edge of the BUSY signal T3 Busy Advance Delay between the rising edge of...

Page 56: ...EADY output signal Ready to Mark mode Figure 35 SW_READY signal timing diagram MARKING_KO output signal Bad marking event Error event Figure 36 MARKING_KO signal timing diagram SYSTEM_ALARM output sig...

Page 57: ...s behavior Figure 38 MARVIS I O signals behavior Safety functions behavior INTERLOCK behavior within 50ms user defined within 600ms Figure 39 INTERLOCK behavior LASER_STOP behavior user defined within...

Page 58: ...en Spot behavior System Ready to Mark mode Figure 41 Green Spot System Ready to mark Marking Confirmation mode 0 1s to 5s Figure 42 Green Spot Marking Confirmation MARVIS Verification mode 0 1s to 5s...

Page 59: ...igure 44 Axes I O signals behavior REF NAME DESCRIPTION T1 Brake release The time that elapses between the brake release signal activation and the start of mechanical movement T2 Ramp Time The time to...

Page 60: ...h the laser marker enabling controlling from one single interface and enhancing individual products performances MARVIS is also available as update for existing products Object Oriented Configuration...

Page 61: ...O and EtherNet IP protocols Scripting programmability The LIGHTER Suite integrates the IDE Integrated Development Environment providing the users with a full set of tools to be used for extremely fle...

Page 62: ...inserted with proper signals provided in order to use the laser marker The absence of such connector blocks the laser marker oper ations Figure 45 Connecting X1 Command Box connector CAUTION Control...

Page 63: ...onnector WARNING If built do not use the SLO Muting Device for external devices since this will result in loss of the safety function of the machine to which this product is installed Do not use the S...

Page 64: ...Ground To ensure high electrical noise immunity it is strongly recommended to connect the chassis to suitable earth ground Figure 48 Connecting the Earth Ground NOTE The locking mechanism is released...

Page 65: ...onnections To use the laser marker in Local Mode Control it is necessary to install a mouse keyboard and monitor Connect the monitor and input devices to laser marker as shown below Figure 49 Connecti...

Page 66: ...SET UP 58 AREX 401 Figure 51 Connecting the monitor NOTE Minimum monitor resolution 800 x 600 VGA standard...

Page 67: ...AN port NOTE The LAN ports are configured by default with a fixed IP Address and Subnet Mask LAN 1 Default IP address 192 168 1 10 LAN 2 Default IP address 192 168 3 10 LAN 3 Default IP address 192 16...

Page 68: ...t with the F Theta pro tective cap for M lenses see F Theta protective cap for M lenses on page 84 acces sory already mounted in the lens Figure 54 Remove the Protective film CAUTION Marking with the...

Page 69: ...not use the SLO Muting Device for external devices since this will result in loss of the safety function of the machine to which this product is installed Do not use the SLO Muting Device except for...

Page 70: ...ate Figure 55 Power on the laser marker During booting up state the status LED on the control rack and the status LED on the scan head blink green Wait until booting up finish the status LED on the co...

Page 71: ...lector one step to 1 position 0 1 2 Figure 57 Key selector in 1 position The status LED on the control rack and the status LED on the scan head are steady orange The laser marker is in STANDBY SHUTTER...

Page 72: ...Rotate the key selector one step to 2 position 0 1 2 Figure 59 Key selector in 2 position The status LED on the control rack and status LED on the scan head will turn red The laser marker is in READY...

Page 73: ...ENABLE_A EXT_ENABLE_B LOW LOW LOW Steady Figure 61 Wait for start state Set the Command box input signals as in the table below EXT_KEY EXT_ENABLE_A EXT_ENABLE_B HIGH LOW LOW Steady The status LED on...

Page 74: ...he table below EXT_KEY EXT_ENABLE_A EXT_ENABLE_B HIGH HIGH HIGH Steady The status LED on the control rack and status LED on the scan head will turn red The laser marker is in READY state Figure 63 Rea...

Page 75: ...of System Protection is still visible on the screen for a few seconds after system startup The tray bar icon color represents the protection state Red the system protection is disabled Green the syste...

Page 76: ...e tray bar icon From Start Menu Datalogic System Protection Enable the system protection Open the System Protection tool GUI Click the ENABLE button A message advise the User to confirm the new settin...

Page 77: ...the User to confirm the new setting Press YES to disable System Protection A message advise the User that the system will be rebooted Press YES to continue CAUTION DO NOT turn OFF or UNPLUG the syste...

Page 78: ...OMIZE THE LASER MARKER SOFTWARE 70 AREX 401 Wait for system reboot Check if the Tray bar icon color is RED protection disabled CAUTION DO NOT turn OFF or UNPLUG the system while Windows is shut ting d...

Page 79: ...an Korean Korea Spanish Spain 1 Disable system protection see Disable the system protection on page 69 2 Wait for the operating system to restart 3 Check that the System Protection is disabled red ico...

Page 80: ...OMIZE THE LASER MARKER SOFTWARE 72 AREX 401 6 Select the Windows display language 7 Click on the Input Indicator icon in the taskbar 8 Select the keyboard layout from the list 9 Close all the open win...

Page 81: ...otection see Enable the system protection on page 68 11 Wait for the operating system to restart 12 Check that the System protection is enabled green icon CAUTION When the System Protection is disable...

Page 82: ...tart 3 Check that the System protection is disabled red icon 4 Click the Search icon and type Ethernet 5 Click on Ethernet settings NOTE In order to perform this setting it is necessary to connect mou...

Page 83: ...CHANGE THE LAN CONFIGURATION AND IP ADDRESS USER MANUAL 75 6 Click on Change adapter options 7 In the Network Connections window double click on the desired Network icon...

Page 84: ...P address and or subnet mask 9 Close all the open windows 10 Enable system protection see Enable the system protection on page 68 11 Wait for the operating system to restart 12 Check that the System p...

Page 85: ...System protection is disabled red icon 4 Click the Search icon and type display 5 Click on Display settings NOTE In order to perform this setting it is necessary to connect mouse keyboard and monitor...

Page 86: ...windows 8 Enable system protection see Enable the system protection on page 68 9 Wait for the operating system to restart 10 Check that the System protection is enabled green icon CAUTION When the Sys...

Page 87: ...user name password and domain if applicable of an account to which you have allowed remote access into the corresponding boxes and then click Con nect 7 In the Log On to Windows dialog box that appea...

Page 88: ...lease see Contents of the packaging on page 10 CONTROL BOX This accessory is used to control the laser marker through the Control Box interface The Control Box allows to perform the following function...

Page 89: ...terfacing System Test I O trou bleshooting etc The DB25 Pass through Command Box connector allows the integrator to use the interface as a I O test tool on previously installed products I O Monitoring...

Page 90: ...leads cable ordering no 985350032 MARVIS ADD ON MARVIS is the most advanced MARK and VALIDATE solution for traceability The inno vative Code Quality Training dramatically simplifies setup in a real pr...

Page 91: ...ordering no 93ACC0372 MICROMETRIC DISTANCE SENSOR KIT Automatically measure target position displacement from pre setted focus position and automatically drive the external optional Z axis stage to t...

Page 92: ...e equipped with handles for easier handling Figure 72 Rack Handles ordering no 985350039 FUME EXTRACTOR This accessory is suitable for collecting and filtering dry and non combustible types of dust co...

Page 93: ...forbidden to operate the laser marker before the machine where it is integrated has been declared in conformance with applicable statutory Directives CAUTION Only Datalogic authorized personnel who ha...

Page 94: ...g these operations The following parts functions have to be controlled periodically Check Clean Weekly wipe gently with a dry cloth or soaked in high purity isopropyl alcohol or clean it with dry air...

Page 95: ...ilter Figure 74 Removal of air filter 5 Clean filter with compressed air or with neutral detergent and air dry it 6 Reinstall filter and grid panel 7 If filter cannot be cleaned replace the filter 8 S...

Page 96: ...nsor of the control rack Shows the temperature measured by BOARD 2 sensor of the control rack Shows the internal temperature of the Scan Head DESCRIPTION This counter is incremented every time the sys...

Page 97: ...upply voltage of the laser source is out of the specified range This counter is incremented every time the laser source detect an high optical power reflected back to the laser This counter is increme...

Page 98: ...ure must not exceed the operative limit Scan Head Temperature error Check the temperature of the environment where the scan head is placed The temperature must not exceed the operative limit Scan Head...

Page 99: ...BLE CAUSE ACTION Laser marker never goes to WAIT FOR START state Laser marker never goes to READY state Laser marker never goes to STANDBY SHUTTER CLOSED state PROBLEM DESCRIPTION POSSIBLE CAUSE ACTIO...

Page 100: ...nal is active Check that the X1 13 STOP_MARKING signal on the X1 Command Box connec tor is not set to HIGH level Incorrect photocell type or incorrect con nection Check that the photocell is compatibl...

Page 101: ...BEAM TYPE prop erty in Laser Engine Configuration LASER refer to Lighter User s Man ual Incorrect Focusing Beam setting Check FOCUSING BEAM TYPE property in Laser Engine Configuration LASER refer to L...

Page 102: ...94 AREX 401 REMOTE ASSISTANCE The laser marker is equipped with a remote connection tool that can be used for diag nostic purposes by Datalogic technical support NOTE The laser marker must be connecte...

Page 103: ...Label Label for non interlock protective housing Caution possibility of electric shock USB port MAC Address for XXX X6X models Windows 10 IoT Enterprise COA 0 1 2 Key Selector positions X1 Command Box...

Page 104: ...E E499316 DATALOGIC S r l via S Vitalino 13 40012 Calderara di Reno BO Italy www datalogic com 2xT6 3 A Figure 75 External labels rack location X2 Axes connector X3 SLO connector LAN1 LAN2 LAN3 LAN po...

Page 105: ...ult with laser labels and labels for non interlock protective housing in Chinese and English language already attached to the product Additional labels in French Swedish German Italian Spanish and Kor...

Page 106: ...ents of the Machine Directive The Machinery Directive 2006 42 EC compels machine manufacturers to meet a mini mum set of requirements before a machine may be placed on the market Annex I of such direc...

Page 107: ...ust be estimated and quantified in terms of THE SEVERITY OF POTENTIAL INJURY THE PROBABILITY OF ITS OCCURRENCE Once the Risk Estimation is completed next step is the Risk Reduction The 2006 42 EC Dire...

Page 108: ...in their approval process as a voluntary act has applied in its laser marker where possible some points of above mentioned regula tions The examples of this appendix relate only to the features introd...

Page 109: ...Hd 14 4 FIT each channel DC Coverage up to 99 Continuous operation yes Reaction Time Class IV to Class I 100 ms IP degree IP54 X3 SLO connector Sub D 15 F type Number of Channels 2 Category 3 PFHd 3 4...

Page 110: ...r radiation RISK SEVERITY SEVERE irreversible eye damage RISK FREQUENCY RARE 1 month for maintenance AVOIDANCE PROBABILITY POSSIBLE with DPI RISK REDUCTION INTERLOCKED DOOR Estimation of PLr for door...

Page 111: ...RE irreversible eye damage RISK FREQUENCY SELDOM 1 week AVOIDANCE PROBABILITY NOT POSSIBLE RISK REDUCTION INTERLOCKED DOOR Estimation of PLr for door interlock safety function SEVERITY SEVERE S2 FREQU...

Page 112: ...versible eye damage RISK FREQUENCY FREQUENT 1 minute AVOIDANCE PROBABILITY NOT POSSIBLE RISK REDUCTION INTERLOCKED DOOR Estimation of PLr for door interlock safety function SEVERITY SEVERE S2 FREQUENC...

Page 113: ...SLO INTEGRATION EXAMPLE USER MANUAL 105 SLO INTEGRATION EXAMPLE...

Page 114: ...sed inside the Scan Head through an optical scan system and F Theta scan lens to scan and focus the laser beam at the marking plane The radiation of the Arex 401 laser marker is therefore invisible to...

Page 115: ...use significant risk of irreversible damage to human eye and skin as well as risk of ignition and fire of flam mable materials even at long distances form laser radiation output aper ture WARNING Make...

Page 116: ...s range includes the visible light as wells a s near infrared The Arex 400 laser mark ers emit in the 1060nm range and thus can be focused by the eye lens at retina with serious risk of causing irreve...

Page 117: ...and divergence depends on the F theta scan lens specifications and thus varies with the different laser marker models While marking the laser radia tion is typically scattered at the object being mar...

Page 118: ...is such protective means respect applicable norms for the type of laser radiation WARNING Do not look to reflected laser beam Individual Protection Devices such goggles may only provide protection fo...

Page 119: ...ults have been done considering Directive 2006 25 CE on the minimum health and safety requirements regarding the exposure of workers to risks arising from physical agents artificial optical radiation...

Page 120: ...and EN208 norms both specify the damage threshold of the filter material used The EN207 standard is used for full attenuation these filters are used to completely block the wavelength for which they a...

Page 121: ...dge of the biological effects of radiation on the Eyes and Skin Understanding of the necessity for Individual Protection Devices I P D OTHER RISKS An additional risk may be represented by fire caused...

Page 122: ...ble click the Laser Editor icon to start the layout editor application Click on the document type selector and choose Layer NOTE This example considers that the laser marker is controlled in Key Selec...

Page 123: ...on in the Object toolbar to add a string object to the layer Edit String properties such as value font style etc using the Properties browser Objects toolbar it allows adding objects to the cur rent d...

Page 124: ...USING MARKING SOFTWARE 116 AREX 401 Edit Filling properties such as filling type interline etc using the Properties browser NOTE Consult Lighter software user s manual for a proper use of the same...

Page 125: ...he optical components of laser marker Verify that the position and geometry of the object to mark does not cause any reflection into the optical aperture of the laser marker F Theta scan lens Please c...

Page 126: ...USING MARKING SOFTWARE 118 AREX 401 In READY state adjust the Laser parameters using the Properties browser Press the Send Marking button in the Laser Toolbar...

Page 127: ...t in the device memory Click on the Show Laser Engine button to display Laser Engine window AUTO MANUAL Mode button allows switching between the two available working modes Auto mode the engraving ope...

Page 128: ...nt from the list and click on the To Auto Mode button The laser marker is ready to mark the document using external X1 11 START_MARK ING and X1 13 STOP_MARKING signals NOTE Consult Lighter software us...

Page 129: ...9 1 Wait for the operating system to restart 2 Check that the System Protection is disabled red icon 3 Close Lighter Laser Editor and Laser Engine right click on the icon in the tray bar and select QU...

Page 130: ...MARKING SOFTWARE UPGRADE 122 AREX 401 5 Press Next to continue 6 Press I Agree to continue 7 Check I accept the terms of the License Agreement and press Next to continue...

Page 131: ...SOFTWARE USER MANUAL 123 8 Choose the INTERACTIVE installation type and press Next to continue 9 Choose the components to install and press Next to continue 10 Do not change the destination folder and...

Page 132: ...ING SOFTWARE UPGRADE 124 AREX 401 11 Press OK to uninstall the old Lighter Suite version 12 Press Next to continue 13 Select the components of the old Lighter Suite version to remove and press Unin st...

Page 133: ...tinue 15 Lighter Suite will be installed Press Finish to complete the procedure 16 If Lighter Suite update includes any control board updates follow the procedure below otherwise jump to step 17 Proce...

Page 134: ...new setting Press YES to enable Sys tem Protection A message advise the User that the system will be rebooted Press NO to con tinue Shut down the system wait until the operating system shuts down blac...

Page 135: ...Y procedure should be used if the Operating System is corrupted or disks are corrupted HOW TO RECOVER THE LASER MARKER CAUTION All existing data in the laser marker will be overwritten All existing da...

Page 136: ...r Wait for Choose an operating system menu to appears Select Change defaults or choose other options using TAB key and then press ENTER key The Options screen will be shown Select Choose other options...

Page 137: ...R MARKER USER MANUAL 129 Select Troubleshoot using TAB key and then press ENTER key The Troubleshoot menu will be shown Select Advanced Options using TAB key and then press ENTER key The Advanced opti...

Page 138: ...RECOVER THE LASER MARKER 130 AREX 401 Select System Image Recovery using TAB key and then press ENTER key Enter the password dla and press CONTINUE...

Page 139: ...HOW TO RECOVER THE LASER MARKER USER MANUAL 131 Select Use the latest available system image recommended Press NEXT to continue Press NEXT to continue...

Page 140: ...RECOVER THE LASER MARKER 132 AREX 401 Press FINISH to continue Press YES to continue...

Page 141: ...HOW TO RECOVER THE LASER MARKER USER MANUAL 133 Wait for disks restoring The system will restart automatically...

Page 142: ...CONFIGURATION After the restart the system will perform the New Hardware Configuration pro cedure Wait for the end of the procedure The system will restart automatically CAUTION DO NOT turn OFF or UN...

Page 143: ...e provided with the laser marker Navigate to the folder Fileinz and report on the USB drive and copy customized laser inz to D DATA CONFIG NOTE In order to work the marking software must be customized...

Page 144: ...ect the right test layout files depending on the laser marker model and copy them to D DATA DOCS LAY OUTS Shut down the operating system Wait until the operating system is shutting down Turn OFF the l...

Page 145: ...USER MANUAL 137 APPENDIX G MECHANICAL DRAWINGS...

Page 146: ...MECHANICAL DRAWINGS 138 AREX 401 CONTROL RACK NOTE Please refer to Datalogic website for detailed drawings...

Page 147: ...SCAN HEAD USER MANUAL 139 SCAN HEAD NOTE Please refer to Datalogic website for detailed drawings...

Page 148: ...right no part of this documentation may be repro duced stored in or introduced into a retrieval system or transmitted in any form or by any means or for any purpose without the express written permiss...

Reviews: