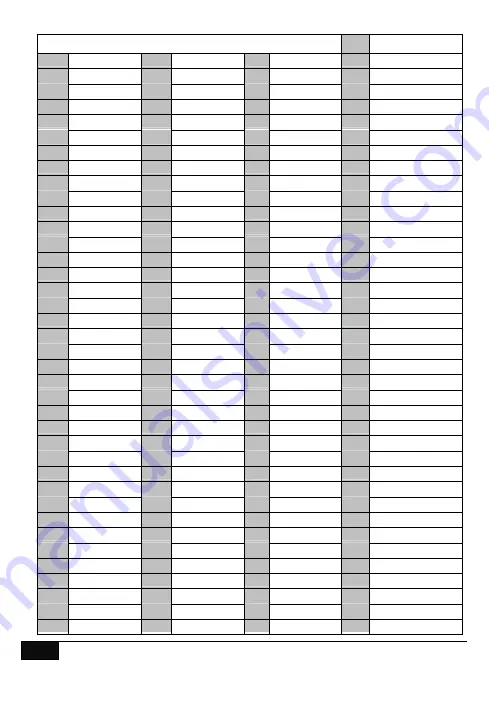
DAS HILLS VoiceNav Lite User Manual Download Page 32

31


                           Hills – VoiceNav Lite User Manual V1.1                         


  Word Library 

115     Remote 

1  

One 

39  

 Boat 

77  

 Gun 

116  

 Roof 

2  

Two 

40  

 Cabinet 

78  

 Hall 

117  

 Room 

3  

Three 

41     Car park 

79  

 Hallway 

118  

 Rumpus 

4  

Four 

42  


Ceiling 

80  

 Heat 

119  

 Safe 

5  

Five 

43  


Cellar 

81  

 Heating 

120  

 Security 

6  

Six 

44  


Child’s 

82  

 Hold-up 

121  

 Sensor 

7  

Seven 

45  


Alert 

83  

 Home 

122  

 Shed 

8  

Eight 

46  


Closet 

84  

 Home 

theatre  123  

 Shock 

9  

Nine 

47  


Computer 

85  

 Infrared 

124  

 Shop 

10  

Ten 

48  


Cool 

86  

 Inside 

125  

 Side 

11  

Eleven 

49  


Curtain 

87  

 Instant 

126  

 Skylight 

12  

Twelve 

50  


Data 

88  

 Interior 

127  

 Sliding 

13  

Thirteen 

51  


Den 

89     Key switch 

128  

 Small 

14  

Fourteen 

52  


Detector 

90  

 Keychain 

129  

 Smoke 

15  

Fifteen 

53  


Dining 

91  

 Kitchen 

130  

 South 

16  

Sixteen 

54  


Door 

92  

 Large 

131  

 Stairs 

17  

Seventeen 

55  


Downstairs 

93  

 Laundry 

132  

 Storage 

18  

Eighteen 


56  


Driveway 

94  

 Lift 

133  

 Study 

19  

Nineteen 

57  


Duress 

95  

 Light 

134  

 Temperature 

20  

Twenty 

58  


East 

96  

 Living 

135  

 Tennis 

21  

thirty 

59  


emergency 

97  

 location 

136  

 Toilet 

22  

forty 

60  


Exterior 

98  

 Master 

137  

 Training 

23  

Fifty 

61  


Family 

99  

 Medicine 

138     T V 

24  

Sixty 

62  


Fan 

100    Meeting 

139  

 Upstairs 

25  

Seventy 

63  


Fence 

101    Motion 

140  

 User 

26  

Eighty 

64  


Fire 

102    Night 

141  

 Utility 

27  

Ninety 

65  


Forced, 

arm  103    North 

142  

 Volt 

28  

Hundred 

66  


Foyer 

104    Nursery 

143  

 Veranda 

29  

Thousand 

67  


Freezer 

105    Office 

144  

 Wall 

30  

Air 

conditioner 68  


Front 

106    Output 

145  

 Warehouse 

31  

Area 

69  


Games 

107    Outside 

146  

 Water 

32  

Attic 

70  


Garage 

108    Panic 

147  

 West 

33  

Automatic 

71  


Gas 

109    Pantry 

148  

 Window 

34  

Auxiliary 

72  


Gate 

110    Partial 

149  

 Windows 

35  

Back 

73  


Glass 

111    Perimeter 

150  

 Wireless 

36  

Basement 

74 

   Glass break 

112    Pool 

151  

 Yard 

37  

Bathroom 

75  


Ground 

113    Rear 

152  

 Zone 

38  

Bedroom 

76  

 Guest 

114    Reception 

153  

 Gym 

Summary of Contents for HILLS VoiceNav Lite

Page 1: ...HILLS VOICENAV LITE User Manual...

Page 2: ...15 Perform a communicator test 16 Perform a battery test 16 Perform walk test 16 Configure set up a new PIN code for a specific user 17 Delete a PIN code from a specific user 18 Configure set up area...

Page 3: ...for the life of the security system If you do not understand any part of this manual you should ask your service provider for further clarification Read the entire manual and if possible practice on t...

Page 4: ...3 Hills VoiceNav Lite User Manual V1 1 This page is intentionally left blank...

Page 5: ...de that will arm disarm the security system whilst sending a special code to the central station indicating the user is entering leaving the premises under duress Only applicable on monitored systems...

Page 6: ...r Not all features are available with a self monitored system Stay Mode To turn your security system on when you are staying in the premises this will automatically bypass pre programmed zones and arm...

Page 7: ...ss the corresponding number on the keypad AWAY Press the corresponding key on the keypad ENTER Press the corresponding number on the keypad followed by enter key ENTER Press the corresponding number s...

Page 8: ...eady to arm Off Area is not ready to arm check zones Red Area is armed in the AWAY mode Green Area is disarmed and is ready to stay arm Off Area is not ready to stay arm check zones Yellow Area is arm...

Page 9: ...the Away Mode Step 1 Close all protected doors and windows ensure everyone has left the premises 2 1 Ensure the status light is lit green 3 AWAY Press Away OR Enter your user PIN code 4 Vacate the pre...

Page 10: ...Nav Lite a warning message reminding you to turn off your security system will be announced If your presence is not detected no warning message is announced 2 Enter your user PIN code to disarm from e...

Page 11: ...ation and setup of your security system From the moment you press the menu key the VoiceNav Lite s personal voice guide PVG will guide you through your chosen selection Menu 1 Zone bypass 2 Zone chime...

Page 12: ...ypassed zones are reset and cleared from memory when your security system is next armed disarmed Your security system must be disarmed turned off before being able to bypass zones After bypassing your...

Page 13: ...lexible chime mode feature The zones you have selected to be in the chime group are stored in memory and are not cleared when the security system is armed and disarmed Control chime mode Step 1 MENU 2...

Page 14: ...rming system faults and alarmed zones All events are time date stamped so ensure your clock is set correctly in menu 9 Alarm memory is a quick recall of the last zone s that caused your security syste...

Page 15: ...le to notify neighbours and other persons within the premises prior to activating this test 2 Communicator Test The Communicator is located within your security system The communicator if enabled is t...

Page 16: ...nectivity between your alarm devices IE movement sensors door contacts etc and your security system When in walk test mode your VoiceNav will emit the chime beep each time a zone is activated and chir...

Page 17: ...r your master PIN code 3 3 Selects battery test 4 MENU Moves back to system test menu step 3 5 MENU Moves back to main menu 6 MENU Exits main menu Perform walk test Step 1 MENU 4 Selects main menu Sys...

Page 18: ...ers determins which sections areas of the security system a user may have access to User Authority Authorisation levels determine the options available to each user user authorisation is where you wou...

Page 19: ...s back to main menu 8 MENU Exits main menu Configure set up area control for a specific user Step 1 MENU 5 Selects main menu User configuration 2 Enter your master PIN code 3 2 Selects configure user...

Page 20: ...le Reserved Arm disarm code Arm only Allowed to bypass zones Arm only after close window User code will send open close reports Master code authority Must be off Note The system must be disarmed befor...

Page 21: ...heard by the receiving party and the call can be terminated ended by pressing and holding the star key on the receiving phone Caution should be used when selecting self monitoring as it does not offe...

Page 22: ...llowed by enter to accept 5 MENU Moves back to phone number configuration menu step 3 6 MENU Moves back to main menu 7 MENU Exits main menu Delete alarm phone numbers Step 1 MENU 6 Selects main menu P...

Page 23: ...ter to accept 5 MENU Moves back to phone number configuration menu step 3 6 MENU Moves back to main menu 7 MENU Exits main menu Enter SMS phone numbers Step 1 MENU 6 Selects main menu Phone number con...

Page 24: ...utter control or even garage door control As additional equipment is required to enable these features please contact your service provider for further details Control connected outputs Step 1 MENU 7...

Page 25: ...in menu Voice message recording 2 Enter your master PIN code 3 4 Zone name 5 Area name 6 Output name 4 ENTER Select which Zone Area or Output number is to be configured 5 ENTER Select library word 1 E...

Page 26: ...djust volume levels Adjust backlight levels Select different voice options Reset detectors that have latched in alarm Note Some detection devices such as smoke detectors shock sensors and some glass b...

Page 27: ...e date 5 ENTER Select the hours value from 1 12 6 ENTER Select the minutes time from 1 59 7 1 Select AM time 2 Select PM time 8 2 1 To configure the time 2 To configure the date 9 ENTER Select the day...

Page 28: ...ep 4 7 MENU Moves back to basic system configuration menu step 2 8 MENU Moves back to main menu 9 MENU Exits main menu Adjust area exit time Step 1 MENU 9 Selects main menu Basic system configuration...

Page 29: ...xits main menu Display run mode Controls the light intensity of the away stay status fire power icons and all zones numbers during the run mode Display idle mode Controls the light intensity of the aw...

Page 30: ...ng this feature off shortens the descriptions of the main menu 2 Time Annunciation Turning this feature on forces annunciation of the time and date during exit and entry delays Turning this feature of...

Page 31: ...tep 1 MENU 9 Selects main menu Basic system configuration 2 0 Selects volume level 3 Enter your master PIN code 4 Select required volume level from 1 8 5 MENU Moves back to basic system configuration...

Page 32: ...93 Laundry 132 Storage 18 Eighteen 56 Driveway 94 Lift 133 Study 19 Nineteen 57 Duress 95 Light 134 Temperature 20 Twenty 58 East 96 Living 135 Tennis 21 thirty 59 emergency 97 location 136 Toilet 22...

Page 33: ...rogrammed phone number 1 Programmed phone number 2 Programmed phone number 3 Zone List Entry Exit Stay Zone 24 Hour Zone 1 2 3 4 5 6 7 8 9 10 11 12 13 14 15 16 Service provider Phone Monitoring statio...

Page 34: ...www das com au...

Reviews: