User’s Manual
Portable Data Terminal
Model: M1000
SHIN CHUAN COMPUTER CO., LTD.
6F-2, 268, LianCheng Rd., ZhongHe Dist, New Taipei City 23553,
Taiwan(R.O.C)
TEL:886-2-82278801. FAX:886-2-82278832.
http://www.sccltd.com.tw
NOV/07/2011 Ver:0.2
Page 1: ...Portable Data Terminal Model M1000 SHIN CHUAN COMPUTER CO LTD 6F 2 268 LianCheng Rd ZhongHe Dist New Taipei City 23553 Taiwan R O C TEL 886 2 82278801 FAX 886 2 82278832 http www sccltd com tw NOV 07...
Page 2: ...ferred to are the Servicemark Trademark or Registered Trademark of the respective manufacturers Information in this document is subject to change without notice No part of this document may be reprodu...
Page 3: ...hapter 2 Getting Started 2 1 2 1 Check the package 2 1 2 2 General View of the PDT 2 2 2 2 1 M1000 general view 2 2 2 3 Charging the Battery Pack 2 4 2 3 1 Installing the battery pack 2 4 2 3 2 Chargi...
Page 4: ...1 3 2 2 Backup Restore 3 18 3 2 3 Bluetooth Device Properties 3 20 3 2 4 Certificates 3 24 3 2 5 Date Time 3 26 3 2 6 Device Information 3 27 3 2 7 Dialing Properties 3 27 3 2 8 Display Properties 3 2...
Page 5: ...ft ActiveSync on the Host PC 4 1 4 1 2 Connecting Device to Host PC 4 1 4 2 Using ActiveSync 4 1 4 2 1 Setting up a Partnership 4 1 4 2 2 ActiveSync File Synchronization 4 2 4 3 Networking 4 3 Chapter...
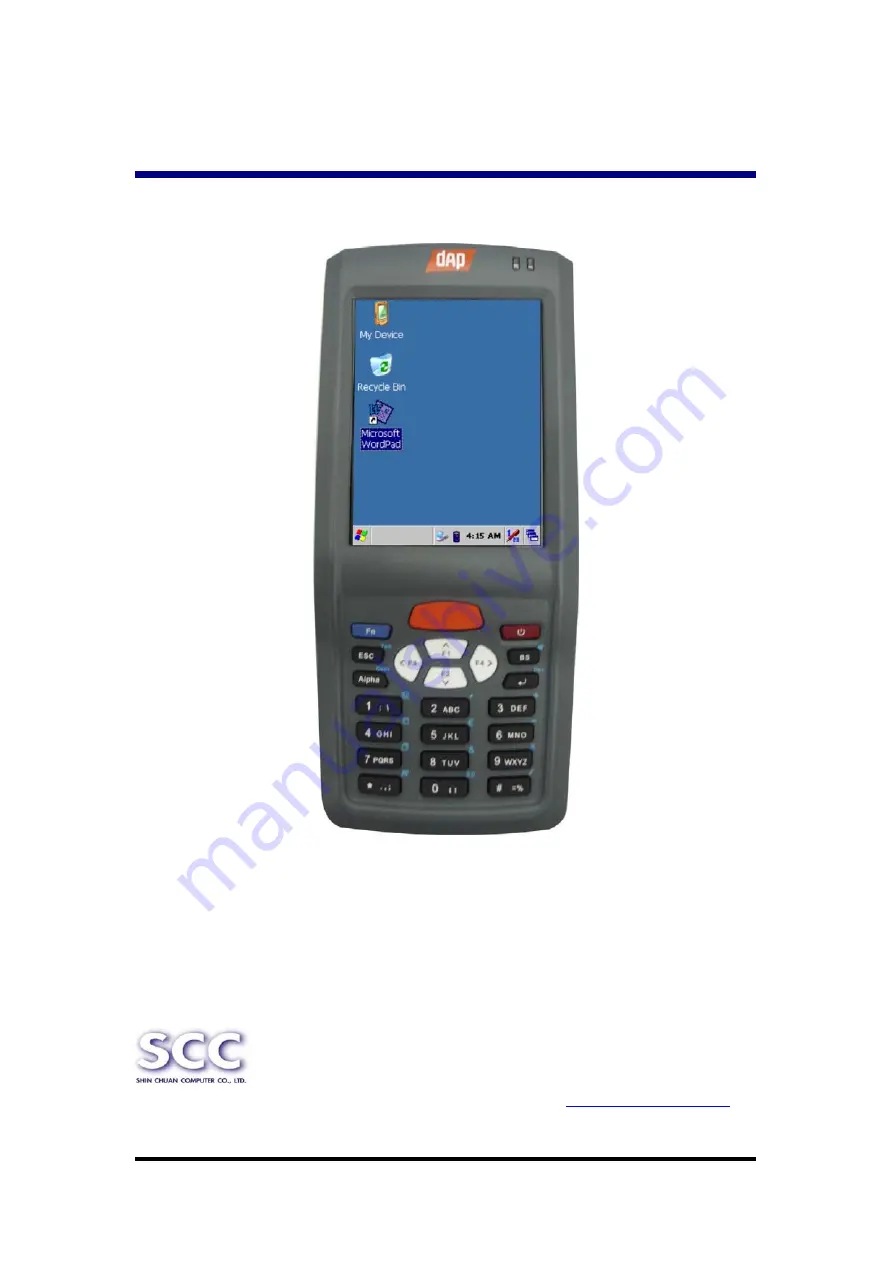
Page 6: ...T Display with Touch Panel One Numeric Alpha Keyboards with LED backlight WLAN 802 11a b g Radio Support Bluetooth V2 0 EDR Class II Support Integrated 1D Barcode Scanner or 2D Imager Scanner 1 1 Abou...
Page 7: ...the Device z Use only the original approved AC Adapter with the Device Use of an unapproved AC Adapter could result in electrical problems or even cause a fire or electrical shock to the user z Do no...
Page 8: ...expose it to strong impacts shocks or excessive force z Do not solder onto the battery pack z Do not expose battery pack to liquid or allow the battery contacts to get wet z Do not disassemble or modi...
Page 9: ...io equipment to be used in the 1 GHz to 40 GHz frequency range Part 2 Harmonized EN covering the essential requirements of article 3 2 of the R TTE Directive EN 300 328 V1 7 1 2006 Electromagnetic com...
Page 10: ...ure to radio frequency fields from handheld and bodymounted wireless communication devices Human models instrumentation and procedures Part 2 Procedure to determine the specific absorption rate SAR fo...
Page 11: ...ele asjakohastele s tetele English Hereby name of manufacturer declares that this type of equipment is in compliance with the essential requirements and other relevant provisions of Directive 1999 5 E...
Page 12: ...pozosta ymi stosownymi postanowieniami Dyrektywy 1999 5 EC Portugu s Portuguese Nome do fabricante declara que este tipo de equipamento est conforme com os requisitos essenciais e outras disposi es da...
Page 13: ...antee that interference will not occur in a particular installation If this equipment does cause harmful interference to radio or television reception which can be determined by turning the equipment...
Page 14: ...nt in the assembly and must provide at least 1 5 cm separation distance between the device and the user s body Caution SCC declares that M1000 FCC ID TQ2 SC900PDT BWG is limited in CH1 CH11 for 2 4GHz...
Page 15: ...1 8 Product Labeling The Device has several labels as shown in Figure 1 1 to 1 2 A M1000 Figure 1 1 Product Labeling Front side view Label nr Description 1 LCD panel protection film Table 1 1 Front l...
Page 16: ...oduct Labeling Back side view Label nr Description 2 Laser radiation warning label 3 System and regulatory label 4 Serial Configuration number 5 Warranty seal 6 Windows CE NET label 7 FCC Statement Ta...
Page 17: ...Dual Color LED for Charger Indicator One Dual Color LED for Scanner Bluetooth and WLAN Indicator Radio Support Wireless LAN 802 11a b g Bluetooth V2 0 EDR Class II Scan Engine Opticon Laser 1D Engine...
Page 18: ...1 10 Environment Standard Table 1 4 Environment Standards Operating Temperature 14o F 122o F 10o C 50o C Storage Temperature 4o F 158o F 20o C 60o C Humidity 5 95 non condensing Drop 4ft 1 2m Drop on...
Page 19: ...ckage Open the package and check all the parts are inside without shortage and damage A M1000 Figure 2 1 Inside the package 1 M1000 Terminal 2 Hand Strip 3 Stylus Cord 4 Standard Battery Pack 3 7VDC 1...
Page 20: ...2 2 122 2 2 General View of the PDT 2 2 1 M1000 general view Figure 2 2 M1000 front side view Figure 2 3 M1000 back side view...
Page 21: ...eys hot keys of application program defined by end user 8 Navigation key Navigation keys for left right up and down directions 9 Alpha Numeric keys Numeric keys Change to Alpha keys after pressing Alp...
Page 22: ...3 1 Installing the battery pack 1 Turn the locking latches right and left downwards and lift the battery cover away from the Device Figure 2 4 Detach the battery cover from Device 2 Insert the batter...
Page 23: ...rst time to charge the battery pack needs approximately 6 hours Subsequent charging time needs approximately 3 hours When charging the battery pack the charge LED indicator on the Device turns on Red...
Page 24: ...if you want to change the main Battery pack 2 4 Handling the Device 2 4 1 Starting the Device Press the Power key to turn on off the Device If the Device does not power on perform a cold boot See 2 7...
Page 25: ...g applications remain as you left them until you press the Power key again to resume operation of the Device 2 4 3 Calibration of the touch Screen On the initial boot up of the Device the stylus calib...
Page 26: ...Navigate the display select menu item and open optional applications 2 Tap the characters on soft keyboard panel 3 Hold the stylus on the screen and drag across the screen to select the list of multip...
Page 27: ...er Right Brightness Function change Escape Tab Change to letters Caps Change to cap letters Backspace Mute Backspace Enter Del Delete Enter 1 at 2 Quotation Marks A B C 3 Plus Sign D E F 4 Paste G H I...
Page 28: ...wo seconds Up Move the cursor up one row or line The cursor will move continuously if button is pressed continuously Application key 1 User can define F1 function from setting Down Move the cursor dow...
Page 29: ...the numeric and alpha modes Numeric mode is when you type numbers with number keys Alpha mode is when you type letters with the number keys 2 When you press key it appears Alpha icon at the Task bar...
Page 30: ...Function by Fn Main Function The Fn key is used in combination with other keys to type special characters and perform system functions Table 2 5 Special Function key define Key Sequence Fn Main Functi...
Page 31: ...sing key first and then pressing key each time Audio Mute 1 Toggle the audio mute on 2 You must press key then press key to enable audio mute or turn on audio function each time Caps Toggle the Caps f...
Page 32: ...unction by pressing key first and then pressing key each time Minus Sign Enter a minus sign by pressing key then pressing key Copy 1 Copy action 2 You must press key then press key to do Copy action e...
Page 33: ...ns Alpha mode is disabled if there isn t Alpha icon at Task bar The keypad stays in the alpha mode until you press key again For an example to type cap1 word press wait 1 seconds 3 If you want to type...
Page 34: ...nter Press the Keys To enter Press the Keys a A b B c C d D e E f F g G h H i I j J k K l L m M n N o O p P q Q r R s S t T u U v V w W x X y Y z Z Note The key is not needed to key in if the characte...
Page 35: ...arrow to increase the value select the down arrow to decrease the value or you can type a new value in the field 3 Select the month to open a pull down list of months or press the arrow buttons to ei...
Page 36: ...ng the stylus across the desired text double tapping to select one word and triple rapping to select an entire line paragraph Refer to 2 5 Navigating the Display starting z Use the soft input panel di...
Page 37: ...ummit radio module Using SCU an end user can z Disable the radio turn it off and enable the radio turn it on z View the contents of configuration profiles or profiles each of which houses the RF secur...
Page 38: ...enables it z Active Profile You can view the name of the active profile and using the selection list select a different profile z Status Indicates the radio s status z Radio Type Indicates the type o...
Page 39: ...are saved to the profile only when the Commit button is pressed Unless it is modified the Default profile does not specify an SSID EAP type or method of encryption If the Default profile is the activ...
Page 40: ...you to define authentication credentials for that EAP type When you as an administrator select an encryption type that requires the definition of WEP keys or a pre shared key the PSKs WEP Keys button...
Page 41: ...nized Disabled Not Associated Associated or EAP type Authenticated z Client info Name IP address and MAC address z AP info Name IP address MAC address beacon period and DTIM interval z Connection info...
Page 42: ...until you tap the Stop Ping button move to an SCU window other than Diags or Status exit SCU or remove the radio z Diagnostics Attempt to re connect to an AP and provide a more thorough dump of data...
Page 43: ...1 Decrease the scanning distance to the bar code when scanning small barcodes 2 Increase the scanning distance from the bar code when scanning large barcodes 3 The scanning area is visible by a red l...
Page 44: ...to a suspend mode when it is idle for a period of time The idle duration can be customized using the Power control panel refer to Figure Schemes Tab Suspend mode works and looks just like you have tur...
Page 45: ...the Device z Press Power key to suspend or resume wake up When a battery pack completely discharges while the unit is in suspend mode the Device remains suspended until discharged battery condition is...
Page 46: ...T OS lock up or Warm Reset still can t work 2 To perform Cold Reset press Power Fn Enter buttons simultaneously 3 Device will initiate boot up after Cold Reset CAUTION Only use the Warm Reset Try warm...
Page 47: ...iew the Control Panel and settings you can modify by tapping Start Settings Control Panel Figure 3 1 Control Panel 3 2 1 BarCode Controls CAUTION Please do not enter into any Barcode Application Progr...
Page 48: ...zer Power Default set to Enable Vibration Default set to Disable To Select Vibration type Disable Short 2 Times Long Select a method based upon the barcode scanning application you will use Key Emulat...
Page 49: ...er showing barcode do not action Enter After showing the barcode jump to next row Space After showing the barcode jump one unit Terminal Char Tab After showing the barcode jump a section Code ID Defau...
Page 50: ...all retail products in the USA and Canada UPC 5 Universal product code seen on almost all retail products in the USA and Canada EAN European Article Numbering system The international standard bar co...
Page 51: ...d in USA Plessey Older code commonly used for retail shelf marking Telepen A variable length symbology with an optional check digit and non printable start stop characters UK Plessey A variable length...
Page 52: ...gs Description Field Name Description Barcode To select a type of barcode you wish to set Transmit Leading Zero After showing the barcode jump to next row Transmit Check Digit Whether send check digit...
Page 53: ...mit Check Digit Whether send check digit by barcode 3 2 1 4 2 UPC E Figure 3 7 UPC E Table 3 6 Settings Description Field Name Description Barcode To select a type of barcode you wish to set Transmit...
Page 54: ...heck Digit Whether send check digit by barcode EAN 8 Transmit Check Digit Whether send check digit by barcode Enable ISBN Translation Enable ISSN Translation EAN 13 label is verified for the correct f...
Page 55: ...Field Name Description Barcode To select a type of barcode you wish to set Normal Code 39 The decoded data characters are transmitted without further translation Transmit Check Digit Whether send chec...
Page 56: ...ransmit Check Digit Whether send check digit by barcode 3 2 1 4 6 Code 2 of 5 S Code Figure 3 11 Code 2 of 5 S Code Table 3 10 Settings Description Field Name Description Barcode To select a type of b...
Page 57: ...igure 3 12 IATA Table 3 11 Settings Description Field Name Description Barcode To select a type of barcode you wish to set Transmit Check Digit Whether send check digit by barcode 3 2 1 4 8 MSI Plesse...
Page 58: ...h to set Check MOD 10 The character position CD2 is not transmitted Transmit Check Digit 1 Whether send check digit by barcode 3 2 1 4 9 Telepen Figure 3 14 Telepen Table 3 13 Settings Description Fie...
Page 59: ...Figure 3 15 UK Plessey Table 3 14 Settings Description Field Name Description Barcode To select a type of barcode you wish to set Transmit Check Digits Whether send check digit by barcode 3 2 1 4 11...
Page 60: ...to set EAN 128 Only The decoded data characters are translated to the EAN 128 format Enable Concatenation 3 2 1 4 12 Code 93 Figure 3 17 Code 93 Table 3 16 Settings Description Field Name Description...
Page 61: ...ettings Description Field Name Description Barcode To select a type of barcode you wish to set Check 1 Check Digit The check digits are not transmitted Check 2 Check Digits The check digits are not tr...
Page 62: ...o set Transmit Dash The dash character hex 2D is Transmitted 3 2 1 4 15 RSS Figure 3 20 RSS Table 3 19 Settings Description Field Name Description Barcode To select a type of barcode you wish to set T...
Page 63: ...on Description Factory Default To set all Barcode parameters to factory default Firmware Version To get firmware version from Barcode engine 3 2 1 6 Barcode Setup A Tap X on top right site to reset al...
Page 64: ...in FlashDisk first And if you select other storage it will check again 3 Then if it has the file appeared its date behind Last backup date if not disable Restore Now Button 4 When you press the Backup...
Page 65: ...3 19 122 Figure 3 26 Backup OK Figure 3 27 Restore Start Figure 3 28 Restore OK Warm Boot Now Figure 3 29 Restore Settings after Cold Boot...
Page 66: ...e Bluetooth Icons 9 Double tap the device to connect to on the device list The Bluetooth Manager Authentication window appears Tap No to connect to the device without authentication or tap Yes to auth...
Page 67: ...the devices you had trusted or active Select the device that you want to map a virtual com and which virtual com you want to use see Figure 3 38 9 Now COM6 has mapped for BT device see Figure 3 40 Fi...
Page 68: ...3 22 122 Figure 3 34 Bluetooth Error Windows Figure 3 35 Bluetooth Authenticate Windows Figure 3 36 Bluetooth Enter PIN Windows Figure 3 37 Bluetooth Manager Windows...
Page 69: ...er COM Success Figure 3 40 Bluetooth Register COM6 Figure 3 41 Bluetooth File Sync Note If the device to which the mobile computer is bonding does not appear in the list ensure it is turned on in disc...
Page 70: ...tablishing trust and for secure communications Certificates are signed and issued by certificate authorities and are valid for a prescribed period of time Windows CE manages multiple certificate store...
Page 71: ...ure 3 45 9 To view more details of the selected certificate such as the expanded name or expiration date choose View Figure 3 46 9 To delete the selected certificate from the store choose Remove Figur...
Page 72: ...e 3 47 Certificates Help 3 2 5 Date Time Table 3 25 Date Time ICON ITEM FUNCTION z Date Time Tab Figure 3 48 9 Please see the detail information of Chapter 2 5 1 Setting Time and Date Figure 3 48 Date...
Page 73: ...here you want to change settings Figure 3 52 9 To create a new location select New Enter the name of the location and then select OK Figure 3 53 9 Enter or edit the area code and local country code as...
Page 74: ...g Hyphens and spaces in dialing strings are ignored Some modems may not respond to the following characters even though your device lets you add them to the dial string Figure 3 51 Dialing Properties...
Page 75: ...ground z Appearance Tab Figure 3 60 9 Change the color scheme Figure 3 61 From the Scheme list select a scheme View your choice in the preview box If you like the scheme select Apply 9 Create a custom...
Page 76: ...3 30 122 Figure 3 57 Display Properties Figure 3 58 Display Properties Figure 3 59 Display Properties Figure 3 60 Display Properties...
Page 77: ...ge 9 To change the Soft Keyboard Options tap Option Figure 3 63 z Options Tab Figure 3 64 9 Change the soft keyboard options as desired selecting from Large or small keys Using gestures for space blac...
Page 78: ...Clear the History z Connection Tab Figure 3 66 9 Modify the network access setting as desired z Security Tab Figure 3 67 Figure 3 68 9 Modify the security settings as desired You can enable any of th...
Page 79: ...9 Modify the popups settings as desired You can enable any of the following by tapping the checkbox Figure 3 65 Internet Settings General Figure 3 66 Internet Settings Connection Figure 3 67 Internet...
Page 80: ...3 34 122 Figure 3 69 Internet Settings privacy Figure 3 70 Internet Settings Figure 3 71 Internet Settings Advanced Figure 3 72 Internet Settings Popups...
Page 81: ...r 9 Test your new setting 9 Tap OK to exit the Keyboard Tab Figure 3 73 Keyboard Properties Figure 3 74 Keyboard Properties 3 2 12 Network and Dial up Connections Table 3 31 Network and Dial up Connec...
Page 82: ...he telephone number Select the Finish button The connection you just created appears as an icon in the Network and Dial up Connections folder 9 Set up a point to Point Protocol PPP account with an ISP...
Page 83: ...the connection To modify select the icon and select the icon and select Advanced Settings from the menu Figure 3 75 Network and Dial up Connections Figure 3 76 Network and Dial up Connections Figure 3...
Page 84: ...3 38 122 Figure 3 79 Network and Dial up Connections Figure 3 80 Network and Dial up Connections Figure 3 81 Network and Dial up Connections Figure 3 82 Network and Dial up Connections...
Page 85: ...3 39 122 Figure 3 83 Network and Dial up Connections Figure 3 84 Network and Dial up Connections Figure 3 85 Network and Dial up Connections Figure 3 86 Network and Dial up Connections...
Page 86: ...select Display Owner Identification at Power On 9 To set up identification for remote networks see Setting up identification for remote networks z Notes Tab Figure 3 88 9 Enter the Notes you use to t...
Page 87: ...3 91 9 Enter the password 9 In the Confirm password box enter the password again 9 To require the password on startup select Enable password protection at power on and or select Enable password protec...
Page 88: ...p computer Figure 3 92 9 Tap the Change Connection button to modify the connection method from USB 9 To exit the Change Connection dialog press OK from the control bar or press the Enter key on the ke...
Page 89: ...d bar or press Enter key on keypad z Schemes Tab Figure 3 95 9 The Scheme Tab allows you to determine the time to switch state to Suspend mode when using either Battery Power or AC Power 9 Select Batt...
Page 90: ...3 44 122 Figure 3 94 Power Figure 3 95 Power Figure 3 96 Power Figure 3 97 Power...
Page 91: ...n Tab Figure 3 100 9 Select the desired location language 9 Review the Appearance samples in the bottom half of the screen 9 Select the Tab at the top for any settings you wish to change Options to mo...
Page 92: ...3 46 122 Figure 3 102 Regional Settings Figure 3 103 Regional Settings Figure 3 104 Regional Settings Figure 3 105 Regional Settings...
Page 93: ...3 107 Remove Programs 3 2 19 Storage Manager Table 3 38 Storage Manager ICON ITEM FUNCTION z Storage Manager Tab Figure 3 108 9 To change Storage properties control panel default settings Insert Micro...
Page 94: ...ol bar or press the Enter key on the keypad Caution Dismounting or formatting the Flash Disk will erase all files and program stored in Flash Memory Figure 3 108 Storage Manager Figure 3 109 Storage M...
Page 95: ...nction is OK if the figures are changed from Figure 3 84 to Figure 3 85 9 To tap OK to exit the Stylus Properties z Calibration Figure 3 114 Figure 3 115 9 In the Welcome Wizard you tapped a target wi...
Page 96: ...storage memory is normally is normally set to about 8MB with the reminder assigned to Program memory 9 Press the OK key on the Keypad Note the difference is occupied by OS between the RAM size in Info...
Page 97: ...e3 119 9 Refer to this tab for specific copyright data As a user you are responsible to read this statement Figure 3 116 System Properties Figure 3 117 System Properties Figure 3 118 System Properties...
Page 98: ...on please warm boot device to affect USB function Figure 3 120 USB Function Driver Figure 3 121 USB Function Driver 3 2 23 Volume Sounds Properties Table 3 42 Volume Sound ICON ITEM FUNCTION z Volume...
Page 99: ...und Figure 3 123 Volume Sound 3 3 Tap Start The Device has some new functions at Start menu Refer to this section for use 3 3 1 Security Tap Start Security to use Security Functions Figure 3 124 Start...
Page 100: ...122 Figure 3 126 Security User mode Figure 3 127 Security Application disabled 3 3 2 Bluetooth Tap Start Programs Bluetooth to use Bluetooth Functions Figure 3 128 Bluetooth Figure 3 129 Bluetooth Man...
Page 101: ...1 Bluetooth Devices 3 3 3 Boot Manager Table 3 43 Boot Manager ICON ITEM FUNCTION z Boot Manager Tab Figure 3 132 9 You can Enable Disable Bluetooth or Wi Fi power after Cold Boot Warm Boot or Suspend...
Page 102: ...high Amounts 11 steps 0 10 20 30 40 50 60 70 80 90 100 LCD Brightness Timeout Figure 3 135 The table has Never 10 seconds 20 seconds 30 seconds 40 seconds 1 minute 3 minutes 5 minutes and 10 minutes K...
Page 103: ...Keypad Backlight Setting 3 3 5 Device Power Table 3 45 Device Power ICON ITEM FUNCTION z Device Power Tab Figure 3 137 9 You can Enable Disable Bluetooth or Wi Fi power Figure 3 137 Device Power Figu...
Page 104: ...ice Power F4 Backlight 9 To assign your favorite application program to Hot Keys 9 Choose one of Hot Keys from pull down list Figure 3 139 9 To tap Browse inside Assign program applet Figure 3 140 9 S...
Page 105: ...al Tab Figure 3 144 9 In this tab You can change the position of the Taskbar and Start menu Is always on top or not Auto hide or not Show Clock or not z Advanced Tab Figure 3 145 Taskbar and Start Men...
Page 106: ...3 60 122 Figure 3 143 Taskbar and Start Menu Figure 3 144 Taskbar and Start Menu General Figure 3 145 Taskbar and Start Menu Advanced Figure 3 146 Taskbar and Start Menu Expand Control Panel...
Page 107: ...u can use a Micro USB cable to connect the Device directly or by a cradle to Host PC To use the dock you must first insert the Device into the slot making sure that the unit is firmly seated the dock...
Page 108: ...older 4 2 2 ActiveSync File Synchronization ActiveSync files synchronization requires an ActiveSync partnership between the Device and the Host PC Refer to Setting up a Partnership above 9 Select the...
Page 109: ...2 4 3 Networking Please see the 3 2 13 Owner Table 3 31 Owner on page 3 61 for setting up the network ID And see the 2 5 6 Setting Up Wireless LAN RF to setup the 802 11a b g Wireless LAN for RF conne...
Page 110: ...ect to an Internet server provider ISP or network 5 2 1 1 Connect to the Internet Before you can view Web pages you must set up a remote connection to your ISP or network 5 2 1 2 Start Internet Explor...
Page 111: ...ect Access the Internet using a proxy server 9 Enter the proxy server address and port For more information see your administrator 9 To bypass the proxy server for local address such as corporate intr...
Page 112: ...ge select View Go Home 5 2 1 11 Refresh current page 9 Select View Refresh 5 2 1 12 Stop loading a page 9 Select View Stop 5 2 1 13 View current page 9 Select View Internet Options 9 To view the proto...
Page 113: ...sired size 5 2 2 Microsoft WordPad You can create and edit documents and templates in WordPad using buttons and menu commands that are similar to those used in the desktop version of Microsoft Word Yo...
Page 114: ...Move copy or delete text Select the text you want to move copy or delete To move or delete text select the Cut button To copy the text select the Copy button To paste the information move the insertio...
Page 115: ...the Bold Italic or Underline button To change the color select Format Font and select the color you want from the Color list 9 Adjust the paragraph alignment Select the paragraph you want to align Se...
Page 116: ...toolbar 5 2 2 5 Inserting Symbols 9 Place the insertion point where you want to insert the symbol 9 Select Tools Insert Symbols 9 Select the symbol you want and then select Insert Tips If you select...
Page 117: ...on your device see the following topics 9 Changes caused by Word document conversion Formatting z Borders and Shading Borders and shading are not displayed in WordPad but are restored when converted...
Page 118: ...n you convert the WordPad file back to a WordPad document OLE Objects OLE Objects are removed during conversion Revisions marks annotations and comments Revision marks are visible but cannot be change...
Page 119: ...ecute any running processes and Remote Connection can later reconnect to this same session if your administrator has configured Remote Connection to reconnect to disconnected sessions 5 2 3 3 Disconne...
Page 120: ...4 2 Viewing Files as Icons Lists 9 To view icons select View Large Icons or Small Icons 9 To view a list select View Details 5 2 4 3 Working with Files and Folders 9 Create a new folder If necessary...
Page 121: ...can be stored into the Flash Memory Note The FlashDisk storage memory persists all reset warm cold reboot conditions and software firmware updates We strongly recommends installing all applications a...
Page 122: ...the FlashDisk will vary depending on the size of system firmware 9 Inside the FlashDisk directory tap File Properties 9 The FlashDisk Properties dialog The number following Free is the amount of memor...