


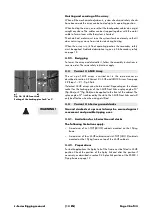


4.4.3. J8/J12 ground stack assembly
The hole grid [2.2] (Ground stack) at the Flying frame (Fig. 37) allows
the first J-TOP cabinet to be set to an fixed vertical aiming of –3°, 0° or
+3°.
1. Place the Flying frame on the ground with the hole grid of the center
bar facing upwards.
2. Remove the additional Front links [1.7] and the respective Locking
pins from the park position at the frame.
3. Attach the Front links at the top of the front tracks of the frame and
fix them with the Locking pins. Observe the direction of attachment -
Fig. 38a/b.
4. Remove the additional Locking pins [1.5] from the park position at
the frame. These Locking pins will be used in a later step to fix the
Splay link of the lowest J-TOP cabinet to the frame.
5. With one person at each side of it attach the first cabinet to the
Flying frame inserting the additional Front links of the frame into the
rigging tracks at the front of the cabinet and connecting them using
the second Locking pins - Fig. 39a/b.
6. Remove the wheel board.
7. Fold out and insert the Splay link of the cabinet into the track of the
center bar of the frame and fix it to the frame using one of the
additional Locking pins. In this case the hole (drill) of the cabinet's
Splay link is used. It supports the cabinet and defines the angle
setting in the hole grid of the frame (–3°, 0° or +3°) - Fig. 39c.
8. The second pin is not needed and should be stored in a hole of the
center grid of the frame.
9. Prepare the Front links of the cabinet to allow the next cabinet to be
attached.
10. Preset the splay angle (0° ... 6°) to the cabinet above at the rear
rigging strand by inserting one Locking pin to the respective hole.
J-Series Rigging manual
(1.3 EN)
Page 27 of 34
Fig. 37: Hole grid [2.2]
a)
b)
Fig. 38: J8/J12 Ground stack
Preparation of the Flying frame
a)
b)
c) Hole grid Ground stack
Fig. 39: J8/J12 Ground stack
Assembly of the first cabinet at the Flying
frame
Summary of Contents for J Series
Page 1: ...J Series Rigging manual 1 3 EN...
Page 33: ......


