background image


Linea Lite GigE Series Camera 

Camera Performance and Features  

  63 

Camera Firmware Updates 

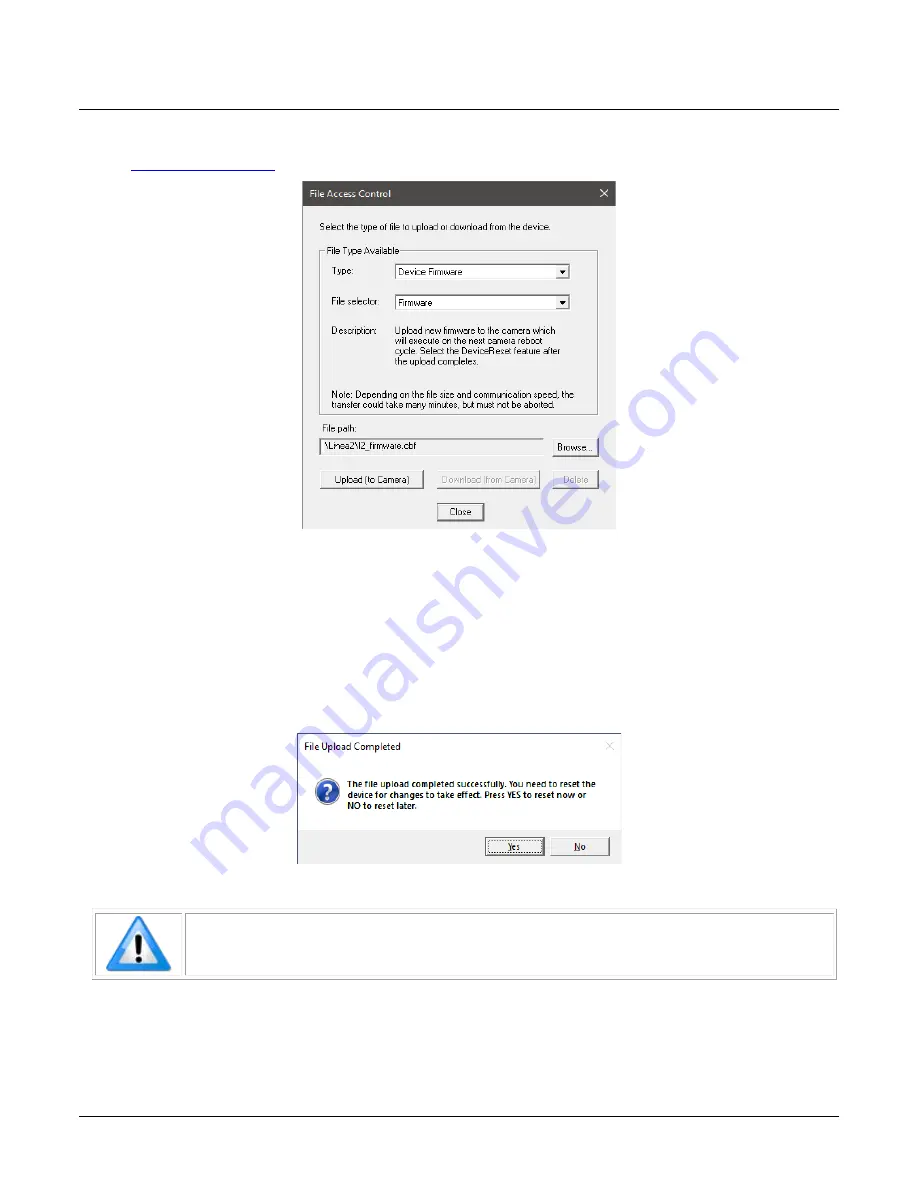
In the 

File Access Control

 category, click Setting to open File Access Control dialog. 


Figure 54: CamExpert – File Access Control Dialog 


Type: select the file type to upload to the camera.  


File selector: select Device Firmware. 


Click Browse… to open Windows Explorer.  


Select the specific file to Upload. 


Click Upload (to Camera) to execute the file transfer to the camera. 

When firmware is successfully updated the camera must be reset to effect the change; CamExpert 

displays a dialog indicating that the upload was successful and prompts to reset the camera. 


Figure 55: CamExpert – File Upload  Completed Message Box 


Note: User sets cannot be uploaded while the camera is acquiring images. The 

camera must be reset for changes to take effect. 


Sapera LT includes a Camera Firmware Update example that demonstrates how to perform a 

firmware update within an application. 

Summary of Contents for Linea Lite GigE Series

Page 1: ...Linea Lite GigE Camera User s Manual 2k 4k Monochrome Color CMOS Line Scan sensors cameras frame grabbers processors software vision solutions P N 03 032 20294 05 www teledynedalsa com...

Page 2: ...ited States and other countries Windows 7 8 and 10 are trademarks of Microsoft Corporation All other trademarks or intellectual property mentioned herein belong to their respective owners Document dat...

Page 3: ...Ethernet to Fiber Optic Interface Requirements 18 GIGE NETWORK ADAPTER OVERVIEW 19 Optimizing the Network Adapter used with Linea Lite 19 Power over Ethernet PoE Support 20 GIGE VISION SAPERA APPLICAT...

Page 4: ...T 66 USER DEFINED CAMERA NAME 68 SAVING RESTORING CAMERA SETUP CONFIGURATIONS 69 Active Settings for Current Operation 69 Camera Configuration Selection Dialog 69 OPERATIONAL REFERENCE 70 Feature Desc...

Page 5: ...escriptions 130 File Access via the CamExpert Tool 131 DEVICE STREAMING REGISTERS 132 Start End Command Requirements 132 IMPLEMENTING TRIGGER TO IMAGE RELIABILITY 133 OVERVIEW 133 T2IR with Linea Lite...

Page 6: ...ing Against Dust Oil and Scratches 159 Cleaning the Sensor Window 160 RUGGEDIZED RJ45 ETHERNET CABLES 161 TROUBLESHOOTING 162 OVERVIEW 162 Problem Type Summary 162 Verifying Network Parameters 164 INS...

Page 7: ...ransfers images between the camera to the host PC Figure 1 Linea Lite GigE Series GigE with TurboDrive Linea Lite cameras include TurboDrive technology delivering high speed data transfers exceeding t...

Page 8: ...software libraries Support for end of frame Metadata Digital horizontal and vertical binning for increased sensitivity 1 s internal timer or external events can timestamp images Provides 4 User Setti...

Page 9: ...meras accessories Optical filters are available from https midopt com Teledyne DALSA Software Platform Sapera LT version 8 50 or higher Sapera LT is a free image acquisition and control software devel...

Page 10: ...on independent with event generation Timestamp 1 s internal timer Test Image Internal generator with choice of static patterns Multicast Programming support for multicasting images requires Multicast...

Page 11: ...ports Power Over Ethernet standard PoE Class 2 as per IEEE 802 3af Power Dissipation 5 W Operating Temperature 0 to 60 C at front plate Relative Humidity 5 to 90 non condensing operating Output Data C...

Page 12: ...5 s to 2500 s Internal Trigger to Start of Exposure 0 24 s minimum programmable exposure mode External Trigger to Start of Exposure 0 30 s minimum programmable and pulse width controlled exposure mod...

Page 13: ...l response curves describe the sensor excluding lens and light source characteristics The quantum efficiency graph describes the fraction of photons at each wavelength that contribute charge to the pi...

Page 14: ...12 Linea Lite GigE Series Overview Linea Lite GigE Series Camera Effective Quantum Efficiency Figure 3 Linea Lite Monochrome 2k Quantum Efficiency...

Page 15: ...Linea Lite GigE Series Camera Linea Lite GigE Series Overview 13 Linea Lite GigE Monochrome 4k Model Spectral Responsivity Figure 4 Linea Lite Monochrome 4k Spectral Responsivity...

Page 16: ...14 Linea Lite GigE Series Overview Linea Lite GigE Series Camera Effective Quantum Efficiency Figure 5 Linea Lite Monochrome 4k Quantum Efficiency...

Page 17: ...Linea Lite GigE Series Camera Linea Lite GigE Series Overview 15 Linea Lite GigE Color 2k Model Spectral Responsivity Figure 6 Linea Lite 2k RGB Spectral Responsivity...

Page 18: ...16 Linea Lite GigE Series Overview Linea Lite GigE Series Camera Linea Lite GigE Color 4k Model Spectral Responsivity Figure 7 Linea Lite 4k RGB Spectral Responsivity...

Page 19: ...ent If the computer to be used with the Linea Lite GigE camera does not have a Gigabit network adapter or second built in Gigabit NIC a Gigabit Network Interface adapter card NIC needs to be installed...

Page 20: ...cameras Linea Lite GigE cameras support the IEEE 802 3x Pause Frame Flow Control protocol automatically so images from many cameras can be reliably transmitted through the switch to the NIC efficientl...

Page 21: ...llowing features to optimize the system GigE Vision Transport Layer Control Packet Size The default size 1500 is often more efficient than larger jumbo packets especially when using Ethernet switches...

Page 22: ...ork setup requires a powered computer NIC supporting PoE or PoE capable Ethernet switch or an Ethernet power injector Important Connect power via the I O or PoE not both Although Linea Lite has protec...

Page 23: ...n takes the form of an XML device description file respecting the syntax defined by the GenApi module of the GenICam specification For more information see www genicam org The Teledyne DALSA GigE Visi...

Page 24: ...control the camera If Linea Lite GigE will be used in a third party GigE Vision Compliant environment Sapera or Sapera runtime is not required follow the installation instructions of the third party...

Page 25: ...that the camera is connected The Linea Lite Status LED will change to steady Blue Once communication with the host computer is started the automatic IP configuration sequence will assign an LLA IP ad...

Page 26: ...ea Lite GigE back end shows connector and LED locations Refer to Mechanical Specifications section for details on the connectors and camera mounting dimensions Status LED 1 Figure 9 Linea Lite GigE Se...

Page 27: ...metallic platform with a good connection to earth ground Method 4 Avoid running the Ethernet cable close to or parallel to AC power lines GigE Server Verification After a successful Sapera GigE Vision...

Page 28: ...ver Pop up Menu Click on Show Status to open a window listing all devices connected to the host system Each GigE device is listed by name along with important information such as the assigned IP addre...

Page 29: ...Error If the camera does not reboot itself contact Technical Support Slow Flashing Blue Ethernet cable disconnected The camera continuously attempts to assign itself an IP address Fast Flashing Blue F...

Page 30: ...completes the automatic device search device discovery Figure 15 CamExpert Device Selector Select the Linea Lite GigE device by clicking on the camera icon By default the camera is identified by its...

Page 31: ...CamExpert cannot grab at high virtual frame rates since it generates an interrupt for each virtual video frame the Sapera Grab Demo application is better suited for high frame rates Firmware is uploa...

Page 32: ...host system ccf An important component of CamExpert is its live acquisition display window which allows immediate verification of timing or control parameters without the need to run a separate acqui...

Page 33: ...res may become active dependent on other feature settings Acquisition Information Buffer Navigation Figure 17 CamExpert Graphical User Interface GUI Device Selector pane View and select from any insta...

Page 34: ...Option All camera features have a Visibility attribute which defines its requirement or complexity The states vary from Beginner features required for basic operation of the device to Guru optional fe...

Page 35: ...ident light TDI camera sensor arrays contain multiple rows of pixels Adding the data together essentially turns the TDI array into a line array with an effective exposure time equal to the sum of the...

Page 36: ...kes the additional exposure time into account and matches the Exposure Time set by the user to the actual sensor exposure time The actual exposure time and the exposure time set by the user are the sa...

Page 37: ...ite 2k sensor has a 14 m pixel there is no spacing between the sensor lines so every time the object being imaged moves 14 m when using an external synchronization trigger signal EXSYNC the trigger sh...

Page 38: ...re all aligned when output However this is only correct when the object pixel size is square that is the distance moved by the object for one EXSYNC period is equal to the width of the object pixel In...

Page 39: ...is is the default condition Line Spatial Correction 1 Figure 25 Default Line Spacial Correction Example 2 Target running slower than example 1 same EXSYNC trigger frequency When the target runs slower...

Page 40: ...xel position That is the missing red or blue pixel is generated from the adjacent pixel values except at the sensor edge where only one adjacent column of values is available Two Color Interpolation m...

Page 41: ...for the camera The camera outputs one row per trigger High Sensitivity Mode In High Sensitivity mode the TDI Stages feature set to two the two rows are summed together to output one row High SNR Mode...

Page 42: ...is determined by the Exposure Time feature The Internal Acquisition Frames Per Second FPS feature returns the FPS for the specified Frame rates are determined by the image buffer Height feature Exter...

Page 43: ...ltiFrame Trigger Start Burst start trigger starts the capture of a number of frames No line is lost between frames The number of frames in this burst mode is defined by the Trigger Frames Count featur...

Page 44: ...s the edge detection for the line as rising falling or any edge The Input Line Debouncing Period specifies how long a signal must be active to be considered valid Trigger Source Rotary Encoder Externa...

Page 45: ...Setup Timer1 Set Timer Start Source Timer1End Timer Duration 5000 Timer Mode set Active Then click the CamExpert Grab button Example of Line Trigger Mode An example setup of a Line Trigger acquisition...

Page 46: ...e Timed The Exposure Time feature sets the integration period The start of exposure can be driven by an internal timer signal an external trigger signal or a software function call Trigger Width The w...

Page 47: ...oder Interface Timing Web inspection systems with variable web speeds typically provide one or two synchronization signals from a web mounted rotary shaft encoder to coordinate trigger signals When us...

Page 48: ...B can be assigned to Line 2 or GND not used using the Rotary Encoder Input B Source feature See HD15 Connector Details for complete connector signal details When enabled using the Trigger Mode feature...

Page 49: ...ising edge Divider 5 specifies how many triggers to drop With Rotary Encoder Rescaler Order Mulitplier Divider 1 2 3 4 5 6 7 8 1 2 3 4 5 6 7 8 1 2 3 4 5 6 7 8 1 2 3 4 5 6 7 8 For example if each rotar...

Page 50: ...tuations The user can evaluate Gain and Black Level by using CamExpert Features and limitations are described below Black Level offset is expressed as a digital number DN providing a offset from the f...

Page 51: ...cal binning is performed over multiple acquisition lines within the camera therefore the virtual frame buffer height is automatically reduced when binning is enabled Note Binning is performed digitall...

Page 52: ...Function Figure 39 LUT Block Diagram LUT Size vs Output Pixel Format The LUT size is the same as the camera s sensor pixel size current Linea Lite standard firmware LUT is 12 bit All camera processin...

Page 53: ...owed the nonlinear output of acquisition data through the LUT effectively boosts low value data As Gamma Correction is increased in value to the maximum allowed the nonlinear output of acquisition dat...

Page 54: ...Offset Gain To calibrate FPN Features flatfieldCorrectionMode fflatfieldCalibrationSampleSize flatfieldCalibrationFPN To calibrate PRNU Features flatfieldCorrectionMode flatfieldCalibrationSampleSize...

Page 55: ...ntained in the top half of the new buffer while the gain buffer is in the bottom half A Sapera application saves the new buffer using the SapBuffer class Save function with the format tiff option whic...

Page 56: ...repare to grab a flat light gray image required for calibration Ideally a controlled diffused light source aimed directly at the lens should be used or a non glossy paper with the lens slightly out of...

Page 57: ...ormance and Features 55 Figure 44 CamExpert Statistics Dialog Average Dark Pixel Value Important the average pixel value for the frame is close to black Note Sensors might show a much higher maximum p...

Page 58: ...ing a bright gray image Figure 45 CamExpert Statistics Dialog Verifying Bright Acquisition Important In this example the average pixel value for the frame is bright gray Note Sensors may show a much h...

Page 59: ...e Before performing a FFC Teledyne DALSA recommends evaluating the bare image characteristics which determine the quality of FFC applied to the image A bare image has no gains applied To obtain a bare...

Page 60: ...ength can reduce lens shading effect In some demanding applications optimized low shading lenses should be considered 2 Height An average value near your calibration target is ideal An extremely low o...

Page 61: ...applied To perform FPN Correction Step 1 Cover the lens place the sensor in dark Step 2 Set the Flat Field Correction Mode to Off and check the line profile histogram If some or all of the pixels out...

Page 62: ...is performed 2 Defocus lens while PRNU Correction is performed Set the Flat Field Correction Mode to Off and check the bare image line profile Step 2 Set the Flat Field Correction Mode to Calibration...

Page 63: ...Linea Lite GigE Series Camera Camera Performance and Features 61 Figure 51 CamExpert Statistics Dialog Line Profile...

Page 64: ...category click Setting Figure 52 CamExpert Power up Configuration In the Power up Configuration dialog box select one of four UserSets for both Camera Power up configuration and Load Save configuratio...

Page 65: ...ile to Upload Click Upload to Camera to execute the file transfer to the camera When firmware is successfully updated the camera must be reset to effect the change CamExpert displays a dialog indicati...

Page 66: ...bject to camera processing and Binning functions Use CamExpert to enable and select any test pattern from the Test Image Selector feature drop down list while the camera is not in Acquisition Mode Fig...

Page 67: ...th a diagonally repeating image ranging from black to white The image moves horizontally to the right in one pixel steps Figure 59 CamExpert Test Image Grey Diagonal Ramp Moving Fixed Offset Display i...

Page 68: ...of the image The color camera includes a Parallax Correction Pixel Stretch feature that can correct these color artifacts Figure 62 Camera Angle Creates Parallax Notes This feature will be most useful...

Page 69: ...Linea Lite GigE Series Camera Camera Performance and Features 67 Image example of color artifact induced by parallax at the image extremity Figure 63 Parallax Image Example...

Page 70: ...Linea_Lite_M2048 14um_xx 2k devices Non Teledyne DALSA cameras are labeled as GigEVision Device Click on a device User Name to select it for control by CamExpert An imaging application uses any one of...

Page 71: ...era is powered on using the User Set Save parameter Once saved the current settings become the selected user set Camera Configuration Selection Dialog CamExpert provides a dialog box which combines th...

Page 72: ...ppercase letter are part of the SFNC while those starting with a lowercase letter are part of the DFNC Parameters in gray are read only either always or due to another parameter being disabled Paramet...

Page 73: ...or name RO Beginner Family Name DeviceFamilyName Displays the device family name RO Beginner Model Name DeviceModelName Displays the device model name RO Beginner Device Version DeviceVersion Displays...

Page 74: ...temperature since power up Value is reset on power off Device Temperature DeviceTemperature The temperature of the selected source in degrees Celsius Beginner DALSA Software Compatibility Component Li...

Page 75: ...le DFNC Device Acquisition Type deviceAcquisitionType Displays the Device Acquisition Type of the product RO Invisible DFNC Sensor Sensor The device gets its data directly from a sensor Device TL Type...

Page 76: ...Drive 8 bit Monochrome or Bayer requires Sapera LT 8 01 or greater TurboDrive 10 bit requires v8 10 or greater Compatibility2 Teledyne DALSA Turbo Drive 10 bit Monochrome or Bayer requires Sapera LT...

Page 77: ...of the sensor RO Beginner Linescan Linescan 1D line scan sensor Sensor Color Type sensorColorType Defines the camera sensor color type RO Beginner DFNC Monochrome Sensor Monochrome Sensor color type...

Page 78: ...quisition to change Possible values are device dependent for example for certain models a numerical value is specified Beginner DFNC On On Turn on spatial correction Off Off Turn off spatial correctio...

Page 79: ...tire image Gain applied after row gains Final digital gain Row gain Digital gain Sensor Analog SensorAnalog Sensor analog gain Possible values are 0 6 1 Digital Row 1 DigitalRow1 Gain applied to first...

Page 80: ...rols category group features used to configure external inputs and acquisition actions based on those inputs plus camera output signals to other devices For more information on using triggers for acqu...

Page 81: ...gger source See Line Selector feature for complete list Line 2 Line2 Select Line 2 and associated I O control block to use as the external trigger source See Line Selector feature for complete list Li...

Page 82: ...rted input line sources is device specific Expert DFNC Line 1 Line1 Line 1 is assigned to the Rotary Encoder Input A Line 3 Line3 Line 3 is assigned to the Rotary Encoder Input A Rotary Encoder Input...

Page 83: ...is an output line configured as an open collector Line Mode LineMode Reports if the physical Line is an Input or Output signal RO See Input Signals Electrical Specifications See Output Signals Electri...

Page 84: ...he input line activation mode to trigger the Output Line pulse Beginner DFNC Rising Edge RisingEdge Specifies that the trigger is considered valid on the rising edge of the source signal Falling Edge...

Page 85: ...re Driven Pulse Generator LineStatus Trigger Line Activation Trigger Signal Timer TimerEnd Event CounterEnd Event Software Trigger Cmd Line Mode Input or Output Input Output Timer and Counter Module C...

Page 86: ...rMode Selects the counter mode The selected Counter is either Active or Disabled When Disabled the Counter can be configured Expert DFNC Off Off The selected Counter is Disabled Active Active The sele...

Page 87: ...able when the counterStartSource feature selects a physical Line Expert DFNC Rising Edge RisingEdge Starts counting on rising edge of the selected Line Falling Edge FallingEdge Starts counting on fall...

Page 88: ...of the Counter 1 end Counter Reset Input Line Activation counterResetLineActivation Specify the edge transition on the selected line that will reset the selected counter Expert DFNC Rising Edge Risin...

Page 89: ...nd Start Timer on Timer 1 End event Counter 1 End Counter1End Start Timer on Counter 1 End event Timer Line Activation timerStartLineActivation Select the trigger activation mode which starts the time...

Page 90: ...ss a new counterReset Cmd is received which then restarts the counter at 00 When Counter Reset Source Event or CounterEnd the counter is reset to 00 but does not restart counting until the next Counte...

Page 91: ...ResetSource Event Counter Reset CMD Counter Completed CounterResetSource CounterEnd Itself CounterStartSource EVENT and Signal Edge Base CounterResetSource Event Itself 0 Figure 73 Example CounterStar...

Page 92: ...unter Trigger Wait Counter Register Countermode Active Counter Completed CounterResetSource CounterEnd Itself CounterStartSource Line Edge Base Example 2 Active Active Active CounterTriggerActivation...

Page 93: ...LUT type of the currently selected Lookup Table Expert DFNC User Defined UserDefined Uses the user programmable LUT Gamma Correction GammaCorrection Uses gamma LUT Gamma Correction gammaCorrection Set...

Page 94: ...ent table as the current Flat Field User Flatfield 1 UserFlatfield1 Sets User Flat Field 1 coefficient table as the current Flat Field User Flatfield 2 UserFlatfield2 Sets User Flat Field 2 coefficien...

Page 95: ...ldCalibrationFPN and flatfieldCalibrationPRNU to the active set Expert DFNC Reset Coefficients flatfieldResetCoefficients Reset all FFC coefficients to pass through Expert DFNC Flat Field Correction R...

Page 96: ...d Cmd balanceWhiteAutoOnDemandCmd Executes the automatic white balance function The first frame acquired is used to calculate the RGB gain adjustments which are then applied to subsequent snaps or gra...

Page 97: ...eatures are described below in more detail Note that computer monitors have wide variations in displaying color Users should consider using professional monitors which have factory calibrated fixed pr...

Page 98: ...However if the angle of incident light with respect to the sensor changes the crosstalk correction values may need to be adjusted It is recommended to calibrate the crosstalk by using the following st...

Page 99: ...e Gr and the average of the Gb pixels in the dark subtracted blue image Blue Crosstalk correction value abs avgGb avgGr B 100 7 Calculate the red crosstalk correction value with the average of the Gr...

Page 100: ...t which data stream to control Default is Stream 1 Beginner DFNC Stream1 Stream1 Adjust parameters for Stream1 Data Stream Type DataStreamType This feature is used to retrieve the transfer protocol us...

Page 101: ...n of Interest when Multiple ROI Mode is enabled Selector range is from 1 to the ROI Count value Expert DFNC ROI x1 y1 roi1_1 ROI x1 y1 ROI x2 y1 roi2_1 ROI x2 y1 ROI x3 y1 roi3_1 ROI x3 y1 Not availab...

Page 102: ...ving GrayDiagonalRampMoving Image is filled horizontally and vertically with an image that goes from the darkest possible value to the brightest in increments of 1 DN per pixel and that moves horizont...

Page 103: ...Feature Descriptions Display Name Feature Values Description Standard View Metadata Mode ChunkModeActive Activates the inclusion of metadata chunk data in the payload of the image Expert False No chun...

Page 104: ...ge Gain Add the Gain feature value used during the image acquisition to the metadata attached to the image Counter1ValueAtReset Copies the value of the Counter Value At Reset feature at the start of F...

Page 105: ...e is enabled to view the metadata of the last frame capture Figure 82 CamExpert Metadata Tab Alternatively Sapera LT provides a demo program called GigEMetaDataDemo exe which will grab a number of fra...

Page 106: ...104 Operational Reference Linea Lite GigE Series Camera The following figure shows the Sapera Explorer tool screen with the Metadata Example highlighted Figure 83 Sapera Explorer...

Page 107: ...it Device is currently waiting for a trigger to capture one or more frames Acquisition Active AcquisitionActive Device is currently doing an acquisition of one or more frames Acquisition Status Acquis...

Page 108: ...tionFrameRate and internalAcquisitionFrameDropCount This feature does not take bandwidth limitations into account Guru DFNC Transfer Control TransferControlMode Sets the method used to control the tra...

Page 109: ...system Image lines frames are buffered in cases where the host system is experiencing high network traffic with other devices through the same Ethernet switch Note By buffering image frames the camer...

Page 110: ...ovides maximum compatibility with any control application running on the host computer The host based acquisition program commands the camera to do a frame grab and send it through the camera s frame...

Page 111: ...d SENSOR CONTROL NA I O CONTROL NA COUNTER AND TIMER CONTROL NA ADVANCED PROCESSING CONTROL flatfieldCorrectionMode IMAGE FORMAT CONTROL PixelFormat OffsetX Width Height BinningHorizontal BinningVerti...

Page 112: ...n application supplied by Teledyne DALSA the user writes an ID value which cannot be read but allows specific Linea Lite cameras to act on commands Contact Sales for additional information Guru Action...

Page 113: ...st command over a subnetwork Please refer to the GigE Vision Specification version 2 0 RC6 for configuration and usage details Contact Teledyne DALSA Support and request example code for Action Comman...

Page 114: ...Reference Linea Lite GigE Series Camera Event Control Category The Linea Lite GigE Event Control category groups parameters used to configure Camera Event related features Figure 87 CamExpert Event C...

Page 115: ...f the frame Valid Frame Trigger ValidFrameTrigger Event sent on control channel when a valid frame trigger is generated Rejected Frame Trigger InvalidFrameTrigger Event sent on control channel when a...

Page 116: ...The camera queues the packet resend requests until they are processed There is a limit to the number of requests that can be queued by the camera When a new request is received and the queue is full...

Page 117: ...sages on its communication path except for Pdelay_Req Pdelay_Resp Pdelay_Resp_Follow_Up signaling or management messages Master Master The port is behaving as a master port Passive Passive The port sh...

Page 118: ...threshold Threshold_1000 Threshold_1000 1000 s threshold Threshold_2000 Threshold_2000 2000 s threshold Timestamp Modulo Event timestampModulo Specifies the additional interval between the current tim...

Page 119: ...event ID to identify the EventInvalidFrameTrigger software Event RO Guru Acquisition Start Next Valid End Data Event ID EventAcquisitionStartNextValid Represents the event ID to identify the EventAcq...

Page 120: ...abled This timestamp tick in ns cannot be reset by the user Linea Lite cameras implement additional features designed to synchronize multiple camera acquisitions via IEEE 1588 PTP Mode not via externa...

Page 121: ...eset if ptpMode Off else only the internal camera Timestamp counter resets Case Examples Overview The following case examples use a simplified Timestamp timeline which for clarity is shown with time t...

Page 122: ...F1 Case 2 differs from case 1 by showing the period of uncertainty if the start time is near the first modulo count that follows The first frame acquisition may occur at the first modulo count time o...

Page 123: ...10 actual start time for the first acquisition is at Timestamp 30 as described in Case 1 If a new Timestamp Reset happens between the Start Time and acquisition Actual Start Time the Timestamp counter...

Page 124: ...ion A shows the initial conditions with the first acquisition F1 at the actual start time B shows a Timestamp reset occurring after the first acquisition C shows that acquisitions then continue at the...

Page 125: ...t event F1 timestampModulo changes to 20 Case 5 shows that the Modulo value can be changed dynamically Using the example of case 1 after the second acquisition F2 the Modulo value is changed from 10 t...

Page 126: ...oughputLimit controls the overall throughput Off Off Disables the DeviceLinkThroughputLimit feature On On Enables the DeviceLinkThroughputLimit feature Device Link Throughput Limit in Bps DeviceLinkTh...

Page 127: ...on the given network interface Guru Primary Application IP Address GevPrimaryApplicationIPAddress Returns the IP address of the device hosting the primary application RO Guru Device Access Privilege C...

Page 128: ...umber of Interfaces GevNumberOfInterfaces Indicates the number of physical network interfaces supported by this device RO Invisible Message Channel Count GevMessageChannelCount Indicates the number of...

Page 129: ...camera is connected beyond routers The GigE Vision camera is forced a static IP address The NIC IP address must use the same subnet otherwise the camera is not accessible If the camera is connected t...

Page 130: ...tion file of the selected manifest entry RO Invisible Manifest Secondary URL DeviceManifestSecondaryURL Indicates the second URL to the XML device description file of the selected manifest entry RO In...

Page 131: ...number of cameras connected to a NIC the data rate of each camera and the trigger modes used Information on these features is found in the Teledyne DALSA Getting Started Manual for GigE Vision Camera...

Page 132: ...ature is called Guru Open Open Select the Open operation executed by FileOperationExecute Close Close Select the Close operation executed by FileOperationExecute Read Read Select the Read operation ex...

Page 133: ...er File Access is supported over FTP DFNC Invisible File Access via the CamExpert Tool Click Setting to open the File Access Control dialog Figure 95 CamExpert File Access Control Dialog Type select t...

Page 134: ...ible Device Registers Streaming End DeviceRegistersStreamingEnd Announces end of registers streaming and performs validation for registers consistency before activating them Invisible Device Feature S...

Page 135: ...provides general information FAQ and White Papers about the Trigger to Image Reliability T2IR framework in hardware and Sapera LT SDK http www teledynedalsa com imaging knowledge center appnotes t2ir...

Page 136: ...nt Events Overflow eventsOverflow Event Statistic Count Reset eventStatisticCountReset Acquisition and Triggers Valid Frame Trigger ValidFrameTrigger Invalid Frame Trigger InvalidFrameTrigger Image Lo...

Page 137: ...IP address is obtained typically in a few seconds with Microsoft Windows 7 8 10 If required a persistent IP address can be assigned see the Running the Network Configuration Tool section Preferably a...

Page 138: ...re no conflicts with other devices through an arbitration scheme The Windows NIC configuration must be set to DHCP the typical default case and no DHCP server must be present on the network Otherwise...

Page 139: ...erver for any additional subnet Windows configures a NIC in DHCP mode by default If no DHCP server is present on the subnet Windows reverts to LLA mode Ensure a different subnet is assigned to each NI...

Page 140: ...y block connecting to the camera Use Teledyne DALSA s Network Configuration tool to recover a camera with an unknown persistent IP It will reset the camera s factory default mode DHCP LLA The camera s...

Page 141: ...work interface controllers NIC allow user modifications to parameters such as Adapter Buffers and Jumbo Frames The optimal settings will be system dependent These should be optimized for use with the...

Page 142: ...m Figure 98 Network Configuration Tool Run the tool from the Windows Start menu Figure 99 Windows Start Menu Network Configuration Tool Shortcut Verify the camera appears as a child of the NIC card it...

Page 143: ...lly required to manage network traffic within an Ethernet switch when multiple cameras are simultaneously used Using PAUSE Frame will require the user to test various values of Jumbo Frames to determi...

Page 144: ...Technical Specifications Linea Lite GigE Series Camera Technical Specifications Mechanical Specifications Linea Lite GigE 2k 4k Monochrome and Color Figure 100 Linea Lite GigE 2k 4k with M42x1 Lens Mo...

Page 145: ...following information Model Part number Serial number MAC Address 2D Barcode Additional Mechanical Notes Linea Lite GigE supports a screw lock Ethernet cable see Ruggedized RJ45 Ethernet Cables For in...

Page 146: ...cameras Dimensions x y z are in microns and referenced to the Linea Lite GigE mechanical body or the optical focal plane for the z axis dimension Theta specifies the sensor rotation relative to the se...

Page 147: ...S 422 1 Input Port 2 5 Signals Ground Signals Ground 6 Line 3 In Out Configurable 2 IO Port 3 7 Line 3 In Out Configurable 2 IO Port 3 8 Input Trigger Level Out 9 Input Trigger Level Out 10 PWR GND Ca...

Page 148: ...255 s Line Input Signal Characteristics See Input Signals Electrical Specifications Output Line Details The general purpose output line signals either dedicated or shared with inputs For more informat...

Page 149: ...ating GPIO Cable Assembly Teledyne DALSA optionally provides for purchase a GPIO breakout cable HD15 Male to 26 Pos Euro Block as shown in the following drawing Use accessory number AC CA 00002 00 R w...

Page 150: ...ected Signal Ground External Signal Programmable Input Threshold Figure 104 External Inputs Block Diagram External Input Overview The input signals can be used as trigger acquisition event counter or...

Page 151: ...oltage Low to High High to Low 3 3 V TTL 1 5 V 1 5 V 5 0 V TTL 2 5 V 2 5 V 12 V 6 V 6 V 24 V 11 V 11 V External Input Timing Reference Input Level Standard Maximum Input Frequency Minimum Pulse Width...

Page 152: ...Signal Ground External Output Signal Single Ended Logic Drive 3 3 V TTL OUTPUT not connected OUTPUT Output Enable Output Signal OUTPUT PIN 5 Signal Ground Output Enable External Output Signal Single E...

Page 153: ...istor Wattage should be calculated accordingly Outputs are open disabled on power up with the default factory settings A software reset will not reset the outputs to the open state if the outputs are...

Page 154: ...uipment is operated in a commercial environment This equipment generates uses and can radiate radio frequency energy and if not installed and used in accordance with the instruction manual may cause h...

Page 155: ...and Teledyne DALSA part numbers for available lens adapters are provided The first two lens parameters Lens Mount and Lens Image Circle are based on correctly matching the lens to the sensor Brief inf...

Page 156: ...154 Additional Reference Information Linea Lite GigE Series Camera M42x1 to Nikon F Bayonet Adapter AC LA 00115 xx R Figure 106 Nikon F Bayonet to M42x1 Adapter 12mm BFD HEAVY DUTY w clip...

Page 157: ...Linea Lite GigE 2k 4k active sensor relative to the lens image circle It compares the Linea Lite GigE 2k 4k relative to a Nikon FDX lens using the optional F mount adapter Image Circle approximate for...

Page 158: ...age objects at some limited distance range at some positive or negative magnification This defines the field of view F Number aperture The lens aperture defines the amount of light that can pass Lense...

Page 159: ...ally complicated issue Click on Knowledge Center and select Application Notes and Technology Primers Exposure settings have more effect than illumination The total amount of energy which is related to...

Page 160: ...second focal point The object distance OD is the distance from the first principal point to the object Primary Points in a Lens System Figure 108 Primary Points in a Lens System Magnification and Reso...

Page 161: ...pated over 24 hours Protecting Against Dust Oil and Scratches The sensor window is part of the optical path and must be handled with extreme care Dust can obscure pixels producing dark patches on the...

Page 162: ...t bursts of air while moving the camera in the air stream Agitating the container will cause condensation to form in the air stream Note Extended airbursts will chill the sensor window causing more co...

Page 163: ...ecommended in a high vibration environment Figure 109 Ruggedized RJ45 Ethernet Cable All cables made in U S A all cables RoHS compliant CAT6 certified tested for near end far end crosstalk and return...

Page 164: ...en the device is found The camera has obtained an IP address and there are no network issues Optimization may still be required to maximize performance Problem Type Summary Camera problems are either...

Page 165: ...mera s filter driver In some cases third party filter drivers modify NIC properties and Teledyne DALSA s Sapera Network Imaging Driver does not install Verify this issue by uninstalling the third part...

Page 166: ...t for support From the Start menu go to Programs Dalsa Sapera LT Tools and run the Log Viewer program From its File menu click on Save Messages to generate a log text file Report the version of GigE V...

Page 167: ...e GigE server tray icon is displaying a warning Open Teledyne DALSA s Network Configuration Tool from Window s Start Menu Cameras displayed in red require a NIC IP Click the camera name and Select Dev...

Page 168: ...166 Troubleshooting Linea Lite GigE Series Camera Click Automatic Recovery Force IP Figure 112 Network Configuration Tool Automatic Recovery Force IP...

Page 169: ...ress which is lost on power down To avoid this issue assign a persistent IP address to the camera Click the Persistent IP Mode shown above and press the Apply button to assign the IP address It will a...

Page 170: ...the device discovery process Linea Lite GigE is found by the Sapera GigE Server but an application such as CamExpert does not see the camera A Linea Lite GigE that had a fault with a firmware update w...

Page 171: ...Linea Lite GigE is in a high vibration environment Refer to Ruggedized RJ45 Ethernet Cables section Check the Ethernet status LEDs on the Linea Lite GigE RJ45 connector The Link Status indicator shou...

Page 172: ...bbing in free run mode at the maximum frame rate start the Sapera Monitor tool from the Sapera Tools installed with Sapera Make sure the Memory Overflow event monitor is enabled Continue grabbing at m...

Page 173: ...onger to fill line rate x frame buffer height than the time set for the GigE Vision Host Control Increase the Image Timeout value as required Issues with Cognex VisionPro When the Cognex VisionPro pac...

Page 174: ...of preliminary version to support early consignment cameras 30 July 2020 01 Alpha version 19 Nov 2020 02 Introduction of 2k model 4 June 2021 03 Introduction of 4k color model 12 Nov 2021 04 Introduc...

Page 175: ...com Teledyne DALSA GMBH Lise Meitner Str 7 82152 Krailling Munich Germany Tel 49 89 89545730 sales europe teledynedalsa com Asian Pacific Sales Teledyne DALSA Asia Pacific Ikebukuro East 6F 3 4 3 Hig...

Reviews: