background image

IOM 1242-8 • PATHFINDER

®

 MODEL AWV CHILLERS 

24 www.DaikinApplied.com

Installation and Application Considerations

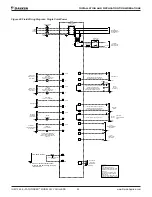
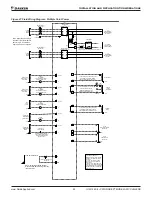
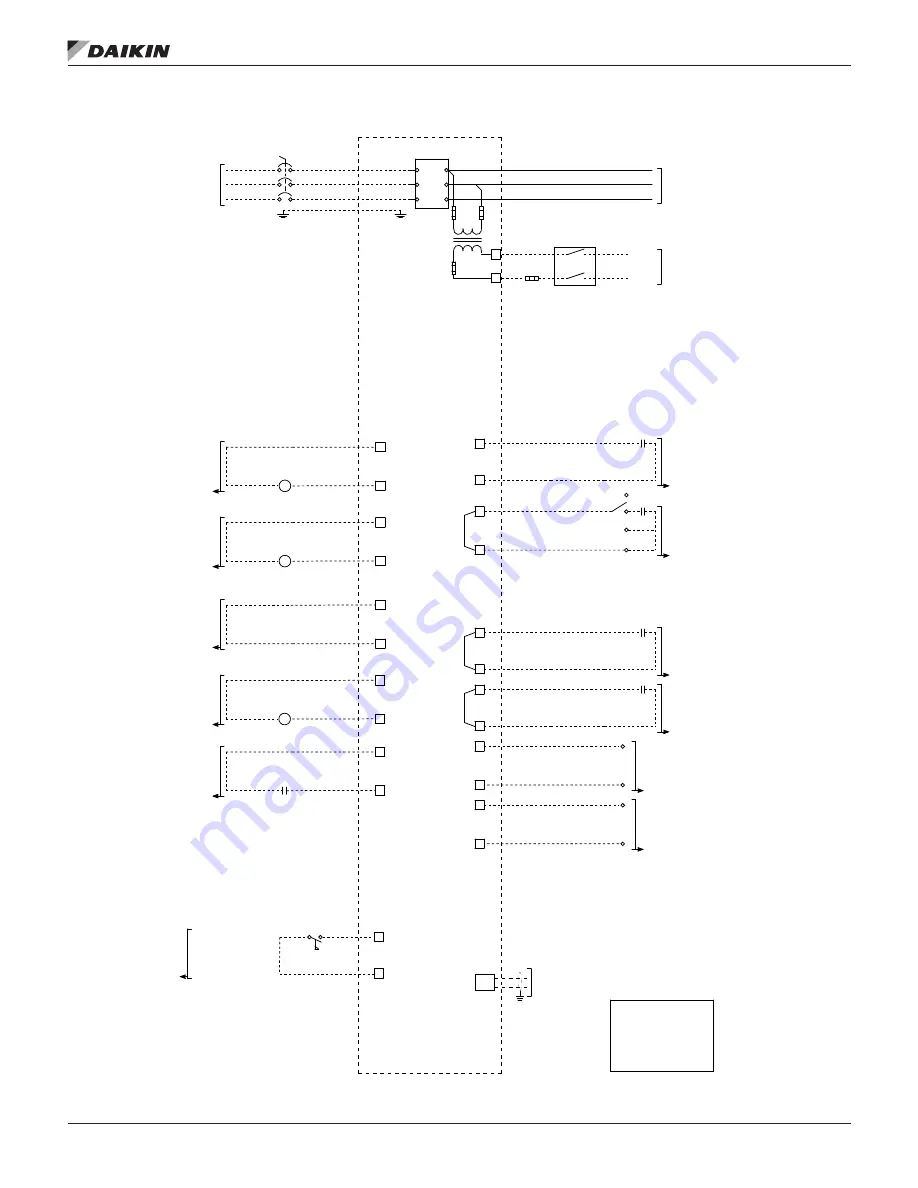
Figure 46: Field Wiring Diagram - Single Point Power   

910170645_1RC

4-20 mA

DEMAND LIMIT

(BY OTHERS)

4-20 mA

SETPOINT OVERRIDE

(BY OTHERS)

_

_

+

+

EA1

** USE DRY CONTACTS ONLY, SEE NOTE 2

IF EXTERNAL ALARM IS USED, REMOVE

LEAD 402 BETWEEN M5 TERMINALS 5 & 15

TIME

CLOCK

OFF

MANUAL

ON

AUTO

OPTIONAL

FIELD SUPPLIED

CONTROL POWER

OPEN Q12 IF SUPPLY IS SEPARATE 120 VAC SOURCE

DISCONNECT

(BY OTHERS)

N

120 VAC

115

VAC

F120

T1

F120

37

M5

REMOTE

SWITCH

(BY OTHERS)

M5

M5

M5

M5

M5

M5

M5

** USE DRY CONTACTS ONLY, SEE NOTE 2

IF REMOTE SWITCH IS USED, 

REMOVE MECHANICAL JUMPER

BETWEEN M5 TERMIONALS 58 & 59.

38

35

5

58

36

15

59

EXTERNAL

ALARM

N

N

N

120 VAC

120 VAC

120 VAC

EVAP. WATER

PUMP RELAY No. 2

(BY OTHERS)

M5

MQ

M5

MQ

M5

MQ

CHWR2

(BY OTHERS)

EVAP. WATER PUMP RELAY

120VAC @ 0.25AMP MAX

26

49

CHWR1

(BY OTHERS)

EVAP. WATER PUMP RELAY

120VAC @ 0.25AMP MAX

28

17

17

17

ALARM OUTPUT

EVAP. WATER

PUMP RELAY No. 1

(BY OTHERS)

3 PHASE

POWER 

SOURCE

POWER BLOCK

OR

DISCONNECT SWITCH

MODE SWITCH

** USE DRY CONTACTS ONLY, SEE NOTE 2

IF MODE SWITCH IS USED, REMOVE

LEAD 322 BETWEEN M5-21 AND MS-10.

57

21

M5

M5

TO

COMPRESSOR(S)

AND FAN MOTORS

OR CIRCUIT 1

CIRCUIT BREAKER

(BY OTHERS)

12

MQ

MQ

17

EARTH

GROUND

(BY OTHERS)

FUSE

20A for 2KVA

30A for 3KVA

Q12

(BY OTHERS)

120VAC @ 0.25AMP MAX

NOTE: 

1) ALL FIELD WIRING TO BE

INSTALLED AS NEC CLASS 1 WIRING

SYSTEM WITH CONDUCTOR RATED

600 VOLTS.

2)**=USE "DRY CONTACTS" ONLY.

DO NOT SUPPLY FIELD POWER TO

THIS CIRCUIT.

3)DO NOT SUPPLY FIELD POWER TO

24VAC OR 120VAC CONTROL CIRCUITS.

23

M5

M5
8

NOTE: For Factory Supplied Thermal

Dispersion Flow Switch wiring, see wiring

instruction in Kit.

FLow Switch Contacts

M

DI2

**USE DRY CONTACS ONLY

    SEE NOTE 2

TO/FROM BAS

(CUSTOMER

CONNECTION)

CLA
CLB

CONNECT TO GROUND 

AT ONE END ONLY.

BACKUP

CHILLER

62

61

M5

M5

BC1

FOR RAPID

RESTORE OPTION

ONLY

** USE DRY CONTACTS ONLY, SEE NOTE 2

T1

L3

T3

L1

PANEL

T2

L2

LON

GND

(833)

(828)

(737)

(830)

(718)

(721)

(720)

(735)

(735)

(856)

(858)

N

120 VAC

M5

MQ

44

17

WSESR

(BY OTHERS)

N

120 VAC

M5

MQ

45

11

WATER SIDE

ECONOMIZER

STATUS RELAY

WATER SIDE

ECONOMIZER ENABLE

(BY OTHERS)

* SEE NOTE 2

*120VAC CIRCUIT

(933)

(947)

IF WATER SIDE ECONOMIZER IS 

USED, REMOVE LEAD 552 AND 

INSTALL SWITCH BETWEEN M5-45 

AND MQ-11

Summary of Contents for Pathfinder AWV

Page 1: ...ation Operation and Maintenance Manual Pathfinder Air cooled Screw Chillers Model AWV 100 to 565 Tons 350 to 1985 kW HFC 134a Refrigerant 60 50 Hz IOM 1242 8 Group Chiller Part Number IOM1242 8 Date April 2022 ...

Page 2: ...serve the right to make changes in design and construction at any time without notice Introduction 5 Installation and Application Considerations 7 Installation and Application Considerations Remote Evaporators 31 Dimensional Drawings 38 Isolator Information 41 Pressure Drop Data 42 Controller Operation 45 Unit Functions 54 Circuit Functions 62 Alarms and Events 72 Using the Controller 85 Startup a...

Page 3: ... least 24 hours before startup not applicable for WWV models Chiller components EXV Sensors Transducers installed and wired properly Wiring complies with National Electrical Code and local codes see notes Remote EXV wired with shielded cable if applicable Miscellaneous Yes No N A Initials Unit control switches all off Remote Evaporator Piping factory reviewed and approved if applicable All refrige...

Page 4: ...THIS PAGE INTENTIONALLY LEFT BLANK ...

Page 5: ... hose A grounding strap must be used between the auxiliary refrigerant tank and the chiller s end sheet earth ground which will safely take the charge to the ground Damage to sensitive electronic components could occur if this procedure is not followed CAUTION This equipment generates uses and can radiate radio frequency energy If not installed and used in accordance with this instruction manual i...

Page 6: ...page 7 The standard limited warranty on this equipment covers parts that prove defective in material or workmanship Specific details of this warranty can be found in the warranty statement furnished with the equipment NOMENCLATURE A W V B XXX Table 1 Operating Limits for AWV Chillers Maximum standby ambient temperature NOTE Maximum operating ambient temperature is determined by unit configuration ...

Page 7: ...ce air and cause suffocation Immediately evacuate and ventilate the equipment area If the unit is damaged follow Environmental Protection Agency EPA requirements Do not expose sparks arcing equipment open flame or other ignition source to the refrigerant DANGER Improper rigging lifting or moving of a unit can result in property damage severe personal injury or death Follow rigging and moving instr...

Page 8: ... base rail is open to allow access for securing mounting bolts etc Mounting location dimensions are given in Dimensional Drawings beginning on page 38 Service Access The control panels are located on the end of the chiller and require a minimum of four feet of clearance in front of the panels Compressors filter driers and manual liquid line shutoff valves are accessible on each side or end of the ...

Page 9: ...4 foot minimum from a wall of any height however performance may be affected at this distance due to air recirculation and elevated condenser pressure Assuming all service clearance requirements are met Figure 6 to Figure 10 depict Case 1 performance adjustments as the wall height and distance increases For AWV models with IWSE option the minimum distance from a wall of any height is 5 feet as mea...

Page 10: ... 12 16 20 24 Capacity Reduction Height of Wall Feet Full Load Capacity Reduction AWV016 018 4 Feet 5 Feet 6 Feet 0 0 0 5 1 0 1 5 2 0 2 5 3 0 8 12 16 20 24 Power Increase Height of Wall Feet Full Load Power Increase AWV016 018 4 Feet 5 Feet 6 Feet 0 0 0 2 0 4 0 6 0 8 1 0 1 2 1 4 8 12 16 20 24 Capacity Reduction Height of Wall Feet Full Load Capacity Reduction AWV020 024 4 Feet 5 Feet 6 Feet 0 0 0 5...

Page 11: ...0 4 0 6 0 8 1 0 1 2 1 4 8 12 16 20 24 Capacity Reduction Height of Wall Feet Full Load Capacity Reduction AWV016 018 5 Feet 6 Feet 7 Feet 0 0 0 5 1 0 1 5 2 0 2 5 3 0 8 12 16 20 24 Power Increase Height of Wall Feet Full Load Power Increase AWV016 018 5 Feet 6 Feet 7 Feet 0 0 0 2 0 4 0 6 0 8 1 0 1 2 1 4 8 12 16 20 24 Capacity Reduction Height of Wall Feet Full Load Capacity Reduction AWV020 024 5 F...

Page 12: ...y Reduction Figure 16 Case 2 Power Increase Figure 17 Two Units Side by Side Figure 18 Case 2 Full Load Capacity Reduction IWSE Option Figure 19 Case 2 Power Increase IWSE Option 0 0 1 0 2 0 3 0 4 0 5 0 6 0 6 8 10 12 Capacity Reduction Distance Between Units ft Full Load Capacity Reduction AWV008 AWV010 AWV012 AWV014 AWV016 AWV018 AWV020 AWV022 AWV024 AWV026 AWV028 AWV030 1 0 2 0 3 0 4 0 5 0 6 0 7...

Page 13: ...ore Units Side by Side Figure 21 Case 3 Full Load Capacity Reduction Figure 22 Case 3 Power Increase Figure 23 Case 3 Full Load Capacity Reduction IWSE Option Figure 24 Case 3 Power Increase IWSE Option 0 5 1 5 2 5 3 5 4 5 5 5 6 5 8 12 16 20 Capacity Reduction Distance Between Units Full Load Capacity Reduction AWV008 AWV010 AWV012 AWV014 AWV016 AWV018 AWV020 AWV022 AWV024 AWV026 AWV028 AWV030 0 5...

Page 14: ...ation The distance from the sides of the unit to the side walls must be sufficient for service such as opening control panel doors For uneven wall spacing the distance from the unit to each wall can be averaged providing no distance is less than 4 feet for most models and 5 feet as measured from the outer base rail of the unit for IWSE models Values are based on walls on all four sides Figure 25 A...

Page 15: ...lation reviewed by the Daikin Applied sales representative prior to installation to ensure it has sufficient air flow characteristics and approved by the installation design engineer to avoid risk of accident Figure 28 Pit Installation Figure 29 Case 5 for AWV008 010 Figure 30 Case 5 for AWV012 014 Figure 31 Case 5 for AWV016 018 H Control Panel D 0 0 1 0 2 0 3 0 4 0 5 0 6 0 7 0 8 0 9 0 0 8 10 12 ...

Page 16: ... 8 0 9 0 10 0 11 0 12 0 13 0 0 8 10 12 13 14 Depth of Pit Wall Height ft Full Load Capacity Reduction Power Increase AWV026 030 Distance 6 ft Distance 8 ft Distance 10 ft Distance 6 ft Distance 8 ft Distance 10 ft 0 0 1 0 2 0 3 0 4 0 5 0 6 0 7 0 8 0 9 0 10 0 11 0 0 8 10 12 13 14 Depth of Pit Wall Height ft Full Load Capacity Reduction Power Increase AWV012 014 Dist 8 ft Capacity Dist 10 ft Capacit...

Page 17: ...o the chiller must include A cleanable strainer installed at the water inlet to the evaporator or IWSE connection to remove debris and impurities before they reach the evaporator Install cleanable strainer within 5 feet 1500 mm of pipe length from the evaporator inlet connection and downstream of any welded connections no welded connections between strainer and evaporator AWV models require a stra...

Page 18: ...h two couplings that may be used for gauges and sensors The pipe provides sufficient clearance from the evaporator for strainer basket removal non IWSE configurations inch blowdown valve non IWSE configurations Two grooved clamps non IWSE configurations The strainer is sized per Table 2 Connection sizes are given in the Pressure Drop Data section on page 42 2 A field supplied strainer to same spec...

Page 19: ... exchangers due to improperly treated water Water systems should be cleaned and flushed prior to chiller installation Water testing and treatment should be verified during initial chiller installation commissioning and maintained on a continuous basis by water treatment professionals see Limited Product Warranty CAUTION The improper use of detergents chemicals and additives in the chiller system w...

Page 20: ...ration of the heater cable is automatic through the fluid sensing thermostat that energizes the evaporator heater cable for protection against freeze up Unless the evaporator is drained in the winter the disconnect switch to the evaporator heater must be closed Conversely do not apply heat to the evaporator if it is drained Chilled Water Pump It is important that the chilled water pumps be wired t...

Page 21: ...Applied sales office for performance outside these temperatures Leaving chilled fluid temperatures below 40 F 4 4 C result in evaporating temperatures at or below the freezing point of water and a glycol solution is required MicroTech III control inhibits compressor unloading at leaving fluid temperatures below 25 F 3 9 C Low fluid temperatures or high equipment room humidity for remote evaporator...

Page 22: ...r the glycol system must meet the requirements of Inlet Strainer Guidelines on page 18 5 Inhibitors for steel copper brass and aluminum must be included for all closed water loop systems Some glycols include inhibitors and should be considered when commissioning the water system Also all chemicals and additives must be compatible with polypropylene pipe 6 The glycol system should include a biocide...

Page 23: ...zed by an electrical engineer familiar with generator applications Transfer Back to Grid Power Proper transfer from stand by generator power back to grid power is essential to avoid chiller damage and must be used to ensure proper function of the unit WARNING Stop the chiller before transferring supply power from the generator back to the utility power grid Transferring power while the chiller is ...

Page 24: ...OCK OR DISCONNECT SWITCH MODE SWITCH USE DRY CONTACTS ONLY SEE NOTE 2 IF MODE SWITCH IS USED REMOVE LEAD 322 BETWEEN M5 21 AND MS 10 57 21 M5 M5 TO COMPRESSOR S AND FAN MOTORS OR CIRCUIT 1 CIRCUIT BREAKER BY OTHERS 12 MQ MQ 17 EARTH GROUND BY OTHERS FUSE 20A for 2KVA 30A for 3KVA Q12 BY OTHERS 120VAC 0 25AMP MAX NOTE 1 ALL FIELD WIRING TO BE INSTALLED AS NEC CLASS 1 WIRING SYSTEM WITH CONDUCTOR RA...

Page 25: ...TWEEN M5 21 AND MS 10 57 21 M5 M5 TO COMPRESSOR S AND FAN MOTORS OR CIRCUIT 1 CIRCUIT BREAKER BY OTHERS 12 MQ MQ 17 EARTH GROUND BY OTHERS FUSE 20A for 2KVA 30A for 3KVA Q12 NOTE 1 ALL FIELD WIRING TO BE INSTALLED AS NEC CLASS 1 WIRING SYSTEM WITH CONDUCTOR RATED 600 VOLTS 2 USE DRY CONTACTS ONLY DO NOT SUPPLY FIELD POWER TO THIS CIRCUIT 3 DO NOT SUPPLY FIELD POWER TO 24VAC OR 120VAC CONTROL CIRCU...

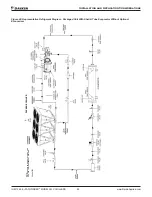
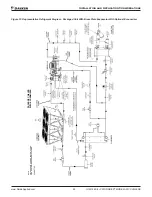
Page 26: ... com Installation and Application Considerations Figure 48 Representative Refrigerant Diagram Packaged Unit With Shell Tube Evaporator Without Optional Economizer NOTE PIPING SHOWN FOR ONE SYSTEM OF UNIT UNIT HAS TWO INDEPENDANT SYSTEMS PACKAGE CHILLER 334887701 ...

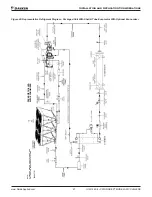
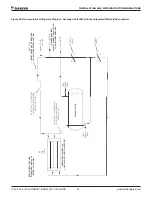
Page 27: ...7 IOM 1242 8 PATHFINDER MODEL AWV CHILLERS Figure 49 Representative Refrigerant Diagram Packaged Unit With Shell Tube Evaporator With Optional Economizer PACKAGE CHILLER WITH ECONOMIZER NOTE PIPING SHOWN FOR ONE SYSTEM OF UNIT UNIT HAS TWO INDEPENDANT SYSTEMS 334887701 ...

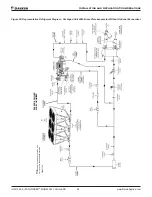
Page 28: ...tallation and Application Considerations Figure 50 Representative Refrigerant Diagram Packaged Unit With Braze Plate Evaporator Without Optional Economizer NOTE PIPING SHOWN FOR ONE SYSTEM OF UNIT UNIT HAS TWO INDEPENDANT SYSTEMS PACKAGE CHILLER W O ECONOMIZER 334887705 ...

Page 29: ... IOM 1242 8 PATHFINDER MODEL AWV CHILLERS Figure 51 Representative Refrigerant Diagram Packaged Unit With Braze Plate Evaporator With Optional Economizer PACKAGE CHILLER WITH ECONOMIZER NOTE PIPING SHOWN FOR ONE SYSTEM OF UNIT UNIT HAS TWO INDEPENDANT SYSTEMS 334887705 ...

Page 30: ...MIX AIR FLOW IWSE MICRO CHANNEL COIL 1 COIL SHOWN FOR DETAIL PURPOSE H TEMP SENSOR WIE 1 2 NPT PLUG FOR VENTING LOCATED ON INLET HEADER BEFORE ALL COi LS 112 NPT PLUG FOR VENTING LOCATED ON INLET HEADER PAST ALL COILS I DX EVAPORATOR I 9 9 I TEMP SENSOR WOE 112 NPT PLUG RELIEF DEVICE MAY BE REQUIRED CONSULT CURRENT PRODUCT IOM I _ T EMP SOR SEN WATER IN ST CONSULT RAINER REQUIRED CURRENT PRODUCT I...

Page 31: ...vide practical and economical refrigerant line sizes without excess pressure drop 3 Maintain uniform oil return to the compressor under all load conditions 4 Keep the refrigerant suction line pressure drop to a maximum of 2 F in saturated temperature equivalent 5 The velocity of each suction line must be sufficient to return oil at 25 of the circuit rating for the application 6 When facing the uni...

Page 32: ... to be a 2 conductor twisted pair shielded cable with drain wire This wire within this cable needs to be a minimum of 22 AWG gauge wire for both conductors Preferably the conductors are colored white and black but not necessary provided notation is made on schematic to aid field servicing of equipment When sourcing cable consideration should be made towards Alpha Wire H1 p n 5481C or equivalent as...

Page 33: ... SUCTION PIPING OIL PRESS TRANSDUCER WITH SCHRADER VALVE DISCHARGE PIPING AIR FLOW AIR FLOW CONDENSER ASSEMBLY F3 F4 COMPRESSOR RELIEF VALVE SUCTION TEMP SENSOR SUCTION TRANSDUCER DISCHARGE TEMP SENSOR WOE TEMP SENSOR WIE TEMP SENSOR OUTSIDE AIR TEMPERATURE WAA BALL VALVE CHARGING VALVE SHUT OFF VALVE RELIEF VALVE DISCHARGE TRANSDUCER STRAINER BALL VALVE SOLENOID VALVE LIQUID INJECTION PIPING SCHR...

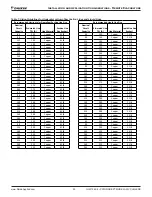
Page 34: ...115 50 Copper 3 5 8 140 50 Copper 4 1 8 165 50 Copper 4 1 8 190 50 Copper 4 1 8 215 50 Copper 5 1 8 240 50 Copper 5 1 8 265 50 Copper 5 1 8 65 75 Copper 3 5 8 90 75 Copper 3 5 8 115 75 Copper 4 1 8 140 75 Copper 4 1 8 165 75 Copper 5 1 8 190 75 Copper 5 1 8 215 75 Copper 5 1 8 240 75 Copper 5 1 8 265 75 Copper 5 1 8 65 100 Copper 3 5 8 90 100 Copper 3 5 8 115 100 Copper 4 1 8 140 100 Copper 5 1 8 ...

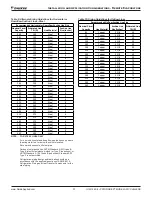
Page 35: ...opper 6 1 8 265 200 Copper 6 1 8 65 225 Copper 4 1 8 90 225 Copper 4 1 8 115 225 Copper 4 1 8 140 225 Copper 5 1 8 165 225 Copper 5 1 8 190 225 Copper 6 1 8 215 225 Copper 6 1 8 240 225 Copper 6 1 8 265 225 Copper 6 1 8 Recommended Liquid Line Size Nominal Circuit Capacity Estimated Line TEL ft Line Material Liquid Line Size Inches 65 150 Copper 1 5 8 90 150 Copper 2 1 8 115 150 Copper 2 1 8 140 1...

Page 36: ...opper 6 1 8 265 275 Copper 6 1 8 65 300 Copper 4 1 8 90 300 Copper 4 1 8 115 300 Copper 4 1 8 140 300 Copper 5 1 8 165 300 Copper 5 1 8 190 300 Copper 6 1 8 215 300 Copper 6 1 8 240 300 Copper 6 1 8 265 300 Copper 6 1 8 Recommended Liquid Line Sizes Nominal Circuit Capacity Estimated Line TEL ft Line Material Liquid Line Size Inches 65 250 Copper 2 1 8 90 250 Copper 2 1 8 115 250 Copper 2 1 8 140 ...

Page 37: ...ty Estimated Line TEL ft Line Material Suction Line Size Inches 240 100 Steel 6 265 100 Steel 6 215 125 Steel 6 240 125 Steel 6 265 125 Steel 6 190 150 Steel 6 215 150 Steel 6 240 150 Steel 6 265 150 Steel 6 190 175 Steel 6 215 175 Steel 6 240 175 Steel 6 265 175 Steel 6 190 200 Steel 6 215 200 Steel 6 240 200 Steel 6 265 200 Steel 6 190 225 Steel 6 215 225 Steel 6 240 225 Steel 6 265 225 Steel 6 ...

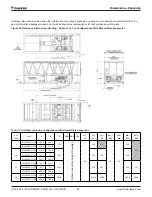
Page 38: ...an Configurations With Brazed Plate Evaporator Table 11 Unit Dimensions by Configuration with Brazed Plate Evaporator OF FANS EVAP A B Z CG X CG Y CG Z L1 L2 L3 L4 L5 L6 M1 M2 M3 M4 M5 M6 M7 M8 8 ACH1000DQ 166 152 8 169 1 179 3 Refer to Submitted As Built Drawings 20 148 N A 12 93 160 N A ACH1000DQ 206 156 5 172 8 10 ACH1000DQ 206 156 5 172 8 217 2 105 169 190 ACH1000DQ 250 160 7 177 ACH1000DQ 330...

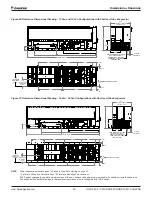
Page 39: ...lt submittal drawings for dimensional information of units configured with IWSE option CG X CG Y CG Z WATER INLET WATER OUTLET M3 M4 2 60 M1 M2 M7 M8 M5 M6 2 60 FIELD POWER ENTRY FROM BOTTOM FOR SMALL CONTROL BOX SHOWN FROM SIDE FOR LARGE CONTROL BOX 100 1 87 6 DOES NOT INCLUDE LIFTING LUGS 5 2 BASE RAIL WIDTH Z BASE LENGTH A C B L1 L2 L3 L4 L5 L6 D RH OPTIONAL RH WATER CONN D LH STANDARD LH WATER...

Page 40: ...1 7 EV 5039 171 1 138 2 21 2 29 9 57 8 371 7 20 EV 5027 171 1 92 9 21 2 29 9 57 8 409 6 23 135 209 320 15 80 3 160 2 238 363 EV 5039 171 1 138 2 21 2 29 9 57 8 409 6 EV 6633 175 5 111 4 21 2 26 9 60 1 409 6 22 EV 5027 171 1 92 9 21 2 29 9 57 8 447 5 23 135 209 365 12 80 3 160 2 280 380 EV 5039 171 1 138 2 21 2 29 9 57 8 447 5 EV 6633 175 5 111 4 21 2 26 9 60 1 447 5 EV 6639 173 7 135 0 21 2 26 9 6...

Page 41: ...nstallation tasks are complete then the springs should be adjusted to the vendor listed compression for the load point When securing the isolator do not overtighten the mounting bolts Overtightening may result in cracking of the cast isolator housing and will have a negative impact on the isolation effect Installation of spring isolators requires flexible piping connections and at least three feet...

Page 42: ...219 3 2 4 876 6 28 4 EV5027F14 08 189 8 2 8 774 6 29 6 EV5027A17 05 290 6 2 6 1171 2 30 4 EV5027F17 06 245 5 3 2 1060 0 38 3 EV5039A12 11 207 8 3 0 834 8 35 7 EV5039F12 12 186 5 3 6 766 1 39 7 EV6633A15 07 336 4 2 7 1329 7 30 4 EV6633F15 08 249 9 2 5 1450 0 43 1 EV6633F16 06 301 2 1 5 1395 0 22 2 EV6639A14 11 260 6 3 7 1042 6 40 6 EV6639F14 12 204 6 3 1 958 2 40 6 EV6639A16 09 317 4 3 7 1261 9 41 ...

Page 43: ...del EV5027 Figure 65 Model EV5039 0 10 20 30 40 100 300 500 700 900 1100 1300 Pressure Drop ft Flow Rate gpm Evaporator EV5027 EV5027A14 07 EV5027A17 05 EV5027F14 08 EV5027F17 06 0 10 20 30 40 200 300 400 500 600 700 800 900 Pressure Drop ft Flow Rate gpm Evaporator EV5039 EV5039A12 11 EV5039F12 12 ...

Page 44: ...odel EV6639 0 10 20 30 200 400 600 800 1000 1200 1400 1600 Pressure Drop ft Flow Rate gpm Evaporator EV6633 EV6633A15 07 EV6633F15 08 EV6633F16 06 0 15 30 45 200 400 600 800 1000 1200 1400 1600 Pressure Drop ft Flow Rate gpm Evaporator EV6639 EV6639A14 11 EV6639A16 09 EV6639A17 07 EV6639F14 12 EV6639F16 10 EV6639F17 08 ...

Page 45: ...g from any interference or for the correction thereof General Description The MicroTech III control system consists of a controller and a number of extension input output I O modules which vary depending on the unit size and configuration The control system provides the monitoring and functions required for the controlled efficient operation of the chiller The MicroTech III controllers used on Pat...

Page 46: ...on on the controller itself Communication to the VFD s and EVAP EXV MODULE is required for operation in all configurations Communication to ECON EXV MODULE is required only if the chiller is configured with economizers Figure 68 System Architecture Schematic NOTE Graphic shows typical chiller controller arrangement individual chiller configurations will be as ordered Compressor VFD 2 Compressor VF...

Page 47: ... 2 Fan Output 2 Fan s Off Fan s On DO9 Circuit 2 Fan Output 3 Fan s Off Fan s On DO10 Circuit 2 Fan Output 4 Fan s Off Fan s On CC Modules Circuit 1 and 2 Table 18 Analog Inputs Description Signal Source X1 Discharge Temperature NTC Thermister 10K 25 C X2 Suction Temperature NTC Thermister 10K 25 C X5 Evaporator Pressure Ratiometric 0 5 4 5 Vdc X6 Oil Pressure Ratiometric 0 5 4 5 Vdc X7 Condenser ...

Page 48: ...ce OK X5 Circuit 1 Switch Circuit Off Circuit On X6 Circuit 2 Switch Circuit Off Circuit On DI1 Waterside Econ Enable Disable Enable Table 30 Digital Outputs Description Output Off Output On DO1 Evaporator Water Pump 2 Pump Off Pump On DO2 Waterside Economizer Status Inactive Active DO3 Circuit 1 Fan Output 5 Fan s Off Fan s On DO4 Circuit 1 Fan Output 6 Fan s Off Fan s On DO5 Circuit 2 Fan Output...

Page 49: ...Type Not Set Not Set F3ALVVR60 F3ALVVR86 F3BLVVR86 F4ALVVR80 Circuit 1 Compressor Max Speed 45 Hz 45 to 60 45 to 70 45 to 80 45 to 86 45 to 90 Dependent on type Circuit 2 Compressor Max Speed 45 Hz 45 to 60 45 to 70 45 to 80 45 to 86 45 to 90 Dependent on type Circuit 1 Compressor VFD Input RLA 100 1 to 1000 amps Circuit 2 Compressor VFD Input RLA 100 1 to 1000 amps Circuit 1 Number of Fans Not Se...

Page 50: ...uid Freeze 2 2 C 36 0 F See Dynamic Set Point Ranges section Evaporator Flow Loss Delay 15 seconds 5 to 15 seconds Evaporator Recirculate Timeout 3 minutes 1 to 10 minutes Low OAT Lockout See Dynamic Set Point Ranges See Dynamic Set Point Ranges section Low OAT Lockout Configuration Lockout Stop Lockout Stop Lockout Only Disabled not available unless Fan VFD Configuration is 1st Fan VFD or All Fan...

Page 51: ...End Month November January through December Daylight Savings Time End Week 1st Week 1st through 5th Week Operator Password Disable Off Off On Apply Changes No No Yes Controller should automatically reboot when Yes Active Alarm Clear Off Off On Alarm Log Clear No No Yes Alarm Log Export to SD Card No No Yes Power Restore Event Log Day Selection Current Current 2nd Day 3rd Day 4th Day 5th Day 6th Da...

Page 52: ...rent 2nd Day 3rd Day 4th Day 5th Day 6th Day 7th Day Alarm Settings High Oil Pressure Drop Minimum Compressor Dependent Compressor Dependent NOTE 1 Manual Speed value will follow the compressor speed command while Speed Control Auto When Speed Control Manual the Manual Speed set point can be adjusted Manual Speed set point should have a maximum value equal to the Maximum Compressor Speed set point...

Page 53: ...ttings The ability to save all setting values and restore those values are available to the operator along with the capability to restore the default values Saving To SD Card When the Save Settings To SD Card setting is set to Yes all the setting values should be saved into a file on the SD card This operation requires that there is an SD Card in the slot on the controller and it is not write prot...

Page 54: ...Enable Enable Enable NOTE A indicates that the value is ignored All of the methods for disabling the chiller discussed in this section will cause a normal shutdown of any running circuits When the controller is powered up the Unit Enable Set Point will be initialized to Disable if the Unit Enable Initial Set Point is set to Disable The chiller will remain disabled after powering up until the Unit ...

Page 55: ...Unit State Auto and Sound Reduction is active 3 Off Ice Mode Timer Unit State Off Unit Mode Ice and Ice Delay Active 4 Off Low OAT Lockout Unit State Off and Low OAT Lockout is active 5 Off DC not ready Unit State Off Condenser Fan Configuration All Fan VFD and DC controller is not in auto control 6 Off All Cir Disabled Unit State Off and all circuits unavailable to start temporary conditions are ...

Page 56: ...nt lockout condition Circuits that are not running will enter a circuit level lockout condition when OAT drops below the lockout set point This condition will clear at the circuit level when OAT rises to the lockout set point plus 2 5 C 4 5 F If the OAT is below the low ambient lockout set point the OAT sensor fault is not active and no circuits are running then low ambient lockout is triggered Th...

Page 57: ... control is selected the primary standby logic above is still used When the evaporator is not in the run state the run hours of the pumps will be compared The pump with the least hours will be designated as the primary at this time Leaving Water Temp LWT Reset LWT Target The evaporator LWT Target varies based on settings and inputs and is selected as follows Table 51 LWT Targets Control Source Ava...

Page 58: ...it Load Unload Sequence This section defines which circuit is the next one to load or unload if the logic does not call for simultaneous load or unload of both circuits The next circuit to load must meet the following requirements Lowest capacity of the running circuits if capacities are equal it must have the lowest sequence number of the circuits that are running if the sequence numbers are equa...

Page 59: ...sly If either circuit is running in manual capacity control or running with active capacity limiting events then no load balancing adjustments will be made Ice Mode Operation In Ice Mode running circuits will load up simultaneously at the maximum possible rate that allows for stable operation of the individual circuits Staging Of Circuits Both circuits should start when LWT error is greater than t...

Page 60: ...et point Yes Waterside Economizer Enable DI is on Waterside Economizer Enable set point Yes If Control Source Network and it is NOT configured with LON then BAS Waterside Economizer Command Enable WSE EWT sensor fault alarm WSE Valve Problem alarm and WSE Valve Fault alarm are not active Unit Mode Cool NOTE WSE parameters are not available on LON so the BAS WSE Command setting cannot be set with L...

Page 61: ...ransition from Hybrid Cooling to Waterside Econ occurs fans may start staging on during pumpdown of running circuit s During Waterside Economizer state the Evaporator EWT will be controlled rather than the Evaporator LWT This is because of the lag that occurs in the Evaporator LWT when WSE capacity changes Calculated Values WSE Delta T WSEEWT EEWT LWT Error EEWT Active Set Point Capacity Control I...

Page 62: ...erence for the trigger values of the high pressure hold and unload events Chiller software is designed to calculate a dynamic maximum saturated condenser temperature High saturated condenser hold and unload offset values are described as follows Table 52 Saturated Condenser Temperature Conditions Condition Saturated Evap Temp or LWT Max Cond Saturated Temp C EXV state is Start Pressure Control LWT...

Page 63: ...on T3 Start to Run Compressor speed 19 Hz for at least 30 seconds T4 Run to Pumpdown Any of the following are required Unit capacity control logic requires this circuit to stop Unit state is pumpdown A pumpdown alarm occurs on the circuit Circuit switch input is off Control Source Network and BAS Circuit Mode Off T5 Pumpdown to Off Any of the following are required Evaporator Pressure drops below ...

Page 64: ...r allowing full capacity Compressor Control The compressor is controlled via a digital output to give the run command to compressor VFD a modbus speed command to control compressor speed a Modbus command to reset alarms faults in the compressor VFD digital outputs for compressor VR solenoids to control VR a digital output for liquid injection to the compressor a Modbus run command to the compresso...

Page 65: ...s equal to the speed that corresponds to the manual speed set point Changes to the speed will be made as fast as allowed by the calculated load and unload delays Speed control may be set to Manual only when circuit state is Start or Run Capacity control shall revert back to automatic control if either circuit state changes from Start or Run to another state speed control has been set to Manual for...

Page 66: ...re difference and pressure ratio above low limit for compressor to run within operational envelope b Achieve best performance at various conditions The target value is displayed on the controller screen and is equal to the base target but also constrained to a calculated range defined by the Minimum Target value and Maximum Target value Base Target Base Target C 0 979264 x OAT 10 7 Target Values M...

Page 67: ... 5 1 2 3 5 1 3 5 1 2 5 1 2 5 7 1 2 3 5 6 1 3 4 5 1 2 3 5 1 3 5 1 3 5 8 1 2 3 4 5 6 1 2 3 4 5 1 3 4 5 1 2 3 5 1 2 3 5 9 1 3 4 5 6 1 2 3 4 5 1 3 4 5 1 4 5 10 1 2 3 4 5 6 1 2 3 5 6 1 2 3 4 5 1 2 4 5 11 1 3 4 5 6 1 3 5 6 1 3 4 5 12 1 2 3 4 5 6 1 2 3 5 6 1 2 3 4 5 13 1 3 4 5 6 1 4 5 6 14 1 2 3 4 5 6 1 2 4 5 6 15 1 3 4 5 6 16 1 2 3 4 5 6 Staging Concept As long as the condenser saturated temperature is ...

Page 68: ...D Speed Control The VFD speed should always be 0 when the fan stage is 0 When the fan stage is greater than 0 the VFD speed will be calculated to control the saturated condenser temperature to the VFD target The minimum and maximum speed are set by the VFD Min Speed and VFD Max Speed set points Stage Up Compensation In order to create a smoother transition when the fan stage increases the VFD comp...

Page 69: ...ways 0 Once the fan stage is more than 0 it will not be allowed to drop back to 0 until the circuit run flag is 0 The maximum fan stage is equal to the number of fans on the circuit When fan stage is 0 it will be set to the maximum fan stage when the PI proportional integral loop reaches 100 This does not occur any time other than when the fan stage is 0 Test Mode Control When Control Mode is set ...

Page 70: ...This target is updated every 10 seconds and averaged over a 100 second period with sampling every 10 seconds Figure 75 Evaporator EXV Suction Superheat Target When the EXV transitions to the superheat control state the target will initially be set to the SSH value The target will then ramp up or down until it meets the calculated SSH target Limits for the SSH target are If SSH Target Min current S...

Page 71: ...llowing are true Discharge Temperature Liquid Injection Activation set point 15 C Circuit state is no longer Run Liquid Line Solenoid Valve As an option the chiller can be equipped with liquid line solenoid valves When configured with this option the Liquid Line Solenoid Valve Configuration setting should be set to Yes If the chiller is configured with liquid line solenoid valves the liquid line s...

Page 72: ...ctivated Clearing Alarms Faults Active alarms can be cleared through the keypad display or a BAS network Alarms are automatically cleared when controller power is cycled Alarms are cleared only if the conditions required to initiate the alarm no longer exist All alarms and groups of alarms can be cleared via the keypad or network via LON using nviClearAlarms and via BACnet using the ClearAlarms ob...

Page 73: ... will clear the alarm After three occurrences the count of occurrences is reset and the cycle starts over if the manual reset flow loss alarm is cleared If active via trigger condition 2 If the flow loss alarm has occurred due to this trigger it is always a manual reset alarm Evaporator Water Freeze Protect Alarm Evaporator Water Freeze Protect Displayed Text Evap Water Freeze Trigger Evaporator L...

Page 74: ...ency Stop input off for 1 second Action Taken Rapid shutdown all circuits and lock out unit from running Reset This alarm can be cleared manually via the keypad or via BAS command after the emergency switch input is on for 5 sec AC Module Comm Failure Alarm AC Module Comm Failure Displayed Text AC Module Comm Fail Trigger Communication with the module has failed Specifically this means the reliabi...

Page 75: ...e Alarm Economizer EXV Module Comm Failure Displayed Text EconExvModCommFail Trigger Economizer Configuration set point is set to Yes and communication with the economizer EXV module has failed Specifically this means that 16 consecutive failures of read write command blocks for this address have occurred Action Taken Economizer valve command is set to 0 in control logic though without communicati...

Page 76: ...ollowing can trigger Evap Pressure 0 kPa for 5 seconds Evap Pressure 50 kPa for 2 seconds When circuit state Start and OAT 8 C any of the following can trigger Evap Pressure 0 kPa for 20 seconds Evap Pressure 50 kPa for 5 seconds Note for this condition where OAT is lower than 8 C the first two times any of the trigger conditions are met in a day the circuit will only shut down and the alarm will ...

Page 77: ... or BAS Mechanical Low Pressure Switch Alarm Mechanical Low Pressure Switch Displayed Text Cn MLP Switch Trigger The alarm is triggered if all of the following are true for at least 40 seconds Circuit State is Run MLP Switch input is off The alarm also requires Evaporator Configuration Remote to trigger This means if the Evaporator Configuration is set to Packaged then the MLP Switch inputs are ig...

Page 78: ...rence Values Oil Feed Loss Alarm Oil Feed Loss Displayed Text Cn Oil Feed Loss Trigger The following are true for 20 second Oil Presence Sensor setting is Yes Compressor is running Oil Presence Sensor input is off Action Taken Rapid shutdown of circuit and lock out from running Reset This alarm can be cleared manually via the Unit Controller HMI High Motor Temperature Alarm High Motor Temperature ...

Page 79: ...ulations for the details on the Max Motor Current value Action Taken Rapid shutdown of circuit and lock out from running Reset This alarm can be cleared manually via the Unit Controller keypad or via BAS command Compressor VFD Current Input High Alarm High Compressor VFD Input Current Displayed Text Cn CmpVFD Curr In Hi Trigger Alarm will trigger when all of the following are true for at least 5 s...

Page 80: ... to specific fault codes so if the fault is due to those codes this alarm should not trigger With 3120 and 3122 compressor types There will be a 10 second delay after the controller boots before allowing this alarm to trigger The alarm will trigger when register 8196 Active Alarm Group word 0 for two seconds and neither of the following alarm trigger conditions are met Register 8196 Active Alarm G...

Page 81: ...rge Temperature Sensor Fault Alarm Discharge Temperature Sensor Fault Displayed Text Cn DiscTempSenFault Trigger Trigger if any of the following are true for at least 1 second Sensor input value 340 Ω Sensor input value 300 kΩ Sensor reliability reported by control system No Fault Action Taken Normal shutdown of circuit and lock out from running Reset This alarm can be cleared manually via the key...

Page 82: ...re This is selectable directly from the event log screen A setting on the Unit Power Restore screen allows selecting which day to show the count for The event log screen also allows selection of either circuit 1 or circuit 2 Each circuit will have its own event log screen These circuit event log screens have a setting that allows selecting which event to view and a setting to allow selecting which...

Page 83: ...still run during this window Action Taken Rapid shutdown of circuit Reset This event resets immediately after triggering High VFD Output Current Unload Trigger This event will trigger when all of the following are true for at least 3 seconds Unit mode is Cool Compressor is running VFD Output Current Max Motor Current x 0 99 Action Taken Compressor speed will be reduced at a rate equivalent to 1 Hz...

Page 84: ...ithin a 2 hour window triggers the alarm All of the following must be true to trigger Compressor Run command is on Compressor VFD Communication Failure is not active Either VFD Actual Speed 0 for more than 15 seconds or VFD Actual Speed 13 Hz for more than 30 seconds Action Taken Rapid shutdown of circuit Reset N A High VFD Capacitor Current Hold Trigger This event will trigger when all of the fol...

Page 85: ... data fields set points A line in a menu may also be a link to further menus This is often referred to as a jump line meaning pushing the navigation wheel will cause a jump to a new menu An arrow is displayed to the far right of the line to indicate it is a jump line and the entire line is highlighted when the cursor is on that line Navigating When power is applied to the control circuit the contr...

Page 86: ...utton is repeatedly pressed the display continues to revert one page back along the current navigation path until the main menu is reached When the Menu Home button is pressed the display reverts to the main page When the Alarm button is depressed the Alarm Lists menu is displayed Edit Mode The Edit Mode is entered by pressing the navigation wheel while the cursor is pointing to a line containing ...

Page 87: ...pen 5 Check the leaving chilled water temperature set point on the MicroTech III controller to be sure it is set at the desired chilled water temperature 6 Start the auxiliary equipment for the installation by turning on the time clock and or remote on off switch and chilled water pump 7 Check to see that pumpdown switches Q1 and Q2 are in the Pumpdown and Stop open position Throw the S1 switch to...

Page 88: ...will energize the crankcase heaters Wait a minimum of 12 hours before starting up unit Turn compressor circuit breakers to Off position until ready to start unit 6 Open the optional compressor suction butterfly valves the liquid line shutoff valves and compressor discharge valves 7 Vent the air from the evaporator water side as well as from the system piping Open all water flow valves and start th...

Page 89: ...ng Guidelines for Flow Switch Flow Switch Setup The flow switch comes from the factory set at a default velocity of 20 cm s This value is typically well below the minimum water flow specified for the unit s evaporator so field adjustment is required for adequate low flow protection Table 60 are the calculated gallons per minute gpm for Schedule 40 steel pipe for various fluid velocities from 20 cm...

Page 90: ...int while pressing the button increases the flow set point Each button press or changes the flow set point by 2 5 cm s Step 4 Press the button until LED 9 begins to flash as shown in Figure 86 Opening of flow switch should now occur at approximately 80 to 90 of minimum flow Figure 86 Upper Range of Minimum Flow Step 5 Once the SP is set it is recommended that the sensor be locked to avoid inadvert...

Page 91: ...m acids that can be harmful to the chiller Avoid prolonged exposure of refrigerant to the atmosphere to prevent this problem CAUTION POE oil must be handled carefully using proper protective equipment gloves eye protection etc The oil must not come into contact with certain polymers e g PVC as it may absorb moisture from this material Also do not use oil or refrigerant additives to the system WARN...

Page 92: ...bly Use fresh refrigerant oil to lubricate parts during reassembly 1 Install new O rings on the oil filter housing cover 2 Insert new oil filter into the housing ensuring the filter sits tightly on the sealing spigot 3 Replace the oil filter housing cover 4 Evacuate air and noncondensables before valving refrigerant back into the compressor Electrical Terminals DANGER Electric equipment can cause ...

Page 93: ...of the unit s regularly scheduled maintenance procedures Failure to clean epoxy coated coils will void the warranty and may result in reduced efficiency and durability in the environment For routine quarterly cleaning first clean the coil with a coil cleaner see Table 63 After cleaning the coils with a cleaning agent use the chloride remover to remove soluble salts and revitalize the unit Recommen...

Page 94: ...s will cycle off first The operator can override the MicroTech III controller and manually select the lead circuit as circuit 1 or 2 Pump Operation It is highly recommended that the chiller unit control the chilled water pump s The integral chiller control system has the capability to selectively start pump A or B or automatically alternate pump selection at each start and also has pump standby op...

Page 95: ...rrect level lubricant charge X Check filter drier pressure drop Note 6 X Perform compressor vibration test optional X Perform oil analysis test on compressor oil X Condenser air cooled Rinse condenser coils Note 4 X Clean epoxy coated condenser coils Note 4 X Check fan blades for tightness on shaft Note 5 X Check fans for loose rivets and cracks check motor brackets X Check coil fins for damage an...

Page 96: ...h above such free labor does not include diagnostic visits inspections travel time and related expenses or unusual access time or costs required by product location 2 Refrigerants fluids oils and expendable items such as filters are not covered by this warranty 3 This warranty shall not apply to products or parts which a have been opened disassembled repaired or altered by anyone other than Compan...

Page 97: ... is sold pursuant to its standard terms and conditions of sale including Limited Product Warranty Consult your local Daikin Applied representative for warranty details To find your local Daikin Applied representative go to www DaikinApplied com Aftermarket Services To find your local parts office visit www DaikinApplied com or call 800 37PARTS 800 377 2787 To find your local service office visit w...

Reviews: