


EWAQ080~260DAYN
Packaged air-cooled water chillers
4PW35556-1E
Operation manual
8
O
PERATION
The EWAQ units are equipped with a digital controller (located
behind the service panel) offering a user-friendly way to set up, use
and maintain the unit.
This part of the manual has a task-oriented, modular structure. Apart
from the first section, which gives a brief description of the controller
itself, each section or subsection deals with a specific task you can
perform with the unit.
Depending on the unit there are one or two cooling circuits in the
system. The units EWAQ130~260 exist out of two circuits, whereas
the units 100 only have one circuit. These circuits are
generally named C1 and C2 in the following descriptions. So all
information about circuit 2 (C2) is not applicable for 100
units.
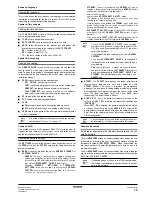
Digital controller
User interface
The digital controller consists of an alphanumeric display, labelled
keys which you can press and a number of LEDs.
■
Digital controller and digital remote controller (EKRUPG)
Figure - Digital (remote) controller
How to enter a menu
Scroll through the main menu using the
fi
and
Ì
keys to go to the
menu of your choice. Push the
‡
key to enter the selected menu.
■
Access to the setpoints menu (
∑
) and the usersettings menu
(
Å
) is protected by a password, refer to
"Changing the user
password" on page 19
.
■
The cool/heat menu is not available for EWAQ units.
Connection of a remote digital controller to the unit
For a remote digital controller a cable length of up to 500 metres
between the remote digital controller and the unit is allowed. This
gives the opportunity to control the unit from a considerable distance.
Refer to "Cable for remote digital controller" in the installation manual
for cable specifications.
These restrictions are the same for units in a DICN configuration.
Working with the unit
This chapter deals with the everyday usage of the unit. Here, you will
find how to perform routine tasks, such as:
■
"Setting the language" on page 8
■
"Switching the unit on" on page 8
■
"Consulting actual operational information" on page 9
■
"Adjusting the temperature setpoint" on page 10
■
"Resetting the unit" on page 10
Setting the language
If desired, the operating language can be changed to any of the
following languages: English, German, French, Spanish or Italian.
1
Enter the
Å
usersettings menu. Refer to chapter
"How to enter
a menu" on page 8
.
2
Go to the Language submenu of the
Å
usersettings menu using
the
fi
and
Ì
keys and press the
‡
key to enter.
3
Press
‡
to change the operating language until the desired
language is active.
The controller is factory set to English.
Switching the unit on
1
Press the
œ
key on the controller.
Depending on whether or not a remote ON/OFF switch has
been configured (refer to the installation manual), the following
conditions may occur.
When no remote ON/OFF switch is configured, the LED inside
the
œ
key lights up and an initialization cycle is started. Once all
the timers have reached zero, the unit starts up.
When a remote ON/OFF switch is configured, the following table
applies:
2
If the water chiller does not start after a few minutes, refer to
"Troubleshooting" on page 19
.
œ
key, to start up or to shut down the unit.
π
key, to enter the safeties menu or to reset an alarm.
ƒ
key, to enter the main menu
fi
Ì
keys, to scroll up or down through the screens of a menu
(only in case
^
,
v
or
÷
appears) or to raise, respectively
lower a setting.
‡
key, to confirm a selection or a setting.
NOTE
Temperature readout tolerance: ±1°C.
Legibility of the alphanumeric display may decrease in
direct sunlight.
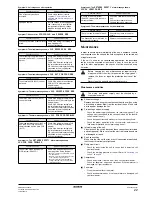
Menu
Not
selected
Selected
Readout menu
Setpoints menu
Usersettings menu
Timers menu
History menu
Info menu
I/O status menu
Login/logout menu
Network menu
Cool/heat menu
=
=
=
=
=
=
=
=
=
=
º
Ò
Â
µ
®
†
Ú
æ
∂
Ï
ª
∑
Å
Ó
‚
™
Ÿ
Æ
∆
Í
ªÒµ®
†Úæ∂Ï
NOTE
When a remote digital controller is connected to a
stand-alone unit, the address of the remote digital
controller has to be set to SUB by means of the DIP-
switches on the back of the remote digital controller.
Refer to the installation manual "Setting the addresses
on the remote digital controller" for setting the address.
NOTE
If the password protection is set to ON, the correct
password has to be given before any further
action is possible.
Local key
Remote
ON/OFF switch
Unit
œ
LED
ON
ON
ON
ON
ON
OFF
OFF
Flashing
OFF
ON
OFF
OFF
OFF
OFF
OFF
OFF