


258
The voice input from device end to client end is multiplexing the audio input of channel 1. The voice in
channle 1 is not encoded when voice talk is enabled.
4.5.3
PTZ
Before PTZ operation, please make sure you have properly set PTZ protocol.
There are eight direction keys. In the middle of the eight direction keys, there is a 3D intelligent
positioning key.
Click 3D intelligent positioning key, system goes back to the single screen mode. Drag the mouse in the
screen to adjust section size. It can realize PTZ automatically.
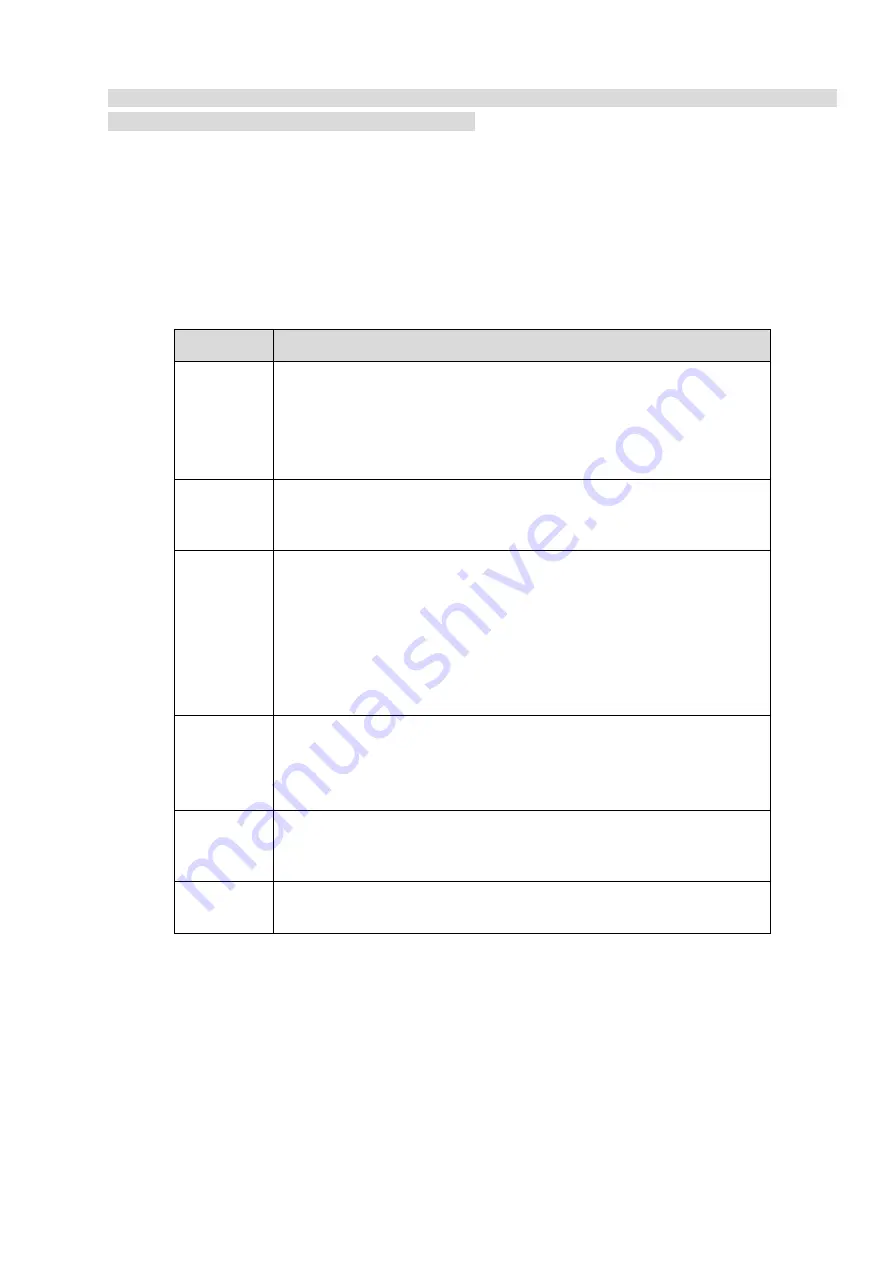
Please refer to the following sheet for PTZ setup information.
Parameter Function
Scan
Select Scan from the dropdown list.
Click Set button, you can set scan left and right limit.
Use direction buttons to move the camera to you desired location
and then click left limit button. Then move the camera again and
then click right limit button to set a right limit.
Preset
Select Preset from the dropdown list.
Turn the camera to the corresponding position and Input the
preset value. Click Add button to add a preset.
Tour
Select Tour from the dropdown list.
Input preset value in the column. Click Add preset button, you
have added one preset in the tour.
Repeat the above procedures you can add more presets in one
tour.
Or you can click delete preset button to remove one preset from
the tour.
Pattern
Select Pattern from the dropdown list.
You can input pattern value and then click Start button to begin
PTZ movement such as zoom, focus, iris, direction and etc. Then
you can click Add button to set one pattern.
Aux
Please input the corresponding aux value here.
You can select one option and then click AUX on or AUX off
button.
Light and
wiper
You can turn on or turn off the light/wiper.
Summary of Contents for NVR608-32-4KS2
Page 1: ...I Network Video Recorder User s Manual V6 0 0 ZHEJIANG DAHUA VISION TECHNOLOGY CO LTD...
Page 121: ...105 Figure 3 92 Figure 3 93...
Page 144: ...128 Figure 3 111 Figure 3 112 Figure 3 113...
Page 157: ...141 Figure 3 126 Figure 3 127...
Page 159: ...143 Figure 3 129 Click draw button to draw the zone See Figure 3 130 Figure 3 130...
Page 162: ...146 Figure 3 133 Click Draw button to draw a zone See Figure 3 134 Figure 3 134...
Page 167: ...151 Figure 3 139 Click draw button to draw the zone See Figure 3 140...
Page 185: ...169 Figure 3 157 Figure 3 158...
Page 186: ...170 Figure 3 159 Figure 3 160...
Page 189: ...173 Figure 3 164 Figure 3 165...
Page 224: ...208 Figure 3 199...
Page 311: ...295 Figure 4 56 Figure 4 57...
Page 317: ...301 Figure 4 62 Figure 4 63...
Page 318: ...302 Figure 4 64 Figure 4 65...
Page 343: ...327 Figure 4 101 Figure 4 102...
Page 352: ...336 Figure 4 115 Figure 4 116...
Page 372: ...356 Figure 4 144 Note For admin you can change the email information See Figure 4 145...


