background image


3  NVR Components 

Check the label on the bottom of the NVR and note the model number and the power requirements 
for this NVR. The label on the rear panel lists the serial number for the NVR. Please provide this serial 
number when requesting information or service for this device.  
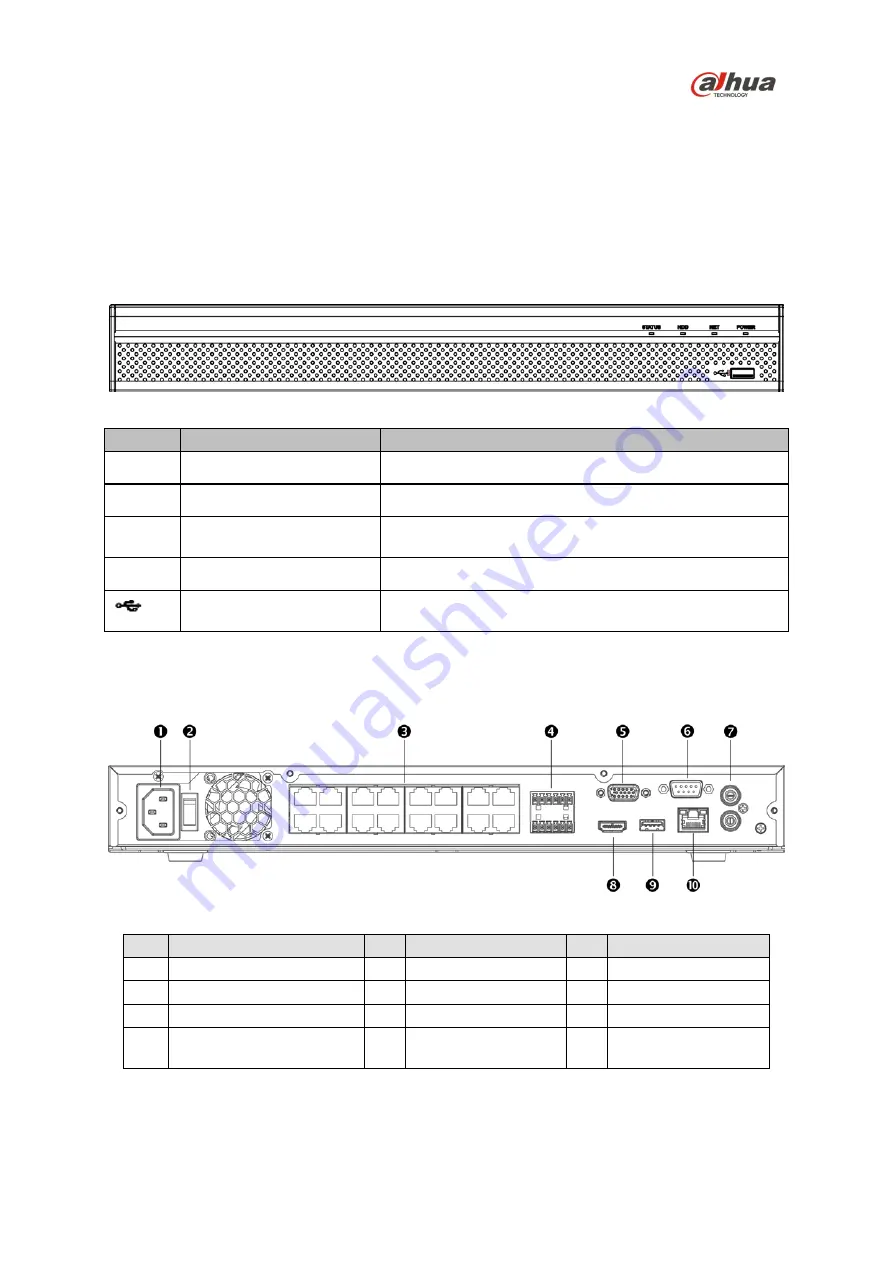
3.1  Front Panel 

The figure below depicts the NVR front panel. 


Figure 3-1 

Light 

Name 

Function 

STATUS   

A blue light indicates the device is operating normally. 

HDD 

HDD status indicator 

A blue light indicates that the HDD is malfunctioning. 

NET 

Network status indicator 

A blue light indicates that the network connection is 
abnormal.  

POWER 

Power status indicator  

A blue light indicates that the power connection is OK.  


USB 2.0 port 

Connect to a peripheral USB 3.0 device (storage mouse, 
CD/DVD burner). 

3.2  Rear Panel 

The image below is for reference only, it may not be an exact representation of your NVR. Please 
refer to the Documentation CD that comes with the product. 


Figure 3-2 

Ref 

Name  

Ref  Name  

Ref  Name  

Power Input 

VGA Output 

USB 3.0 Port 

On/Off Button  

RS232 Port 

10 

RJ45 Port (1000 M) 

PoE Ports (x16) 

Audio Input/Output 


Alarm Input/Output and 
RS485 Connections (A/B) 

HDMI Output  


Summary of Contents for NVR52A16-16P-4KS2

Page 1: ...16 Channel 4K Network Video Recorder NVR52A16 16P 4KS2 Quick Start Guide Version 1 0 1 Dahua Technology USA Inc...

Page 2: ...attery Disclaimer 2 Warnings 3 1 2 FCC Information 3 FCC compliance 3 1 3 Legal Notices 3 Copyright 3 Trademarks 3 1 4 Disclaimer 3 2 Unpacking 4 3 NVR Components 5 3 1 Front Panel 5 3 2 Rear Panel 5...

Page 3: ...proved power supplies Limited power sources must comply with EN 60950 Substitutions may damage the unit or cause fire or shock For 24 VAC units voltage applied to the unit s input power should not exc...

Page 4: ...onment requires proper and adequate circuitry Ensure the circuits to the rack are capable of handling the electrical requirements of all units in the rack to protect against circuit overloads Pack the...

Page 5: ...r is connected Consult the dealer or an experienced radio TV technician for help 1 3 Legal Notices Copyright This user guide is 2017 Dahua Technology Company LTD This user guide is the intellectual pr...

Page 6: ...are included If an item is missing contact customer support or your local representative The original packing carton is the safest container to transport the unit in the event the unit must be returne...

Page 7: ...that the HDD is malfunctioning NET Network status indicator A blue light indicates that the network connection is abnormal POWER Power status indicator A blue light indicates that the power connection...

Page 8: ...the rear panel and side panels and remove the upper housing 3 Place the HDD under the HDD bracket in the chassis and align the four screw holes Affix the HDD to the chassis using a Philips screwdriver...

Page 9: ...where you must supply the default username and password and then set your own credentials Figure 5 1 1 Select admin from the User Name pull down menu 2 Type a unique password for the admin account 3 T...

Page 10: ...ch you can use the Smart Add function to add all network cameras to the NVR at the same time There are two methods to access the Smart Add interface 1 Click the Smart Add button from the Startup Wizar...

Page 11: ...ct the Camera tab and click the Remote link in the left pane Figure 7 1 3 Click the Device Search button located in the upper frame to search for remote devices on the network 4 Double click an IP add...

Page 12: ...nternet Explorer and type the NVR s IP address in the address bar Internet Explorer opens the Login page 2 Click Yes to install webrec cab when the system displays the installation prompt Note If you...

Page 13: ...logy USA Inc 23 Hubble Irvine CA 92618 Tel 949 679 7777 Fax 949 679 5760 Email sales usa global dahuatech com Rev 001 001 2017 Dahua All rights reserved Design and specifications are subject to change...

Reviews: