DAF LF45 Series Maintenance Schedule Download Page 1

©

 200515

1-1

Maintenance intervals

MAINTENANCE SCHEDULE

ΛΦ45/55

 series

4

1. MAINTENANCE INTERVALS

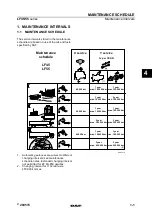
1.1 MAINTENANCE SCHEDULE

The service intervals stated in the maintenance 

schedule are based on use of the oils and fuels 

specified by DAF.

1.

Automatic gearboxes are subject to different 

changing intervals; see maintenance 

schedule notes. Extended changing interval 

not permitted for ZF 6S-850 gearbox.

2.

Changing interval for 1132 rear axle 

450,000 km max.

+

+

Maintenance

schedule

LF45
LF55

1x per YEAR

G000318

 X service

 Y service

40.000 km

40.000 km

40.000 km

1 year

max. 100.000 km

1 year

max. 100.000 km

1 year

max. 150.000 km

3 year

max. 180.000 km

3 year

max. 300.000 km

3 year

max. 450.000 km

1 year

max. 100.000 km

1 year

max. 100.000 km

1 year

max. 150.000 km

2 year

max. 120.000 km

3 year

max. 300.000 km

3 year

max. 300.000 km

Ext.

Ext.

Ext.

(1)

(2)

Summary of Contents for LF45 Series

Page 1: ...schedule notes Extended changing interval not permitted for ZF 6S 850 gearbox 2 Changing interval for 1132 rear axle 450 000 km max Maintenance schedule LF45 LF55 1x per YEAR G000318 X service Y serv...

Page 2: ...the load dependent control valve O Replace the steering gear filter element if the vehicle is equipped with the RAS EC system See note 6 Replaced O Yes O No O Replace the steering gear high pressure f...

Page 3: ...nti clockwise 3 Put the dipstick back 4 Remove the dipstick and check the oil level 5 The oil level should be between the Hot add and Hot full marks 6 Clean the dipstick with a lint free cloth and put...

Page 4: ...marks could indicate a leak in the seal Checking greased wheel hubs for leaks 1132 axle 1 Check the wheel hubs for leaks Note If there are serious grease marks on the brake disc side of the wheel hub...

Page 5: ...this is very dirty 3 Remove the filter element by turning it anti clockwise Collect the oil that comes out 4 Remove the O ring if it has not been removed already Installing the lubricating oil filter...

Page 6: ...o not fill the fine filter with fuel until it has been fitted The fine filter is filled with fuel by the primer pump after it has been fitted This considerably reduces the risk of dirt getting into th...

Page 7: ...oil escapes See Technical data 5 With the engine running at idling speed top up gearbox oil until the oil level is between the Cold add and Cold Full marks 6 Check the oil level See Inspection and ad...

Page 8: ...lters 2 See Removal and installation 3 Fill the gearbox through the dipstick holder with the specified quantity of oil see Technical data 4 Check that the oil level reaches the Cold full mark Note To...

Page 9: ...alation get fresh air rest and consult a doctor 1 Disconnect the earth lead from the battery terminal 2 Disconnect the positive lead from the battery terminal 3 Clean the battery terminals battery cab...

Page 10: ...e vehicle has air conditioning loosen the support of the refrigerant pipes 1 on the radiator and remove the condenser from the air cooler supports Push the condenser as far as possible forwards 2 Inse...

Page 11: ...icating stub axles S general 1 To make sure that the grease can penetrate adequately the stub axles should be lubricated in unloaded condition The front axle should therefore be completely jacked up m...

Page 12: ...EXPLANATORY NOTES ON THE MAINTENANCE ACTIVITIES 7 2 200515 Lubrication 5 45 55 series 152N S front axle 1 The 152N front axle has a grease nipple on the top side and underside G000189...

Reviews: