ENGLISH
90
NOTE: On initial start-up and when default settings are restored, RC is set to 0.0[A] and the correct value
must be entered; otherwise the unit will not start and the error message EC is displayed.
6.5.2
RT: Setting the direction of rotation
If the direction of pump rotation is incorrect, it can be inverted by changing this parameter. In this menu item,
use b and – to activate and display the two possible states “0” or “1”. The phase sequence is shown
in the comment line on display. The function is also enabled when the motor is running.
If it is not possible to see the direction of motor rotation, proceed as follows:
o
Turn on a utility and check the frequency.
o
Without changing collection, modify parameter RT and check the FR frequency again.
o
The correct RT parameter is that which requires, compared to collection, a lower frequency FR.
CAUTION
:
on some electric pumps, it may occur that there is little difference in frequency in the two cases,
and it is therefore difficult to understand which is the correct direction of rotation. In these cases, repeat the
test described above, but rather than checking frequency, attempt to check the phase current absorption
(parameter C1 in the user menu). The correct RT parameter is that which requires, compared to collection, a
lower phase current C1.
6.5.3
FN: Rated frequency settings
This parameter defines the rated frequency of the electric pump, and can be set from a minimum of 50 [Hz]
and maximum of 200 [Hz].
Press “+” or “-” to selected the required frequency starting from 50 [Hz].
The values 50 and 60 [Hz] have priority over other selections as they are the most common: on entry of any
frequency value, when the value 50 or 60 [Hz] is reached, the increment or decrement stops; to modify the
frequency from one of these two values, release each button and then press "+" or "-" for at least 3 seconds.
NOTE:
On initial start-up and when default settings are restored, FN is set at 50 [Hz] and the correct value
must be entered, as stated on the pump.
Each modification to FN is interpreted as a system change, and therefore the parameters FS, FL and FP are
adjusted automatically according to the set FN. On each variation to FN re-check FS, FL, FP to ensure
settings are as required.
6.5.4
OD: Type of system
Set with two possible values (1 and 2) according to a rigid or flexible system.
The inverter leaves the factory set to mode 1, suited to most systems. In the event of pressure variations that
cannot be stabilised by adjusting parameters GI and GP, switch to mode 2.
IMPORTANT:
In the two configurations, the values of adjustment parameters
GP
and
GI
also change.
Furthermore, the values of GP and GI set in mode 1 are stored in a different memory from
the GP and GI values set in mode 2. Therefore, for example, the value of GP in mode 1,
when switching to mode 2, is replaced by the GP value of mode 2, but is stored and restored
on return to mode 1. The same value seen on display has a different meaning in each of the
modes, as the check algorithm is different.
6.5.5
RP: Setting the pressure drop for restart
This shows the drop in pressure, with respect to the value SP which causes pump restart.
For example, if the setpoint pressure is 3.0 [bar] and RP is 0.5 [bar] the pump is restarted at 2.5 [bar].
RP is normally set from a minimum of 0.1 to maximum 5 [bar]. In special conditions (for example in the case
of a setpoint lower than RP) this can be limited automatically.
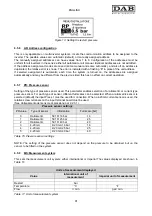
To facilitate the work of the user, the RP setting page, highlighted below the symbol RP, shows the effective
restart pressure; see Figure 13.
Summary of Contents for MCE-22/P
Page 278: ...274 1 276 2 279 3 280 4 282 5 283 6 4 20 284 7 285 8 286 9 287 10 290 11 290 12 292...
Page 279: ...275 IEC 60634...
Page 280: ...276 1 6 MCE 22 P MCE 15 P MCE 11 P 1 1 1...
Page 282: ...278 2 5 2 1 2 1 2 2 1 1 2 1 2 L L L 2 2 4 15...
Page 283: ...279 2 2 2 1 2 2 1 1 3 1 LN 2 2 3 1 3 4 4...
Page 284: ...280 A 3 3 2 2 1 2 4 3 1 UVW 2 2 4 3 50 60 200 1...
Page 286: ...282 4 2 2 3 Press e Flow 5 A B C D d1 d2...
Page 291: ...287 3 9 64 X 128 4 MODE SET 9 7 MODE 1 SET 8 3 EEprom SET 6 SET MODE...
Page 292: ...288 3 1 9 3 2 1 2 3 2 1 MODE SET MODE 8 2 2 5 5 5 2 2 9...
Page 294: ...290 3 2 2 10 SET 10 15 12 11...
Page 296: ...292 12 12 12 GO SB...
Page 297: ...293 4 4 1 Link 8 4 2 4 2 1 Link 2 Link 5...
Page 300: ...296 4 3 1 2 1 4 3 1 3 SET MODE LA RC FN MS FS FL AC AE O1 1 O2 2 4 4 ET 6 6 9 FL...
Page 326: ...322 BL 10 6 24 24 30 LP 180 200 HP OT TE 100 C 85 C OB BT 120 C 100 C OC 10 6 OF 10 6 30...
Page 327: ...323 8 8 1 PMW 4 2 8 2 8 3 8 3 SET EE EEprom FLASH...
Page 494: ...490 1 492 2 495 3 496 4 498 5 499 6 4 20 mA 500 7 501 8 502 9 503 10 506 11 506 12 508 13 523...
Page 495: ...491 IEC 364 inverter...
Page 496: ...492 1 Inverter inverter inverter 6 inverter MCE 22 P MCE 15 P MCE 11 P 1 1 1...
Page 499: ...495 2 2 2 1 inverter inverter 2 2 1 1 inverter 3 1 LN 2 inverter 2 PVC 3 inverter 1 3 inverter...
Page 502: ...498 4 2 2 3 Press Flow 5 A B C D d1 d2...
Page 507: ...503 3 9 oled 64 X 128 4 MODE SET 9 inverter 7 MODE 1 SET 8 3 EEprom SET 6 SET MODE...
Page 508: ...504 3 1 9 3 2 1 2 3 2 1 MODE SET Setpoint MODE 9 ONOMA TOY MENOY 2 Setpoint 2 5 5 5 2 2 9...
Page 512: ...508 12 12 12 GO SB FAULT...
Page 543: ...539 8 8 1 PMW 4 2 8 2 inverter 8 3 8 3 inverter SET EEPROM FLASH setpoint...
Page 599: ...595...


