background image

A subdivision of The DAAN Groups

Email: [email protected]

CONTACT US

Before returning your product, please contact us first! Voltz 

Toys Customer Service can assist you with any replacement 

parts, damages, or defective issues reported. You can con-

tact us directly at www.voltztoys.ca.

Phone number: 1-888-338-6589
Head Office: Unit 7-3600A Laird Rd, Mississauga, ON, L5L 

6A6

MODEL: 80001

MERCEDES-AMG GTR

ENGLISH

COMPLIANCE STANDARDS:

SOR/2011-17 

SOR/2018-138 

SOR/2016-195 

SOR/2016-302 

SOR/2018-83 

SOR/2016-188 

SOR/2014-254 

EN71 

ASTM F963-17 

CPSIA

Summary of Contents for VOLTZ TOYS 80001

Page 1: ...th any replacement parts damages or defective issues reported You can con tact us directly at www voltztoys ca Phone number 1 888 338 6589 Head Office Unit 7 3600A Laird Rd Mississauga ON L5L 6A6 MODE...

Page 2: ...lease refer to the actual product itself We apologize for any inconve nience caused An adult should assemble the product All pictures shown are for illus tration and reference purposes only The actual...

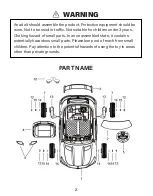
Page 3: ...in traffic Not suitable for children under 3 years Choking hazard of small parts In an unassembled state it contains potentially hazardous small parts Please keep out of reach from small children Pay...

Page 4: ...3 PARTS LIST...

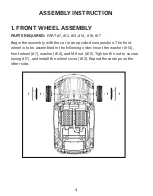
Page 5: ...7 Begin the assembly with the car in an upside down position The front wheel is to be assembled in the following order Insert the washer 14 front wheel 7 washer 14 and M8 nut 15 Tighten the nut to sec...

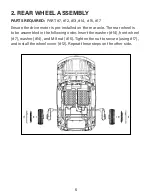
Page 6: ...the drive motor is pre installed on the rear axle The rear wheel is to be assembled in the following order Insert the washer 14 front wheel 7 washer 14 and M8 nut 15 Tighten the nut to secure using 17...

Page 7: ...heels 10 to slots on the car body Fix the wheels with two M4x12 screws 18 4 SEAT ASSEMBLY PARTS REQUIRED PART 4 18 Flip the car in an upright position First connect the red battery wire to enable powe...

Page 8: ...7 5 SPOILER ASSEMBLY PARTS REQUIRED PART 3 18 Align the spoiler 3 on the car body Press down firmly until it snaps into place Fix the spoiler with two M4x12mm screws 18...

Page 9: ...steering wheel with a M5x40 bolt and M5 nut 16 Attention Please ensure the steering wheel is installed in the correct posi tion Incorrect positioning will cause the wire to tear while steering 7 WIND...

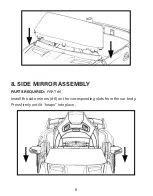
Page 10: ...9 8 SIDE MIRROR ASSEMBLY PARTS REQUIRED PART 6 Install the side mirrors 6 on the corresponding slots from the car body Press firmly until it snaps into place...

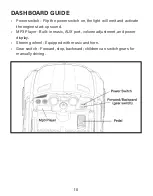
Page 11: ...the light will emit and activate the engine start up sound MP3 Player Built in music AUX port volume adjustment and power display Steering wheel Equipped with music and horn Gear switch Forward stop...

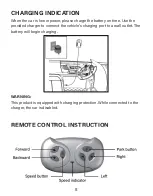
Page 12: ...he battery on time Use the provided charger to connect the vehicle s charging port to a wall outlet The battery will begin charging WARNING This product is equipped with charging protection While conn...

Page 13: ...ndicates the pairing has initiated 3 Turn on the power from the vehicle while the remote is flashing After turning on the vehicle the lights on the remote will stop and stay lit This indicates the pai...

Page 14: ...riod it is recommended to remove the batteries to avoid battery leakage and corrosion to the circuit board 9 Do not drop or throw the remote control 10 Install batteries with correct polarity to avoid...

Page 15: ...e dashboard Follow the instructions to charge the battery If the car is starting to slow down this indicates the battery is low Re charge for 8 12 hours maximum 20 hours Do not overcharge or under cha...

Page 16: ...ot reverse the battery ATTENTION Before charging please inspect the charger battery and plug to ensure no damages or abnormalities are found If any damages are found dis continue usage of the car unti...

Page 17: ...done by an adult If the product is inactive it must be fully charged Charge at least once a month to ensure battery functionality and life 6 Use a soft cloth to clean the car Do not use chemical solve...

Page 18: ...Low batteries should be removed from the car and kept away from chil dren 15 Disconnect the batteries when completely inactive or discontinued Do not let children use the car in this state TROUBLESHO...

Page 19: ...18 25kg...
Reviews: