


D-Link DNR-322L mydlink Network Video Recorder
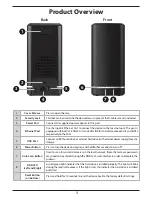
Product Overview
1
1
Cover Release
Press to open the case.
2
Security Lock
This lock can be used to tie the device down to prevent theft. Cables are not included.
3
Power Port
Connect the supplied power adapter to this port.
4
Ethernet Port
Use the Gigabit Ethernet Port to connect the device to the local network. The port is
equipped with both a Traffic LED (L) and LAN LINK (R) to indicate connectivity and traffic
respectively to the LAN.
5
USB Port
Connect a USB thumb drive or external hard drive (with external power supply) for extra
storage.
6
Power Button
Press to turn the device on or press and hold for five seconds to turn off.
7
Auto Scan Button
Used to scan for and add cameras on the local network. (Note that camera passwords
may need to be entered through the DNR-322L web interface in order to complete the
process).
8
HDD LED
(Left and Right)
A solid green light indicates that the hard drive is installed properly. This light will blink
during the read/write process. If the light is red, this indicates the hard drive is installed
but failed.
Reset Button
(on bottom)
Press and hold for 10 seconds to reset the device back to the factory default settings.
3
2
5
4
6
7 8
Back
Front
3
EN
G
LIS
H


