background image

4  Configuration


DGS-1210 series Metro Ethernet Managed Switch User Manual


19 


 Configuration 

The features and functions of the D-Link DGS-1210/ME Metro  Ethernet Switch  can be configured through 
the web-based management interface. 


Web-based Management 

After press the 

OK

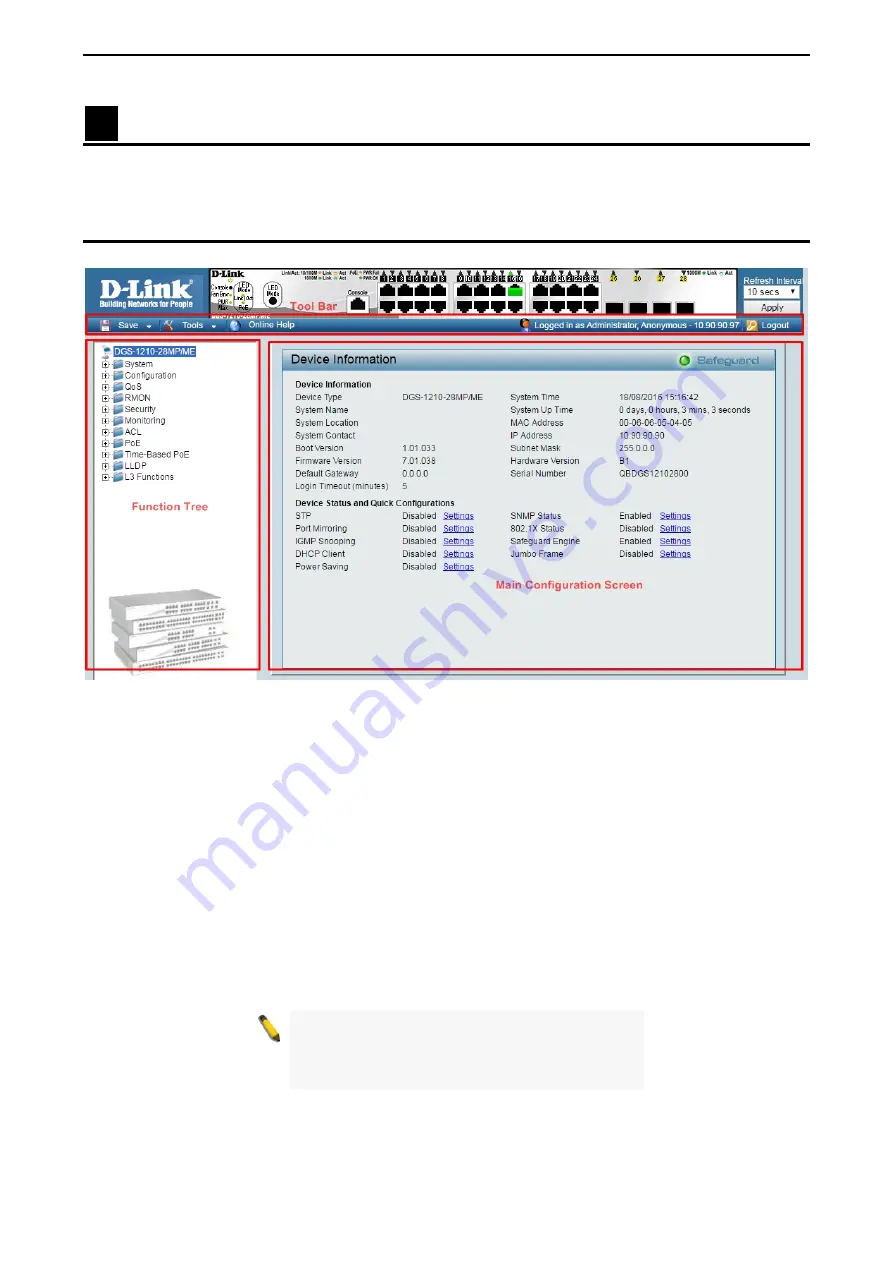
 button in Logon Dialog Box, you will see the screen below: 


Figure 4.1 – Web-based Management 


The three main areas are the 

Tool Bar

 on top, the 

Function Tree 

on the left, and the 

Main Configuration 

Screen


The 

Tool Bar

  provides a quick and convenient way for accessing essential functions such as firmware 

upgrades and basic settings. 


Clicking on a section or subsection in the function tree will display all the settings of that section in the main 
configuration screen.  The main configuration screen will show the current status of your Switch by clicking 
the model name on top of the function tree.  


In the upper-right corner of the screen the username and current IP address will be displayed. 


Under the username is the 

Logout 

button. Click this to end this session. 


NOTE:

  If you close the web browser without 

clicking the 

Logout

 button first, then it will be seen 

as an abnormal exit and the login session will still 
be occupied.  


Finally, by clicking on the D-Link logo at the upper-left corner of the screen you will be redirected to the local 
D-Link website. 


Summary of Contents for DGS-1210 Series

Page 1: ...User Manual Product Model DGS 1210 ME Series Metro Ethernet Switches Release 2 10 Copyright 2016 All rights reserved ...

Page 2: ...Unpacking 13 Step 2 Switch Installation 13 Desktop or Shelf Installation 13 Rack Installation 13 Step 3 Plugging in the AC Power Cord 14 Power Failure 15 3 Getting Started 16 Management Options 16 Using Web based Management Interface 16 Supported Web Browsers 16 Connecting to the Switch 16 Accessing the Web based Management Interface 17 Web based Management 17 D Link Network Assistant DNA 17 4 Con...

Page 3: ...ttings 37 System Telnet Settings 37 System Password Encryption 37 System Ping Test 37 System MAC Notification Settings 38 System System Log Configuration System Log Settings 38 System System Log Configuration System Log Server 39 System Time Profile 39 System Power Saving 40 System IEEE802 3az EEE Settings 40 System SMTP Service SMTP Server Settings 41 System SMTP Service SMTP Service 41 System D ...

Page 4: ... Settings 68 Configuration DHCPv6 Relay Option38 Settings 69 Configuration Spanning Tree STP Bridge Global Settings 69 Configuration Spanning Tree STP Port Settings 71 Configuration Spanning Tree MST Configuration Identification 72 Configuration Spanning Tree STP Instance Settings 73 Configuration Spanning Tree MSTP Port Information 74 Configuration Ethernet OAM Ethernet OAM Port Settings 74 Confi...

Page 5: ...ecurity Access Authentication Control Authentication Server 102 Security Access Authentication Control Login Method Lists 103 Security Access Authentication Control Enable Method Lists 103 Security Access Authentication Control Local Enable Password Settings 104 Security Traffic Segmentation 104 Security DoS Prevention Settings 105 Security DHCP Server Screening DHCP Server Screening Port Settings...

Page 6: ...zard 130 ACL Access Profile List 131 ACL ACL Finder 132 ACL CPU Filter Configuration Wizard 132 ACL CPU Filter Access Profile List 133 ACL CPU Filter Finder 134 ACL ACL Flow Meter 134 PoE PoE Port Settings DGS 1210 10P 28P 28MP 52P 52MP 52MPP ME only 136 PoE PoE System Settings DGS 1210 10P 28P 28MP 52P 52MP 52MPP ME only 138 Time Based PoE Time Range Settings 138 LLDP LLDP Global Settings 139 LLD...

Page 7: ...Table of Contents DGS 1210 series Metro Ethernet Managed Switch User Manual v vi i L3 Features 150 QoS Quality of Service 150 Security 151 OAM 151 Management 151 ...

Page 8: ... Switch first letter capitalized refers to DGS 1210 ME Metro Ethernet Switch and switch first letter lower case refers to other Ethernet switches Some technologies refer to terms switch bridge and switching hubs interchangeably and both are commonly accepted for Ethernet switches A NOTE indicates important information that helps a better use of the device A CAUTION indicates potential property dam...

Page 9: ... interoperability and impressive technology to future proof departmental and enterprise network deployments It allows IGMP Snooping and Authentication QoS Bandwidth Control ACL and many security functions It can be managed by Web UI or commands via Telnet The DGS 1210 ME Metro Ethernet Switches have different port configuration 10 100 1000Base T or SFP ports that may be used in to uplink various n...

Page 10: ...RJ 45 Console Port LEDs for Power Console RPS Link Act for port 1 12 Figure 1 3 DGS 1210 12TS ME Front Panel CAUTION The MiniGBIC ports should use UL listed Optical Transceiver product Rated Laser Class I 3 3Vdc The front panel of the DGS 1210 20 ME switch consists out of the following 16 10 100 1000Mbps Copper Ports 4 1000Mbps SFP ports One RJ 45 Console Port LEDs for Power Console RPS Link Act f...

Page 11: ...l CAUTION The MiniGBIC ports should use UL listed Optical Transceiver product Rated Laser Class I 3 3Vdc NOTE The power budget is 193 Watts for DGS 1210 28P ME The front panel of the DGS 1210 28MP ME switch consists out of the following 24 10 100 1000Mbps Copper Ports 4 1000Mbps SFP port One RJ 45 Console Port LEDs for Power Console Fan Error Pwr Max Link Act for port 1 28 Mode By pressing the Mod...

Page 12: ...use UL listed Optical Transceiver product Rated Laser Class I 3 3Vdc The front panel of the DGS 1210 52 ME switch consists out of the following 48 10 100 1000Mbps Copper Ports 4 1000Mbps SFP ports LEDs for Power Console Fan Error RPS Link Act for port 1 52 Figure 1 10 DGS 1210 52 ME Front Panel CAUTION The MiniGBIC ports should use UL listed Optical Transceiver product Rated Laser Class I 3 3Vdc T...

Page 13: ... Rated Laser Class I 3 3Vdc NOTE The power budget is 370 Watts for DGS 1210 52MP ME The front panel of the DGS 1210 52MPP ME switch consists out of the following 48 10 100 1000Mbps Copper and PoE Ports 4 1000Mbps SFP ports One RJ 45 Console Port LEDs for Power Console Fan Error PoE Max Link Act for port 1 52 Mode By pressing the Mode button the Port LED will switch between Link Act and PoE modes F...

Page 14: ...P 52MP ME and 733 Watts for DGS 1210 52MPP ME In the meantime no additional PoE device can be supported Light off When the system power usage does not reach the guard band range RPS DGS 1210 10 12TS 20 28 28X 28XS 52 ME Green Solid Light RPS power on Light off RPS power off LED Per 10 100 1000Mbps Copper Port Link Act Green Amber Solid Green When there is a secure 1000Mbps Ethernet connection or l...

Page 15: ...e port Blinking Amber When there is reception or transmission occurring at the port Off Solid off No link Rear Panel Description The rear panel of the Switch contains an AC power connector The AC power connector is a standard three pronged connector that supports the power cord Plug in the female connector of the provided power cord into this socket and the male side of the cord into a power outle...

Page 16: ... Panel DGS 1210 20 ME Figure 1 18 DGS 1210 20 ME Rear Panel DGS 1210 28 ME Figure 1 19 DGS 1210 28 ME Rear Panel DGS 1210 28P ME Figure 1 20 DGS 1210 28P ME Rear Panel DGS 1210 28MP ME Figure 1 21 DGS 1210 28MP ME Rear Panel DGS 1210 28X ME Figure 1 22 DGS 1210 28X ME Rear Panel DGS 1210 28XS ME Figure 1 23 DGS 1210 28XS ME Rear Panel ...

Page 17: ...els of the Switch have heat vents to dissipate heat Do not block these openings and leave at least 6 inches of space at the rear and sides of the Switch for proper ventilation Be reminded that without proper heat dissipation and air circulation system components might overheat which could lead to system failure Figure 1 28 Side panels of the DGS 1210 ME SERIES Gigabit Fiber Ports The DGS 1210 ME S...

Page 18: ...s other networking devices for a gigabit link that may span great distances Connecting the DPS 200A 500A 500DC to the RPS Port for DGS 1210 10 12TS 20 28 28X 28XS 52 ME only The DPS 200A 500A 500DC redundant power supply can be connected to the RPS port of the Switch using the DC power supply cord called the DPS CB150 2PS It is important to notice that the DPS 200A 500A 500DC can supply power to o...

Page 19: ...Switch software for this installation NOTE See the DPS 200A 500A 500DC Quick Installation Guide for more information Installing the RPS into a Rack mount Chassis for DGS 1210 10 12TS 20 28 28X 28XS 52 ME only The DPS 200A 500A 500DC are the redundant power supply unit designed to conform to the voltage requirements of the RPS port of the Switch being supported The DPS 200A 500A 500DC can be instal...

Page 20: ... you Visually inspect the power cord to see that it is secured fully to the AC power connector Make sure that there is proper heat dissipation and adequate ventilation around the switch Do not place heavy objects on the switch Desktop or Shelf Installation The DGS 1210 ME series switches come with a strip of four adhesive rubber pads that can be placed on the bottom of the device to prevent the de...

Page 21: ...required for safe operation of the equipment is not compromised C Mechanical Loading Mounting of the equipment in the rack should be such that a hazardous condition is not achieved due to uneven mechanical loading D Circuit Overloading Consideration should be given to the connection of the equipment to the supply circuit and the effect that overloading of the circuits might have on overcurrent pro...

Page 22: ... series Metro Ethernet Managed Switch User Manual 1 15 5 Figure 2 4 Plugging the switch into an outlet Power Failure As a precaution the switch should be unplugged in case of power failure When power is resumed plug the switch back in ...

Page 23: ...tches the D Link Network Assistant DNA is a more convenient choice By using the D Link Network Assistant DNA you do not need to change the IP address of your PC making it easier to simultaneously initialize multiple D Link Managed Switches Please refer to the following installation instructions for the Web interface and the D Link Network Assistant DNA Using Web based Management Interface After su...

Page 24: ... Enter the IP address 10 90 90 90 in the web browser NOTE The switch s factory default IP address is 10 90 90 90 with a subnet mask of 255 0 0 0 and a default gateway of 0 0 0 0 When the following logon dialog box appears enter the password and choose the language of the Web based Management interface then click OK By default the Username and Password are empty Figure 3 3 Logon Dialog Box Web base...

Page 25: ...earch results 3 Click Add app button in the pop up window to install the D Link Network Assistant in Chrome 4 When the installation process has finished Option 1 Click the LAUNCH APP button in the upper right corner of the window to start DNA Option 2 Click the Apps icon in the upper left corner of the Chrome browser and click the DNA icon to start the app ...

Page 26: ...s firmware upgrades and basic settings Clicking on a section or subsection in the function tree will display all the settings of that section in the main configuration screen The main configuration screen will show the current status of your Switch by clicking the model name on top of the function tree In the upper right corner of the screen the username and current IP address will be displayed Un...

Page 27: ... Configuration Save Log Save the log entries to your local drive and a pop up message will prompt you for the file path You can view or edit the log file by using text editor e g Notepad Figure 4 4 Save Log Tool Bar Tool Menu The Tool Menu offers global function controls such as Reset System Reboot Device Configuration Backup and Restore Firmware Backup and Upgrade and Flash Information Figure 4 5...

Page 28: ...selecting the backup settings file you want to restore TFTP TFTP Trivial File Transfer Protocol is a file transfer protocol that allows you to transfer files to a remote TFTP server The maximum Telnet Server connection is 4 Backup Restore Config ID number Specify the configuration ID number to be backup or restored TFTP Server IP Address Specify the IPv4 or IPv6 address TFTP File Name Enter the fi...

Page 29: ...k Backup to save the firmware to your disk Click Choose File to browse your inventories for a saved firmware file Click Upgrade after selecting the firmware file you want to restore TFTP Backup or upgrade the firmware to or from a remote TFTP server The maximum Telnet Server connection is 4 Backup Restore Image ID number Specify the firmware image ID number to be backup or restored TFTP Server IP ...

Page 30: ...ormation page displays the detail information of flash on the Switch Figure 4 10 Tool Menu Flash Information Tool Bar Online Help The Online Help provides two ways of online support Figure 4 11 Online Help D Link Support Site This will lead you to the D Link website where you can find online resources such as updated firmware images User Guide This can offer an immediate reference for the feature ...

Page 31: ... link to Configuration IGMP Snooping IGMP Snooping Default is disabled DHCP Client Click Settings to link to System System Settings Default is disabled Power Saving Click Settings to link to System Power Saving Default is disabled SNMP Status Click Settings to link to System SNMP Settings SNMP Global State Default is enabled 802 1X Status Click Settings to link to Security 802 1X 802 1X Settings D...

Page 32: ...ettings By default the IP setting is static mode with IP address is 10 90 90 90 and subnet mask is 255 0 0 0 System Information By entering a System Name and System Location the device can more easily be recognized Login Timeout The Login Timeout controls the idle time out period for security purposes and when there is no action for a specific time span in the Web based Management If the current s...

Page 33: ...console port the baud rate must be set to 9600 which is the default setting Auto Logout Select the logout time used for the console interface This automatically logs the user out after an idle period of time as defined Choose from the following options 2 5 10 15 minutes or Never The default setting is 10 minutes Date Bits Display the date bits used for the serial port connection Parity Bits Displa...

Page 34: ...s IP addresses into physical addresses This table allows network managers to view define modify and delete ARP information for specific devices Static entries can be defined in the ARP table When static entries are defined a permanent entry is entered and is used to translate IP addresses to MAC addresses Figure 4 18 System Static ARP Settings Add Static ARP Entry Allows user to add a static ARP e...

Page 35: ...retransmit time for IPv6 The field range is 1 3600 and default is 1 second Automatic Link Local State Settings Automatic Link Local Address Specifies the automatic link is enabled or disabled Click Apply to make the configurations take effect System IPv6 Neighbor Settings The user can configure the Switch s IPv6 neighbor settings The Switch s current IPv6 neighbor settings will be displayed in the...

Page 36: ...a DHCP client and gets the configuration file from a TFTP server automatically on next boot up To accomplish this the DHCP server must deliver the TFTP server IP address and configuration file name information in the DHCP reply packet The TFTP server must be up and running and store the necessary configuration file in its base directory when the request is received from the Switch Figure 4 21 Syst...

Page 37: ...et as an MDI port in order to connect to other hubs or switches without an Ethernet crossover cable Auto is designed on the switch to detect if the connection is backwards and automatically chooses MDI or MDIX to properly match the connection The default setting is Auto MDI MDIX Flow Control You can enable this function to mitigate the traffic congestion Ports configured for full duplex use 802 3x...

Page 38: ...evices SNMP enables network management stations to read and modify the settings of gateways routers switches and other network devices Use SNMP to configure system features for proper operation monitor performance and detect potential problems in the Switch or LAN Managed devices that support SNMP include software referred to as an agent which runs locally on the device A defined set of variables ...

Page 39: ...y the SNMP user group of up to 32 characters Read View Name Specify a SNMP group name for users that are allowed SNMP read privileges to the Switch s SNMP agent Write View Name Specify a SNMP group name for users that are allowed SNMP write privileges to the Switch s SNMP agent Security Model Select the SNMP security model SNMPv1 SNMPv1 does not support the security features SNMPv2 SNMPv2 supports...

Page 40: ...eans do not concerned For example 1 3 6 1 2 1 1 with mask 1 1 1 1 1 1 0 means 1 3 6 1 2 1 X View Type Specify the configured OID is Included or Excluded that a SNMP manager can access Click Apply to create a new view Delete to remove an existing view System SNMP Settings SNMP Community Table This page is used to maintain the SNMP community string of the SNMP managers using the same community strin...

Page 41: ...P Engine ID The Engine ID is a unique identifier used to identify the SNMPv3 engine on the Switch Input the Engine ID then click Apply to apply the changes and click Default resets to default value Figure 4 33 System SNMP Settings SNMP Engine ID System SNMP Settings SNMP Trap Settings The SNMP Trap Settings page provide user to Specify whether the device can send SNMP notifications Figure 4 34 Sys...

Page 42: ...nformation of ICMPv6 RA all node filter Click Apply to make the configurations take effect System User Accounts The User Accounts page provides user to control user privileges To add a new user by typing in a User Name Password and retype the same password in the Confirm Password and choose the level of privilege Admin Operator PowerUser or User from the Access Right drop down menu then click the ...

Page 43: ...e request packet if the tag is absent It will remove the circuit ID tag from the received PPPoE offer and session confirmation packet Figure 4 38 System PPPoE Circuit ID Insertion Settings PPPoE Circuit Insertion State Enable or disable the PPPoE circuit insertion state and Click Apply to make the configurations take effect From Port To Port Specifies the ports to be configured State Enable or dis...

Page 44: ... configuration they only need to disable the Telnet State Figure 4 40 System Telnet Settings Port 1 65535 The TCP port number TCP ports are numbered between 1 and 65535 The well known TCP port for the Telnet protocol is 23 Click Apply to make the configurations take effect System Password Encryption The Password Encryption page is used to enable or disable the password encryption state Select Enab...

Page 45: ...3647 sec The time in seconds between notifications History Size 1 500 The maximum number of entries listed in the history log used for notification Up to 500 entries can be specified Click Apply to make the configurations take effect To change MAC notification settings for a port or group of ports on the Switch configure the following parameters then click the Apply button From Port To Port Select...

Page 46: ...ddress of the system log server Server IPv6 Address Specifies the IPv6 address of the system log server Facility Specifies an application from which system logs are sent to the remote server Only one facility can be assigned to a single server If a second facility level is assigned the first facility is overwritten There are up to eight facilities can be assigned Local 0 Local 7 UDP Port Specifies...

Page 47: ...bled the Time Profile function will work Port Shut off The Port Shut off state has high priority the priority rule is the same as LED Therefore if the Port Shut off sate is already disabled the Time Profile function will not take effect System Hibernation In this mode switches get most power saving figures since main chipsets both MAC and PHY are disabled for all ports and energy required to power...

Page 48: ...ply button to configure Figure 4 49 System SMTP Service SMTP Server Settings SMTP State Enabled or Disabled the SMTP service on this device SMTP Server Address Select IPv4 or IPv6 and enter the IP address of the SMTP server on a remote device This will be the device that sends out the mail for user SMTP Server Port Enter the virtual port number that the Switch will connect with on the SMTP server ...

Page 49: ...end to send this mail to all recipients configured on the Switch for SMTP System D Link Discover Protocol Settings For the D Link Discovery Protocol DDP supported device this page is an option for you to disable DDP or configure the DDP packet report timer D Link Discover Protocol State The default setting is Enabled Select Disabled then click Apply to turn off D Link Discover Protocol State Figur...

Page 50: ...ult is disabled Select Enabled then click Apply to turn on the jumbo frame support Figure 4 52 Configuration Jumbo Frame Settings Configuration 802 1Q VLAN A VLAN is a group of ports that can be anywhere in the network but communicate as though they were in the same area VLANs can be easily organized to reflect department groups such as R D Marketing usage groups such as e mail or multicast groups...

Page 51: ...ck Apply Figure 4 54 Configuration 802 1Q VLAN Add VLAN After click Apply the 802 1Q VLAN Configuration Table will displayed with updates Figure 4 55 Configuration 802 1Q VLAN Example VIDs Click the VID number the configuration of VLAN group which selected by user will displayed Change the port assignment then Click Apply to make the configurations take effect User can also click the Previous Page...

Page 52: ...ave the untagged member port The member port of a secondary VLAN cannot be member port of other secondary VLAN at the same time When a VLAN is associated with a primary VLAN as the secondary VLAN the promiscuous port of the primary VLAN will behave as the untagged member of the secondary VLAN and the trunk port of the primary VLAN will behave as the tagged member of the secondary VLAN A secondary ...

Page 53: ... a Private VLAN enabled device An endpoint connected to an isolated port will only possess the ability to communicate with those endpoints connected to promiscuous ports Endpoints connected to isolated ports cannot communicate with one another Community The ports within a community VLAN can communicate with each other but cannot communicate with ports in other communities at the Layer 2 level With...

Page 54: ...ces including the community and isolated host ports and private VLAN trunk ports that belong to the secondary VLANs associated with the primary VLAN Config Secondary Trunk Ports To specify the secondary trunk ports to the specified private VLAN to be enabled or disabled Click Apply to make the configurations take effect Configuration VLAN Status The VLAN Status page is for user to search the VLAN ...

Page 55: ...ets whose PVID does not match the PVID of the port Results can be seen in the table under the configuration settings as seen below Figure 4 63 Configuration GVRP Settings From Port To Port These two fields allow user to specify the range of ports that will be included in the Port based VLAN that user is creating using the 802 1Q Port Settings page PVID 1 4094 The read only field in the 802 1Q Port...

Page 56: ...ms Leave_All Time 100 100000 Used to confirm the port within the VLAN The time in milliseconds between messages sent The default value is 10000ms Click Apply to make the configurations take effect Configuration QinQ QinQ Settings The QinQ Settings page allows user to enable or disable the Q in Q function Q in Q is designed for service providers to carry traffic from multiple users across a network...

Page 57: ...t does not match any assignment rule in the VLAN translation and Q in Q profile will be dropped If disabled the packet will be forwarded and will be assigned to the PVID of the received port Add Inner Tag Unselect the Disable check box and enter an entry that an Inner Tag will be added to the entry Click Apply to make the configurations take effect Configuration QinQ VLAN Translation CVID Entry Se...

Page 58: ...ng with the Q in Q disabled the BPDU will have its DA replaced by the tunnel multicast address and is transmitted out based on the VLAN configuration and the tunnel uplink setting Figure 4 67 Configuration Layer2 Protocol Tunneling Settings Layer 2 Protocol Tunneling State Specify to enable or disable the layer 2 Protocol Tunneling of ports From Port To Port A consecutive group of ports that are p...

Page 59: ...EEE802 3 SNAP and IEEE802 3 LLC Protocol Value Enter a value for the group The protocol value is used to identify a protocol of the frame type specified The form of the input is 0x0 to 0xffff Configuration 802 1v Protocol VLAN 802 1v Protocol VLAN Settings The 802 1v Protocol VLAN Settings page allows user to configure the Protocol VLAN settings Figure 4 69 Configuration 802 1v Protocol VLAN 802 1...

Page 60: ...s together to increase bandwidth Up to eight Trunk groups may be created and each group consists up to eight ports Select Enabled and click Apply to active the Link Aggregation State Figure 4 71 Configuration Link Aggregation Port Trunkings Link Aggregation Algorithm Specify the algorithm to be MAC Source MAC Destination MAC Source Destination IP Source IP Destination or IP Source Destination and ...

Page 61: ...st one of the participating devices must designate LACP ports as active Both devices must support LACP Passive LACP ports that are designated as passive cannot initially send LACP control frames In order to allow the linked port group to negotiate adjustments and make changes dynamically one end of the connection must have active LACP ports Timeout Specify the administrative LACP timeout The possi...

Page 62: ...ection mode The default mode is shutdown Drop Drop all received BPDU packets when the port enters under attack stats Block Drop all packets includes BPDU and normal packets when the port enters under attack state Shutdown Shut down the port when the port enters under attack state Click Apply for changes to take effect Configuration IGMP Snooping IGMP Snooping With Internet Group Management Protoco...

Page 63: ... value Default value is 256 Router Timeout 60 600 sec This is the interval after which a learned router port entry will be purged For each router port learned a Router Port Purge Timer runs for Router Port Purge Interval This timer will be restarted whenever a Query control message is received over that port If there were no Query control messages received for Router Port Purge Interval time the l...

Page 64: ...idden Router Port and a Dynamic Router Port is dynamically configured by the Switch when a query control message is received Press Apply for changes to take effect Figure 4 76 Configuration IGMP Snooping IGMP Snooping Router Port Settings To view the Multicast Entry Table for a given VLAN press the View button Figure 4 77 Configuration IGMP Snooping IGMP Snooping Multicast Entry Table Configuratio...

Page 65: ...tiple copies Regardless of other normal VLANs that are incorporated on the Switch users may add any ports to the multicast VLAN where they wish multicast traffic to be sent Users are to set up a source port where the multicast traffic is entering the switch and then set the ports where the incoming multicast traffic is to be sent The source port cannot be a recipient port and if configured to do s...

Page 66: ...rce Ports Enter a port or list of ports to be added to the Multicast VLAN Source ports shall be the tagged members of the multicast VLAN Remap Priority Specify the remap priority 0 to 7 to be associated with the data traffic to be forwarded on the multicast VLAN Specify None the packet s original priority is used The default setting is None Click Add to add the ISM VLAN which will appear in the ta...

Page 67: ... IPv6 and select the Access is Deny or Permit then Click Apply to make the configurations take effect Figure 4 83 Configuration IGMP Snooping Limited Multicast Range Settings From Port To Port Specify the port ranges to be configured Profile Type Specify the profile type is IPv4 or IPv6 Profile ID Specify the Profile ID Click Add to create the Profile ID with specified ports or click Delete to rem...

Page 68: ... action Click Apply to make the configurations take effect Configuration IGMP Snooping IGMP Snooping Static Group Settings The IGMP Snooping Static Group Settings page allows the Switch to read the Multicast Group IP address and the corresponding MAC address from IGMP packets that pass through the Switch Figure 4 85 Configuration IGMP Snooping IGMP Snooping Static Group Settings VLAN Name Specifie...

Page 69: ...s page allows user to configure the max multicast group for IGMP Snooping Figure 4 87 Configuration MLD Snooping MLD Snooping Settings MLD Snooping Enable or disable the MLD Snooping MLD Global Settings Host Timeout 130 153025 sec Specifies the time interval in seconds after which a port is removed from a Multicast Group Ports are removed if a Multicast group MLD report was not received from a Mul...

Page 70: ... Port Click all to include all ports into port mirroring RX receive mode Duplicates the data that is received from the source port and forwards it to the Target Port Click all to include all ports into port mirroring Both TX and RX mode Duplicate both the data transmitted from and data sent to the source port and forwards all the data to the assigned Target Port Click all to include all ports into...

Page 71: ...cted port To Port The ending of a consecutive group of ports may be configured starting with the selected port State Use the drop down menu to toggle between Enabled and Disabled Default is Disabled Click Apply to make the configurations take effect Configuration SNTP Settings Time Settings SNTP or Simple Network Time Protocol is used by the Switch to synchronize the clock of the computer The SNTP...

Page 72: ...ettings TimeZone Settings The TimeZone Setting Page is used to configure time zones and Daylight Savings time settings for SNTP Figure 4 92 Configuration SNTP TimeZone Settings Daylight Saving Time State Enable or disable the DST Settings Daylight Saving Time Offset Use this drop down menu to specify the amount of time that will constitute your local DST offset 30 60 90 or 120 minutes Time Zone Of...

Page 73: ...ward a given BOOTP or DHCP packet BOOTP Relay Port List Specify the ports for BOOTP relay DHCP Relay Agent Information Option 82 State This field can be toggled between Enabled and Disabled using the pull down menu It is used to enable or disable the DHCP Agent Information Option 82 on the Switch The default is Disabled Enabled When this field is toggled to Enabled the relay agent will insert and ...

Page 74: ...r Define DHCP Relay Agent Information Option 82 Circuit ID Type This field can be toggled between Default User Define User Define Hex vendor1 vendor2 vendor3 vendor4 vendor5 and vendor6 NOTE If the Switch receives a packet that contains the option 82 field from a DHCP client and the information checking feature is enabled the switch drops the packet because it is invalid However in some instances ...

Page 75: ...elay on the device Disabled Disables DHCP Local Relay on the device This is the default value DHCP BOOTP Local Relay Port List Specifies the port or ports for DHCP BOOTP local relay port Config VLAN by Configure the VLAN by VID or VLAN Name of drop down menu State Specifies whether DHCP Local Relay is enabled on the VLAN Enabled Enables DHCP Local Relay on the VLAN Disabled Disables DHCP Local Rel...

Page 76: ...e enabled or disabled DHCPv6 Relay Option37 Remote ID Type Specifies the DHCPv6 Relay Option37 Remote ID type is CID with User Defined User Defined or Default Interface Enter a name of the interface Server IP Enter the server IP address Click Apply to make the configurations take effect Configuration DHCPv6 Relay Option38 Settings The DHCPv6 Relay Option38 Settings page allows user to configure th...

Page 77: ...between bridges is sensitive to the status of the link Ultimately this difference results in faster detection of failed links and thus faster topology adjustment By default Multiple Spanning Tree is enabled It will tag BPDU packets to receiving devices and distinguish spanning tree instances spanning tree regions and the VLANs associated with them After enabling STP setting the STP Global Setting ...

Page 78: ...a hop count from 6 to 40 The default is 20 Root Bridge Displays the MAC address of the Root Bridge Root Cost Defines a metric that indicates the relative cost of forwarding packets to the specified port list Port cost can be set automatically or as a metric value The default value is 0 auto Root Maximum Age Displays the Maximum Age of the Root Bridge The default is 20 Root Forward Delay Displays t...

Page 79: ...2P ports are similar to edge ports however they are restricted in that a P2P port must operate in full duplex Like edge ports P2P ports transition to a forwarding state rapidly thus benefiting from RSTP A p2p value of false indicates that the port cannot have p2p status Auto allows the port to have p2p status whenever possible and operate as if the p2p status were true If the port cannot maintain ...

Page 80: ...5 Enter a number between 1 and 15 to set a new MSTI on the Switch Type This field allows the user to choose a desired method for altering the MSTI settings Add VID Select this parameter to add VIDs to the MSTI ID in conjunction with the VID List parameter Remote VID Select this parameter to remove VIDs from the MSTI ID in con junction with the VID List parameter VID List 1 4094 This field displays...

Page 81: ...a particular MSTI Instance click Edit button then modify the MSTP Port Setting and click Apply Figure 4 102 Configuration Spanning Tree MST Port Information Instance ID Displays the MSTI ID of the instance being configured An entry of 0 in this field denotes the CIST default MSTI Internal Path Cost 0 Auto This parameter is set to represent the relative cost of forwarding packets to specified ports...

Page 82: ... to disable the remote loopback Start Select to request the peer to change to the remote loopback mode Received Remote Loopback To configure the client to process or to ignore the received Ethernet OAM remote loopback command Process Select to process the received Ethernet OAM remote loopback command Ignore Select to ignore the received Ethernet OAM remote loopback command Click Apply to make the ...

Page 83: ...g DDM functions allow the user to view the digital diagnostic monitoring status of SFP modules inserting to the Switch and to configure related settings The DDM Settings page allows user to configure the action that will occur for specific ports when an exceeding alarm threshold or warning threshold event is encountered Figure 4 105 Configuration DDM DDM Settings Power Unit Specifies the power uni...

Page 84: ... below the configured value the action associated with the warning is taken Vaule 128 127 996 Specifies the value for the specified type of port Click Apply to make the configurations take effect Configuration DDM DDM Voltage Settings Threshold Settings The DDM Voltage Settings Threshold Settings page is used to configure the DDM voltage threshold for specific ports on the Switch Figure 4 107 Conf...

Page 85: ... high threshold for the alarm When the Bias current threshold rises above the configured value the action associated with the alarm is taken Low Alarm Specifies the low threshold for the alarm When the Bias current threshold falls below the configured value the action associated with the alarm is taken High Warning Specifies the high threshold for the warning When the Bias current threshold rises ...

Page 86: ...reshold Settings page is used to configure the threshold of RX power for specific ports on the Switch Figure 4 110 Configuration DDM DDM RX Power Threshold Settings Port Specifies the port to be configured Type Specifies the type for the operating parameter the options are High Alarm Low Alarm High Warning and Low Warning High Alarm Specifies the high threshold for the alarm When the RX power thre...

Page 87: ...gured discovery time it concludes the link is bidirectional Otherwise it starts detecting task to detect the link status Figure 4 113 Configuration DULD DULD Port Settings From Port To Port Specifies a range of ports to be configured Admin State Enable or disable the port unidirectional link detection status The default is disabled Mode Specifies the mode of DULD Normal Only log and event when a u...

Page 88: ...witching APS protocol for Ethernet ring networks ERPS provides sub 50ms protection for Ethernet traffic in a ring topology It ensures that there are no loops formed at the Ethernet layer One link within a ring will be blocked to avoid Loop RPL Ring Protection Link When the failure happens protection switching blocks the failed link and unblocks the RPL When the failure clears protection switching ...

Page 89: ... following window will appear Figure 4 116 Configuration ERPS Setting Detail QoS Traffic Control The Traffic Control feature provides the ability to control the receive rate of broadcast multicast and unknown unicast packets Once a packet storm has been detected the Switch will drop packets coming into the Switch until the storm has subsided Figure 4 117 QoS Traffic Control From Port To Port A con...

Page 90: ...inutes 0 denotes that the port will never shutdown Time Interval 5 30 The interval will set the time between Multicast and Broadcast packet counts sent from the Switch s chip to the Traffic Control function These packet counts are the determining factor in deciding when incoming packets exceed the Threshold value The interval may be set between 5 and 30 seconds with the default setting of 5 second...

Page 91: ...ower multiple of 1850 QoS CoS Scheduling Mechanism The CoS Scheduling Mechanism page allows user to select between a WRR and a Strict mechanism for emptying the priority classes Figure 4 119 QoS CoS Scheduling Mechanism Strict Priority Denoting a Strict scheduling will set the highest queue to be emptied first while the other queues will follow the weighted round robin scheduling scheme WRR Use th...

Page 92: ...s or video conferencing Thus with larger bandwidth less critical traffic is limited and therefore excessive bandwidth can be saved Figure 4 121 QoS 802 1p Default Priority From Port To Port A consecutive group of ports may be configured starting with the selected port Priority Defines the priority assigned to the port The priority are 0 7 Click Apply to make the configurations take effect QoS 802 ...

Page 93: ...e 4 123 QoS DSCP Priority Settings Select QoS Mode Specify the mode to be DASP or TOS From DSCP value To DSCP value Specify the range of DSCP values Priority Specify the priority queue for the switch The value is from 0 to 7 Click Apply to make the configurations take effect QoS Priority Settings The Priority Setting page allow users to configure the CoS priority settings on a port or ports When C...

Page 94: ...lds Index 1 65535 Indicates the RMON Ethernet Statistics entry number Port Specifies the port from which the RMON information was taken Owner Displays the RMON station or user that requested the RMON information Click Apply to make the configurations take effect RMON RMON History Control Configuration The RMON History Control Configuration page contains information about samples of data taken from...

Page 95: ... Defines the sampling method for the selected variable and comparing the value against the thresholds The possible field values are Delta value Subtracts the last sampled value from the current value The difference in the values is compared to the threshold Absolute value Compares the values directly with the thresholds at the end of the sampling interval Falling Threshold 0 2 31 1 Displays the fa...

Page 96: ...Click the Apply button to save your settings You may permit only single or a range of IP addresses by different IP mask settings the format can either be 192 168 1 1 255 255 255 0 or 192 168 0 1 24 Please see the example below for permitting the IP range IP Address Subnet Mask Permitted IP 192 168 0 1 255 255 255 0 192 168 0 1 192 168 0 255 172 17 5 215 255 0 0 0 172 0 0 1 172 255 255 255 To delet...

Page 97: ...ure 4 133 Security Gratuitous ARP Send when IP Interface is up This is used to enable disable the sending of gratuitous ARP request packets while an IP interface comes up This is used to automatically announce the interface s IP address to other nodes By default the state is Disabled and only one ARP packet will be broadcast Send when duplicated IP is detected This is used to enable disable the se...

Page 98: ... forwarding table for the selected switch and group of ports Lock Address Mode This pull down menu allows you to select how the MAC address table locking will be implemented on the Switch for the selected group of ports The options are Delete On Reset The locked addresses will not age out until the Switch has been reset Delete On Timeout The locked addresses will age out after the aging timer expi...

Page 99: ...ename of the certificate file to download This file must have a der extension Ex c cert der Click Download to download the certificate file NOTE Enabling the SSL command will disable the web based switch management To log on to the Switch again the header of the URL must begin with https Entering anything else into the address field of the web browser will result in an error and no authentication ...

Page 100: ... PC will not send out ARP packets IP Inspection When IP Inspection is enabled and ARP Inspection is disabled all non IP packets are forwarded by default If ARP Inspection and IP Inspection mode are enabled the Switch will inspect all incoming ARP and IP packets and compare them to the IMPB white list If the IP MAC pair find a match in the white list the packets from that MAC address are unblocked ...

Page 101: ...g devices Apply click Apply to set IP MAC Port Binding entries Select All to check the boxes of Binding for all found devices Clear All to cancel the box of Binding Security Smart Binding White List When IP ARP Inspection Mode were selected the White List page displays finished IP MAC Port Binding entries from page Smart Binding Only IP packets or ARP packets carrying matched IP MAC Port informati...

Page 102: ... resources by simply attaching a client PC Unfortunately this automatic configuration also allows unauthorized personnel to easily intrude and possibly gain access to sensitive data IEEE 802 1X provides a security standard for network access control especially in Wi Fi wireless networks 802 1X holds a network port disconnected until authentication is completed The switch uses Extensible Authentica...

Page 103: ...ty Indicates the capability of the 802 1X The possible field values are Authenticator Specify the Authenticator settings to be applied on a per port basis None Disable 802 1X functions on the port SuppTimeout 1 65535 sec This value determines timeout conditions in the exchanges between the Authenticator and the client Default is 30 seconds MaxReq 1 10 This parameter specifies the maximum number of...

Page 104: ...IUS The 802 1X Authentication RUAIUS of the Switch allows you to facilitate centralized user administration as well as providing protection against a sniffing active hacker Figure 4 143 Security 802 1X 802 1X Authentication RUDIUS Index Choose the desired RADIUS server to configure 1 2 or 3 IP Address Select IPv4 or IPv6 and enter the IP address Authentication Port 1 65535 Set the RADIUS authentic...

Page 105: ...a port isn t specified as an uplink port for example connects to a DHCP Server or Gateway By default this feature is Off disabled Figure 4 145 Security MAC Address Table Static Mac Address To initiate the removal of auto learning for any of the uplink ports click On to enable this feature and then select the port s for auto learning to be disabled The Static MAC Address List table displays the sta...

Page 106: ...akes an entry into its forwarding table These entries are then used to forward packets through the Switch Figure 4 147 Security MAC Address Table Dynamic Forwarding Table VLAN Name Enter a VLAN Name by which to browse the forwarding table MAC Address Enter a MAC address by which to browse the forwarding table Port Select the port or all ports by using the corresponding pull down menu Find Allows t...

Page 107: ...gure 4 149 Security Access Authentication control Authentication Policy Settings Authentication Policy Use the pull down menu to enable or disable the Authentication Policy on the Switch Response Timeout 0 255 This field will set the time the Switch will wait for a response of authentication from the user The user may set a time between 0 and 255 seconds The default setting is 30 seconds User atte...

Page 108: ...thentication Server Group A server group is a technique used to group TACACS and RADIUS server hosts into user defined categories for authentication using method lists The user may define the type of server group by protocol or by previously defined server group The Switch has three built in Authentication Server Groups that cannot be removed but can be modified To add a user defined group to the ...

Page 109: ...te entities and are not compatible with each other The maximum supported number of server hosts is 16 Figure 4 153 Security Access Authentication control Authentication Server To add an Authentication Server Host IP Address Select IPv4 or IPv6 and enter the IP address Protocol The protocol used by the server host The user may choose one of the following TACACS Enter this parameter if the server ho...

Page 110: ...meter will require the user to be authenticated using the local user account database on the Switch tacacs Adding this parameter will require the user to be authenticated using the TACACS protocol from a remote TACACS server radius Adding this parameter will require the user to be authenticated using the RADIUS protocol from a remote RADIUS server Security Access Authentication Control Enable Meth...

Page 111: ...ication control Local Enable Password Settings To set the Local Enable Password set the following parameters and click Apply Old Local Enable Password If a password was previously configured for this entry enter it here in order to change it to a new password New Local Enable Password Enter the new password that you wish to set on the Switch to authenticate users attempting to access Administrator...

Page 112: ... the mirror port to be active Priority 0 7 Specifies the priority The priority range is between 0 and 7 Rx Rate 64 1024000 Specifies the RX rate The range is between 64 and 1024000 State Specify the state to be enabled or disabled Click Apply to make the configurations take effect Security DHCP Server Screening DHCP Server Screening Port Settings DHCP Server Screening function allows user to restr...

Page 113: ...ter DHCP Server page allows you to designed trusted DHCP Server IP address and Client MAC Address Figure 4 161 Security DHCP Server Screening Filter DHCP Server To add the DHCP Trusted DHCP Server set the following fields and click Add Or click Delete All to remove all DHCP Server IP Address DHCP Server IP Address Specifies the IP address of the DHCP server to be trusted Client MAC Address Specify...

Page 114: ...nable or disable the filter DHCPv6 server state for the specified ports Click Apply to makes effects DHCPv6 Server Permit List Server IP Address Specify the IP address for the DHCPv6 server Ports Specify the ports or select All Ports Click the Add button to add a DHCPv6 server permit list or click the Delete button to remove a DHCPv6 server permit list Click the Delete All button to remove all DHC...

Page 115: ...an ICMPv6 RA_All_Node permit list or click the Delete button to remove a ICMPv6 RA_All_Node permit list Click the Delete All button to remove all ICMPv6 RA_All_Node permit list Security SSH Settings SSH Settings SSH is an abbreviation of Secure Shell which is a program allowing secure remote login and secure network services over an insecure network It allows a secure login to remote host computer...

Page 116: ...ation and Algorithm Settings page allows user to configure the desired types of SSH algorithms used for authentication encryption Figure 4 165 Security SSH Settings SSH Authmode and Algorithm Settings SSH Authentication Mode Settings Password Allows user to use a locally configured password for authentication on the Switch Public Key This parameter may be enabled if the administrator wishes to use...

Page 117: ...s port access rights while for host based MAC the method determines the MAC access rights A MAC user must be authenticated before being granted access to a network Both local authentication and remote RADIUS server authentication methods are supported In M AC based Access Control M AC user information in a local database or a RADIUS server data base is searched for authentication Following the aut...

Page 118: ... default is disabled Log State Enable or disable the MAC based Access Control log state The default is disabled Max User 1 1000 Specify the max users The value is between 1 1000 and the default is 128 Click the Apply button to implement the configuration changes Port Settings From Port To Port The ports of range to be configured for MAC based Access Control State Enable or disable MAC based Access...

Page 119: ... MAC based Access Control Authentication State The MAC based Access Control Authentication State page allows user to configure the authentication state of ports Figure 4 169 Security MAC based Access Control MAC MAC based Access Control Authentication State Monitoring Statistics The Statistics screen displays the status of each port packet count Figure 4 170 Monitoring Statistics Refresh All Renew...

Page 120: ...the Switch Information such as the Session ID of the user initial Login Time Live Time configuration connection From the Switch Level and Name of the user are displayed Click Reload to refresh this window Figure 4 172 Monitoring Session Table Monitoring CPU Utilization The CPU Utilization displays the percentage of the CPU being used expressed as an integer percentage and calculated as a simple av...

Page 121: ...ng Memory Utilization The information is described as follows Time Interval Select the desired setting between 1s and 60s where s stands for seconds The default value is one second Record Number Select number of times the Switch will be polled between 20 and 200 The default value is 200 Show Hide Check whether to display Five Secs One Min and or Five Mins Clear Clicking this button clears all stat...

Page 122: ...ndow Monitoring Packet Size The Web Manager allows packets received by the Switch arranged in six groups and classed by size to be viewed as either a line graph or a table Two windows are offered To select a port to view these statistics for select the port by using the Port pull down menu The user may also use the real time graphic of the Switch at the top of the web page by simply clicking on a ...

Page 123: ...g bits but including FCS octets 1024 1518 The total number of packets including bad packets received that were between 1024 and 1518 octets in length inclusive excluding framing bits but including FCS octets Show Hide Check whether or not to display 64 65 127 128 255 256 511 512 1023 and 1024 1518 packets received Clear Clicking this button clears all statistics counters on this window View Table ...

Page 124: ...al number of good packets that were transmitted by a multicast address Broadcast Counts the total number of good packets that were transmitted by a broadcast address Show Hide Check whether or not to display Bytes and Packets Clear Clicking this button clears all statistics counters on this window View Table Clicking this button instructs the Switch to display a table rather than a line graph View...

Page 125: ...icast Counts the total number of good packets that were received by a multicast address Broadcast Counts the total number of good packets that were received by a broadcast address Show Hide Check whether or not to display Bytes and Packets Clear Clicking this button clears all statistics counters on this window View Table Clicking this button instructs the Switch to display a table rather than a l...

Page 126: ...packets that were received by a multicast address Broadcast Counts the total number of good packets that were received by a broadcast address Show Hide Check whether or not to display Multicast Broadcast and Unicast packets Clear Clicking this button clears all statistics counters on this window View Table Clicking this button instructs the Switch to display a table rather than a line graph View L...

Page 127: ...ss that the MAX_PKT_LEN Internally MAX_PKT_LEN is equal to 1522 Fragment The number of packets less than 64 bytes with either bad framing or an invalid CRC These are normally the result of collisions Jabber The number of packets with lengths more than the MAX_PKT_LEN bytes Internally MAX_PKT_LEN is equal to 1522 Drop The number of packets that are dropped by this port since the last Switch reboot ...

Page 128: ...was busy CRC Error Counts otherwise valid packets that did not end on a byte octet boundary LateColl Counts the number of times that a collision is detected later than 512 bit times into the transmission of a packet ExColl Excessive Collisions The number of packets for which transmission failed due to excessive collisions SingColl Single Collision Frames The number of successfully transmitted pack...

Page 129: ...again Cable Fault Distance meters Indicates the distance of the cable fault from the Switch port if the cable is less than 2 meters it will show No Cable whether the fiber is connected to the port or not Cable Length meter If the test result shows OK then cable length will be indicated for the total length of the cable The cable lengths are categorized into four types 50 meters 50 80 meters 80 100...

Page 130: ...apped to what MAC address To clear the ARP Table click Clear All Figure 4 190 Monitoring Browse ARP Table Click Find The table updates and displays the values required Interface Name Defines the name of ARP mappings IP Address Defines the station IP address which is associated with the MAC address MAC Address Displays the MAC address associated with the IP address Type Indicates how the MAC was as...

Page 131: ...r to clear all the information entered in the fields Monitoring IGMP Snooping IGMP Snooping Group The IGMP Snooping Group page is used to display the current IGMP snooping static group information on the Switch Figure 4 193 Monitoring IGMP Snooping IGMP Snooping Group VLAN Name Specify the name of the VLAN for which to be displayed the IGMP Snooping Group information VID Specify the list of the VL...

Page 132: ...onfigure the MLD Snooping group settings Figure 4 195 Monitoring MLD Snooping MLD Snooping Group VLAN Name Specify the VLAN name for MLD Snooping group VID Specify the VID for MLD Snooping group Group IP Address Specify the IP address for the specified VLAN Click Find Vlan to locate a specific entry based on the information entered Click View All to display all the existing entries Click View All ...

Page 133: ...interval in hundredths of a second between the most recent Access Reply Access Challenge and the Access Request that matched it from this RADIUS authentication server AccessRetrans The number of RADIUS Access Request packets retransmitted to this RADIUS authentication server PendingRequests The number of RADIUS Access Request packets destined for this server that have not yet timed out or received...

Page 134: ...itted to this RADIUS authentication server PendindRequests The number of RADIUS Accounting Request packets sent to this server that have not yet timed out or received a response This variable is incremented when an Accounting Request is sent and decremented due to receipt of an Accounting Response a timeout or a retransmission MalformedResponses The number of malformed RADIUS Accounting Response p...

Page 135: ...yzer server ID specifies the ID of a server analyzer where the packet will be forwarded Owner Name The entity making use of this sFlow analyzer server When owner is set or modified the timeout value will become 400 automatically Timeout 1 2000000 The length of time before the server times out When the analyzer server times out all of the flow samplers and counter pollers associated with this analy...

Page 136: ...e sampling rate for packet Tx sampling The configured rate value multiplied by 256 is the actual rate For example if the rate is 20 the actual rate 5120 One packet will be sampled from every 5120 packets If set to 0 the sampler is disabled If the rate is not specified its default value is 0 Max Header Size 18 256 The maximum number of leading bytes in the packet which has been sampled that will be...

Page 137: ...The possible values are Any Indicates ACL action will be on packets from any source MAC Address Indicates ACL action will be on packets from this MAC address The field of format is xx xx xx xx xx xx IPv4 Addresses Indicates ACL action will be on packets from this IPv4 source address IPv6 Addresses Indicates ACL action will be on packets from this IPv6 source address Service Type Specify the type o...

Page 138: ...rofiles are attached to interfaces and define how packets are forwarded if they match the ACL criteria Figure 4 203 ACL Access Profile List The contents of Access Profile List table include Profile ID Indicates the profile Identification number The possible configured profile IDs are 1 50 and profile ID 51 55 are reserved for the pre defined features Owner Type The owner type of ACL profile it can...

Page 139: ...etwork of 192 168 1 0 24 then you should enter the IP mask as 255 255 255 0 NOTE You cannot select Payload in a MAC ACL or L2 Header in IP ACL 3 After the Profile ID has been created it will go back to the main Access Profile List page ACL ACL Finder The ACL Finder page is used to help user to find a previously configured ACL entry To search for an entry enter the Profile ID from the drop down men...

Page 140: ...dicates CPU Filter action will be on packets of any service type Ether type Specifies an Ethernet type for filtering packets ICMP All Indicates CPU Filter action will be on all ICMP packets IGMP IGMP packets can be filtered by IGMP message type TCP All Indicates CPU Filter action will be on all TCP Packets TCP Source Port Take effect if TCP Source Port matches TCP Destination Port Take effect if T...

Page 141: ...r ICMP IGMP TCP UDP Protocol ID for IPv4 or Traffic Class for IPv6 then click Select and a simplified frame diagram will be displayed 2 Select the field of interest and related columns will be displayed in lower part of the page Enter the filtering mask and click Create when done A filtering mask is to specify the digit that you want to check For example if you want to check a network of 192 168 1...

Page 142: ...ropriate information and click Find the entries will be displayed on the lower half of the table To edit and entry click the corresponding Modify button to delete an entry click the corresponding Delete button to add a new entry click the Add button which will display the following window for the user to configure Figure 4 211 ACL Add ACL Flow Meter Profile ID 1 6 Specify the profile ID Access ID ...

Page 143: ... P50 IEEE 802 3at defined that the PSE provides power according to the following classification Class Usage Output power limit by PSE 0 Default 15 4W 1 Optional 4 0W 2 Optional 7 0W 3 Optional 15 4W 4 Reserved 30W The PoE port table will display the PoE status including Port Enable Power Limit Power W Voltage V Current mA Classification Port Status You can select From Port To Port to control the P...

Page 144: ... extend the time interval to 500ms If the PD is still not powering on please contact the vendor of your device for support Power Limit This function allows you to manually set the port power current limitation to be given to the PD To protect the DGS 1210 28P ME and the connected devices the power limit function will disable the PoE function of the port when the power is overloaded Select from Cla...

Page 145: ...gardless of the port priority Deny low priority port The port with the lower priority will be shut down to allow the higher priority port to power up Click Apply to make the configurations take effect System Power Status Displays the system power status of device System Budget Power Displays the total PoE power budget of this switch Support Total Power Displays the current used power of the switch...

Page 146: ...ertised from the neighbor in the neighbor table Click Apply to make the change effective Message TX Hold Multiplier 2 10 This parameter is a multiplier that determines the actual TTL value used in an LLDPDU The default value is 4 Message TX Interval 5 32768 This parameter indicates the interval at which LLDP frames are transmitted on behalf of this LLDP agent The default value is 30 seconds LLDP R...

Page 147: ...tem Name TLV is enabled on the port The possible field values are Enabled Enables the System Name TLV on the port Disabled Disables the System Name TLV on the port System Description Specifies whether the System Description TLV is enabled on the port The possible field values are Enabled Enables the System Description TLV on the port Disabled Disables the System Description TLV on the port System ...

Page 148: ...cifies whether the MAC PHY Configuration Status is enabled on the port The possible field values are Enabled Enables the MAC PHY Configuration Status on the port Disabled Disables the MAC PHY Configuration Status on the port Power Via MDI Advertises the Power via MDI implementations supported by the port The possible field values are Enabled Enables the Power via MDI configured on the port Disable...

Page 149: ...can be viewed LLDP Statistics System Displays the counters that refer to the whole switch Last Change Time Displays the time for when the last change entry was last deleted or added It is also displays the time elapsed since last change was detected Number of Table Insert Displays the number of new entries inserted since switch reboot Number of Table Delete Displays the number of new entries delet...

Page 150: ... Management Address Table page displays the detailed management address information for the entry Figure 4 221 LLDP LLDP Management Address Table Management Address Specifies IPv4 or IPv6 address then enter the address Click Search and the table will update and display the values required Subtype Displays the managed address subtype For example MAC or IPv4 Management Address Displays the IP addres...

Page 151: ...Port Normal Table Click View of Detailed column to display detail information Figure 4 224 LLDP LLDP Local Port Detailed Table LLDP LLDP Remote Port Table This LLDP Remote Port Table page is used to display the LLDP Remote Port Brief Table Select port number and click Search to display additional information ...

Page 152: ...45 5 Figure 4 225 LLDP LLDP Remote Port Table To view the settings for a remote port click View Normal and the following page displays Figure 4 226 LLDP LLDP Remote Port Normal Table To view the detail settings for a remote port click View Detailed and the following page displays ...

Page 153: ... for IPv4 formatted addressing User can create up to 256 static route entries for IPv4 For IPv4 static routes once a static route has been set the Switch will send an ARP request packet to the next hop router that has been set by the user Once an ARP response has been retrieved by the Switch from that next hop the route becomes enabled However if the ARP entry already exists an ARP request will no...

Page 154: ... the backup state When the primary route failed Switch will try the backup routes according to the order learnt by the routing table until route success The field represents the Backup state that the Static and Default Route is configured for Click Add to create a new IPv4 static route entry L3 Functions IPv4 Routing Table Finder The IPv4 routing table stores all the external routes information of...

Page 155: ... route while other routes should be assigned to the backup state When the primary route failed the Switch will try the backup routes according to the order learnt by the routing table until route success This field represents the backup state for the IPv6 configured This field may be Primary or Backup Click Add to create a new IPv6 static route entry L3 Functions IPv6 Routing Table Finder The IPv6...

Page 156: ...ver unshielded twisted pair UTP cabling a flexible foundation for the next generation of network technology products will be created This will outfit your network with a powerful 1000 Mbps capable backbone server connection Fast Ethernet Technology The growing importance of LANs and the increasing complexity of desktop computing applications are fueling the need for high performance networks A num...

Page 157: ...ic VLAN Management VLAN ISM VLAN Private VLAN GVRP Support 256 dynamic VLANs VLAN Trunking Supports Port based Q in Q L3 Features ARP Max 256 ARP entries Support 255 static ARP Support Gratuitous ARP IPv4 IPv6 Static Route QoS Quality of Service Be able to classify packets according to follow contents Switch port 802 1p priority VID MAC address IP address IPv6 Traffic Class TCP UDP Port DSCP TOS P...

Page 158: ...ction as default ARP and IP packet Inspection as option Supports DHCP Snooping Dos Attack Prevention OAM Cable Diagnostics Detect and show cable length and status 802 3ah Support 802 3ah link layer remote loopback and discovery 802 3ah D Link extension D link Undirectional Link Detection DULD Management Web based GUI D Link proprietary CLI Telnet Server SNMP support DHCP client DHCP Relay Support ...

Page 159: ...140 ...

Reviews: