Cypress Semiconductor CapSense Express CY3218-CAPEXP2 Quick Start Manual Download Page 4

5. Tune the CY3218-CAPEXP2 CapSense Express Board

Functional Description

When a finger moves along the capacitive slider, corresponding LEDs are lit in a circular pro-
gression. Additionally, pressing the pushbutton switch causes all of the LEDs to be lit.

Tuning Steps

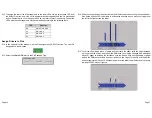
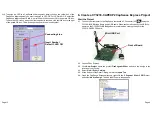
5.1. Connect your computer to the CapSense test board ISSP Connector (J5) 

 using the 

CY3240-I2USB Bridge Board and a USB cable. When connected correctly, the USB con-
nector on the CY3240-I2USB Bridge Board is visible when viewing the front of the 
CY3218-CAPEXP2 board.

5.2. Launch PSoc Express.
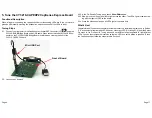
Front of Board

Mini USB Port

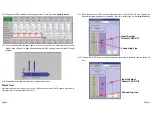
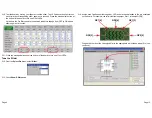
6.22. In the Pin Specific Tuning pane, check 

Show Differences

.

6.23. Slowly move your finger from left to right across the slider. The LEDs light clockwise start-

ing with the topmost LED on the board.

6.24. Press the mechanical button. All LEDs light at the same time.
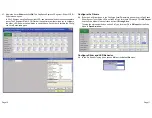
What’s Next

Congratulations! You have successfully recreated the factory installed program used in Section
5. To experiment with slider and LED behavior, select any LED (G3 through G8) from the Select
Pin menu in the Pin Specific Tuning pane and set different slider segments to light different
LEDs. You can also reverse the inversion so that an LED is on until a button is pressed. To tune
the CapSense slider, follow the steps listed in Section 5.

Page 4

Page 17

Summary of Contents for CapSense Express CY3218-CAPEXP2

Page 1: ...ore information on these kits please go to www cypress com CapSense Evaluation Kits Development Kit CapSense Express Quickest and Easiest to Use Touch Sensing CY3218 CAPEXP1 CAPEXP3 For Buttons Up to...

Page 2: ...Designer s Guide to Rapid Prototyping of Capacitive Sensors on any Surface Controls Sensors Touch Sensors Spread Out White Paper Cypress s CapSense Successive Approximation Algorithm The Art of Capaci...

Page 3: ...ense Express in Production AN44209 CapSense Express Power and Sleep Considerations AN2292 Layout Guidelines for PSoC CapSense AN2318 EMC Design Considerations for PSoC CapSense Applications AN2394 Cap...

Page 4: ...s Front of Board Mini USB Port 6 22 In the Pin Specific Tuning pane check Show Differences 6 23 Slowly move your finger from left to right across the slider The LEDs light clockwise start ing with the...

Page 5: ...g appears click OK If your board is already programmed with the cor rect design the Apply to board button is grayed out 6 17 Click OK to close the User Pin Assignment window 6 18 Click Apply to board...

Page 6: ...a slider segment is touched 5 11 Press the mechanical button at the bottom of the board to turn on all four LEDs Tune the Slider 5 12 From the Select Pin menu select Slider 5 13 Check Show Differences...

Page 7: ...r4 G4 G1 Sldr1 G4 G2 Sldr2 G4 G3 Sldr3 G4 5 14 Slide your finger across the slider Notice the difference bars above the green position bar Also notice how the LEDs illuminate in a clockwise direction...

Page 8: ...wood What s Next Now that you know how easy it is to tune a CapSense slider with PSoC Express learn how to create the project from scratch in Section 6 6 11 Since there are four LEDs and five slider...

Page 9: ...ss Project Start the Project 6 1 Connect your computer to the CapSense test board I2C Connector J5 using the CY3240 I2USB Bridge Board and a USB cable When connected correctly the USB con nector on th...

Page 10: ...r is listed in the Config ure Local Parameters pane Configure the Drivers 6 8 By default all driver types in the Configure Local Parameters pane are set to CapSense Slider Sensor To setup the LEDs set...

Page 11: ...r is listed in the Config ure Local Parameters pane Configure the Drivers 6 8 By default all driver types in the Configure Local Parameters pane are set to CapSense Slider Sensor To setup the LEDs set...

Page 12: ...ss Project Start the Project 6 1 Connect your computer to the CapSense test board I2C Connector J5 using the CY3240 I2USB Bridge Board and a USB cable When connected correctly the USB con nector on th...

Page 13: ...wood What s Next Now that you know how easy it is to tune a CapSense slider with PSoC Express learn how to create the project from scratch in Section 6 6 11 Since there are four LEDs and five slider...

Page 14: ...r4 G4 G1 Sldr1 G4 G2 Sldr2 G4 G3 Sldr3 G4 5 14 Slide your finger across the slider Notice the difference bars above the green position bar Also notice how the LEDs illuminate in a clockwise direction...

Page 15: ...a slider segment is touched 5 11 Press the mechanical button at the bottom of the board to turn on all four LEDs Tune the Slider 5 12 From the Select Pin menu select Slider 5 13 Check Show Differences...

Page 16: ...g appears click OK If your board is already programmed with the cor rect design the Apply to board button is grayed out 6 17 Click OK to close the User Pin Assignment window 6 18 Click Apply to board...

Page 17: ...s Front of Board Mini USB Port 6 22 In the Pin Specific Tuning pane check Show Differences 6 23 Slowly move your finger from left to right across the slider The LEDs light clockwise start ing with the...

Page 18: ...ense Express in Production AN44209 CapSense Express Power and Sleep Considerations AN2292 Layout Guidelines for PSoC CapSense AN2318 EMC Design Considerations for PSoC CapSense Applications AN2394 Cap...

Page 19: ...Designer s Guide to Rapid Prototyping of Capacitive Sensors on any Surface Controls Sensors Touch Sensors Spread Out White Paper Cypress s CapSense Successive Approximation Algorithm The Art of Capaci...

Page 20: ...ore information on these kits please go to www cypress com CapSense Evaluation Kits Development Kit CapSense Express Quickest and Easiest to Use Touch Sensing CY3218 CAPEXP1 CAPEXP3 For Buttons Up to...

Reviews: