background image


4 -  5

OPERATING PROCEDURES

Read all of this manual to become thoroughly familiar with this vehicle. Pay particular attention to all Notices, Cautions, Warnings, and Dangers.

4

tacle on the vehicle.

If vehicle it to be charged with a non E-Z-GO charger, refer to the instructions supplied with the charger.

Using the Charger

The charger may remain plugged into the AC outlet when not in use. To charge the vehicle refer to the instruction 
labels on the charger. Insert the polarized DC plug completely into the vehicle receptacle. The charger will automati-
cally start a few seconds after the plug is in place. The charger will automatically stop when the batteries are fully 
charged and the DC plug can be removed to permit use of the vehicle.

Understanding the Charger

Plugging the charger into the vehicle’s charger receptacle will lock the vehicle out of operation. When the charger is 
plugged into the vehicle’s charger receptacle, the charger will automatically turn on and the charger’s LED and the 
vehicle receptacle’s LED will start flashing GREEN to indicate the batteries are charging.

Once a minimum battery voltage of 2 volts per cell (Vpc) is reached, the charger’s output current will change from a 
full current charge to the trickle rated charging current. The length of charge time will vary by how depleted the bat-
teries are, the input AC voltage, and/or charger ambient temperatures. The charger’s LED will give a SHORT flash if 
the charge is less than 80% and a LONG flash if the charge is greater than 80%. If the charger’s LED is a steady 
GREEN the batteries are fully charged and the charger may be unplugged, although not necessary. The charger 
may be left plugged in for long periods of time to maintain the batteries charge level.

If a fault occurred anytime during the charging the charger’s LED will quickly flash RED. The specific fault is indi-
cated by the number of RED flashes that occur, there will be a pause and then the flashes will repeat again. There 
are several possible conditions that will generate errors. Some errors will require human intervention to first resolve 
the problem and then reset the charger by unplugging the DC cord from the vehicle. 

If the AC voltage is interrupted and restored, the charger will turn back on automatically.

LED Operation Codes:

SHORT GREEN FLASH = less than 80% charged
LONG GREEN FLASH = more than 80% charged
SOLID GREEN = 100% charged
RED FLASH = fault code

LED Fault Codes:

RED FLASH: Light turns on briefly, but does not flash after that - check for valid AC voltage.
ONE RED FLASH: One flash, a pause and then again one flash and a pause - Charge Enable Fault: poor con-
tact in the DC connector or dirty contacts or Battery Temperature Fault: battery temperature is greater than 
122° F (50° C) or less than 14° F (-10° C).
TWO RED FLASHES: Two flashes, a pause and then again two flashes and a pause - Battery Voltage Fault: 
Battery pack is less than 48.0 Volts or more than 67.2 Volts. Battery pack is too discharged or over charged for 
the charger to work.
THREE RED FLASHES: Three flashes, a pause and then again three flashes and a pause - Battery Charge 
Time-out: Charge time exceeded 24 hours. This may indicate a problem with the battery pack or that the char-
ger output current was severely reduced due to high ambient temperatures.
FOUR RED FLASHES: Four flashes, a pause and then again four flashes and a pause - Battery Fault: Charge 
time exceeded. This indicates a problem with the battery pack voltage not reaching the required nominal level 
within the maximum time allowed.
SIX RED FLASHES: Six flashes, a pause and then again six flashes and a pause - Charger Fault: An internal 
fault has been detected. If this fault is displayed again after unplugging the charger’s DC power cord and plug-
ging it back in, the charger must be taken to a qualified service center.

NOTICE

Summary of Contents for 626501

Page 1: ...626501 Owner s Guide ISSUED FEBRUARY 2012 REVISED JUNE 2015 48V ELECTRIC POWERED VEHICLE...

Page 2: ...ces in controls will be illustrated Most of the service procedures in this guide can be accomplished using common automotive hand tools Contact your service representative on servicing the vehicle in...

Page 3: ...Inc reserves the right to incorporate engineering and design changes to products in this manual without obligation to include these changes on units sold previously The information contained in this...

Page 4: ...m any source of electrical drain The battery charger may be left connected to the vehicle to maintain a full charge on the bat teries provided the charger is plugged into an active electrical source I...

Page 5: ...thoroughly familiar with this vehicle Pay particular attention to all Notices Cautions Warnings and Dangers SECTION PAGE NO SAFETY 1 1 GENERAL SPECIFICATIONS 2 1 INTRODUCTION 3 1 OPERATING PROCEDURES...

Page 6: ...Page iv TABLE OF CONTENTS Read all of this manual to become thoroughly familiar with this vehicle Pay particular attention to all Notices Cautions Warnings and Dangers Notes...

Page 7: ...ghly familiar with this vehicle Pay particular attention to all Notices Cautions Warnings and Dangers 1 TITLE PAGE NO GENERAL 1 2 NOTICES CAUTIONS WARNINGS AND DANGERS 1 2 GENERAL OPERATION 1 3 MAINTE...

Page 8: ...used to warn of sit uations that could result in an unsafe condition NOTICES CAUTIONS WARNINGS AND DANGERS Throughout this guide NOTICE CAUTION WARNING and DANGER will be used Please observe these NOT...

Page 9: ...ng practices Good common sense and prudent driving practices do more to prevent accidents and injury than all of the warnings and instructions combined E Z GO strongly suggests that all users and main...

Page 10: ...eating capacity Read the following text and warnings before attempting to service vehicle In any product components may eventually fail to perform properly as the result of normal use age wear or abus...

Page 11: ...olarity of each battery terminal and be sure to rewire the batteries correctly use specified replacement parts NEVER use replacement parts of lesser quality use recommended tools determine that tools...

Page 12: ...NOT OPERATE UNDER THE INFULENCE OF DRUGS OR ALCOHOL WARNING READ MANUAL FOR MAXIMUM LOAD BED CAPACITY AND RAMP OR HILL DO NOT DRIVE ON HIGHWAY 74443G01 1 To Prevent Roll Back On a Hill From a Stopped...

Page 13: ...DO NOT OPERATE IF USING DRUGS OR ALCOHOL DO NOT OPERATE VEHICLE WHEN LIGHTNING IS IN THE AREA WARNING READ MANUAL FOR MAXIMUM LOAD BED CAPACITY AND RAMP OR HILL ANGLE WARNING MAXIMUM CROSS HILL OR RAM...

Page 14: ...1 8 SAFETY Read all of this manual to become thoroughly familiar with this vehicle Pay particular attention to all Notices Cautions Warnings and Dangers Notes 1...

Page 15: ...to become thoroughly familiar with this vehicle Pay particular attention to all Notices Cautions Warnings and Dangers 2 TITLE PAGE NO Vehicle Specifications SHUTTLE 8 2 2 Vehicle Dimensions SHUTTLE 8...

Page 16: ...0 5 mph 21 kph 0 8 kph Towing Capacity N A Steering Suspension Steering Self compensating rack and pinion Front Suspension Leaf springs with hydraulic shock absorbers Rear Suspension Leaf springs with...

Page 17: ...ticular attention to all Notices Cautions Warnings and Dangers 2 46 0 in 116 8 cm 149 0 in 3178 5 cm 167 5 in 425 5 cm 123 5 in 313 7 cm 45 5 in 115 6 cm 75 6 in 192 0 cm Center Rear Wheels 38 3 in 97...

Page 18: ...l to become thoroughly familiar with this vehicle Pay particular attention to all Notices Cautions Warnings and Dangers 2 4 2 TURNING CLEARANCE DIAMETER 33 ft 10 1 m RECOMMENDED MAX SIDE TILT 25 or 14...

Page 19: ...2 5 Notes Read all of this manual to become thoroughly familiar with this vehicle Pay particular attention to all Notices Cautions Warnings and Dangers GENERAL SPECIFICATIONS 2...

Page 20: ...2 6 GENERAL SPECIFICATIONS Read all of this manual to become thoroughly familiar with this vehicle Pay particular attention to all Notices Cautions Warnings and Dangers Notes 2...

Page 21: ...itch Headlight Switch 3 3 Direction Selector 3 3 State of Charge Meter 3 3 Horn 3 3 Brake Pedal 3 3 Park Brake 3 3 Accelerator Pedal 3 4 Master Cylinder 3 4 Fuse Block 3 4 Run Tow Maintenance Storage...

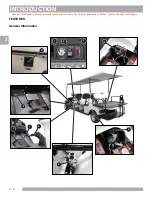
Page 22: ...CTION Read all of this manual to become thoroughly familiar with this vehicle Pay particular attention to all Notices Cautions Warnings and Dangers 3 2 3 FEATURES General Information 5 7 6 4 8 9 3 2 1...

Page 23: ...t move vehicle direction selector while the vehicle is in motion Moving the selector will result in sudden slowing of the vehicle and the beeping of a warning device Located on the dash panel this swi...

Page 24: ...jury or death resulting from loss of vehicle control consider the grade of the terrain the vehicle is on and set vehicle s park brake accordingly before switch ing the Run Tow Maintenance switch to th...

Page 25: ...Notices Cautions Warnings and Dangers 3 the electronic braking system and warning beeper features are activated 11 Charger Receptacle The plarized charger receptacle is located in the seat pod below...

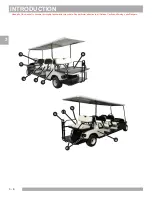
Page 26: ...INTRODUCTION Read all of this manual to become thoroughly familiar with this vehicle Pay particular attention to all Notices Cautions Warnings and Dangers 3 6 3 12 13 16 14 15 17 18 20 19 22 21...

Page 27: ...dden vehicle position changes 17 Rear Seat The rear facing seat is designed for two occupants one on each side of the seat To prevent severe injury or death rear seat passengers should hold on to both...

Page 28: ...3 8 INTRODUCTION Read all of this manual to become thoroughly familiar with this vehicle Pay particular attention to all Notices Cautions Warnings and Dangers Notes 3...

Page 29: ...ing the Charger 4 5 Understanding the Charger 4 5 LED Operation Codes 4 5 LED Fault Codes 4 5 Maintenance Instructions 4 6 OPERATING THE VEHICLE 4 5 PERFORMANCE 4 7 Speed Control 4 7 Pedal Up Braking...

Page 30: ...rame weld tube The other PART A and PART B is located on the crossmember section of the chassis on the driver side seat back support To access it raise the seat and lift up the flap on the access pane...

Page 31: ...explosion that could result in severe injury or death never smoke around or charge batteries in an area that has open flame or electrical equipment that could cause an electrical arc Hydrogen gas is...

Page 32: ...r in such a manner as to per mit the maximum air flow underneath and around the charger Portable chargers are shipped with the vehicles Prior to vehicle or charger operation the charger must be remove...

Page 33: ...r s LED will quickly flash RED The specific fault is indi cated by the number of RED flashes that occur there will be a pause and then the flashes will repeat again There are several possible conditio...

Page 34: ...ep the cooling fins free of dirt and debris do not expose the charger to oil dirt mud or to direct heavy water spray when cleaning equipment 4 Inspect the plug of the battery charger and the vehicle r...

Page 35: ...e vehicle s top speed is sensed and regulated directly by the controller Speed Control To prevent the possibility of loss of control that could cause severe injury or death use service brake to contro...

Page 36: ...be overridden and normal vehicle operation resumes Any unusual situation sensed by the TruCourse Technology system will cause a similar response The system functions in all key switch positions Anti R...

Page 37: ...ed Release the park brake by depressing the service brake pedal until the park brake releases Slowly depress the accelerator pedal to start the motor When the accelerator pedal is released the motor c...

Page 38: ...the labels that are used on this vehicle Sun Top And Windshield The sun top does not provide protection from roll over or falling objects The windshield does not provide protection from tree limbs or...

Page 39: ...GHT BULB REPLACEMENT 5 8 FUSE REPLACEMENT 5 8 TRANSPORTING VEHICLE 5 9 Towing 5 9 Hauling 5 9 SERVICE AND MAINTENANCE 5 9 ROUTINE MAINTENANCE 5 10 Tire Inspection 5 10 BRAKES 5 10 Periodic Brake Test...

Page 40: ...5 2 MAINTENANCE 5 Battery Cleaning 5 18 Battery Replacement 5 19 Prolonged Storage 5 19 Battery Charging 5 20 AC Voltage 5 20 Troubleshooting 5 21 HYDROMETER 5 21 Using Hydrometer 5 22...

Page 41: ...mercial plastic polish or Plexus plastic cleaner available from the service parts department Normal cleaning of vinyl seats and plastic or rubber trim requires the use of a mild soap solution applied...

Page 42: ...ehicle in wet weather conditions remember that the brakes may need to be lightly applied in order to provide enough friction to dry the brake unit If wet the brakes will lose much of their effect Slow...

Page 43: ...le Tool List Qty Tool List Qty Floor Jack 1 Jack Stands 4 Wheel Chocks 4 Remove payload from vehicle before lifting No person s should be in or on the vehicle while lifting To raise the entire vehicle...

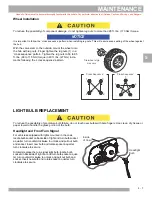
Page 44: ...ld be determined by the condition of the terrain See GENERAL SPECIFICATIONS section for rec ommended tire inflation pressure For outdoor applications with major use on grassy areas the following shoul...

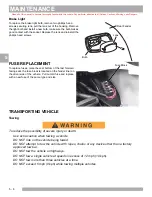
Page 45: ...cross sequence pattern LIGHT BULB REPLACEMENT To reduce the possibility of premature bulb failure do not touch new bulbs with bare fingers Use clean dry tissue or paper towel to handle the glass porti...

Page 46: ...ottom of the last forward facing seat the fuse block is located on the fender liner on the driver side of the vehicle Pull out old fuse and replace with a new fuse of the same type and size TRANSPORTI...

Page 47: ...ts to be made to the powertrain while the motor is running must be made with both drive wheels raised and vehicle properly supported on jack stands To reduce the possibility of motor damage never oper...

Page 48: ...echnician s Repair and Service Manual Some service procedures may require the vehicle to be lifted Refer to LIFTING THE VEHICLE for proper lifting pro cedure and safety information ROUTINE MAINTENANCE...

Page 49: ...should be felt at approximately 2 mph 3 kph indicating that the system is functioning If vehicle speed continues to rise apply the service brake and have vehicle inspected by a trained mechanic REAR...

Page 50: ...Signal Bulb Tail Light Bulb 40 oz 1 2 liters MOBIL 424 15 amp P N 18392 G1 1157 P N 21759 G1 Capacities and Replacement Parts P N 619100 P N 619101 P N 619102 ALL TORQUE FIGURES ARE IN FT LBS Nm BOLT...

Page 51: ...A Park Brake operation does it hold on a hill C A C A C A C A Accelerator smooth operation Charger Receptacle inspect charger connector and receptacle at each charge Wiring loose connections broken o...

Page 52: ...fety shield or approved safety goggles when adding water or charging batteries Any electrolyte spills should be neutralized with a solution of 1 4 cup 60 ml sodium bicarbonate baking soda dissolved in...

Page 53: ...he available life and reduce the factors that can reduce the life of the battery Battery Maintenance Tool List Qty Tool List Qty Insulated Wrench 9 16 1 Battery Carrier 1 Hydrometer 1 Battery Maintena...

Page 54: ...vent tube and the gas will force it out of the vent tube and battery cap The water will evaporate but the sulphuric acid will remain where it can damage vehicle components and the storage facility flo...

Page 55: ...d solution which can cause severe burns to the skin and eyes Treat all electrolyte spills to the body and eyes with extended flushing with clear water Contact a physician immediately Any electrolyte s...

Page 56: ...eep all smoking materials open flame or sparks away from the battery The correct cleaning technique is to spray the top and sides of the batteries with a solution of baking soda and water This solutio...

Page 57: ...lean if required To prevent battery explosion that could result in severe personal injury or death extreme care must be used with aerosol containers of battery terminal protectant Insulate the metal c...

Page 58: ...ff when the battery set is fully charged Always refer to the instructions of the specific charger used Before charging the following should be observed Do not overfill batteries The charging cycle wil...

Page 59: ...ximate age HYDROMETER A hydrometer P N 50900 G1 is used to test the state of charge of a battery cell This is performed by measuring the density of the electrolyte which is accomplished by measuring t...

Page 60: ...he 1 250 to give a corrected reading of 1 246 5 Test each cell and note the readings corrected to 80 F or 27 C A variation of fifty points between any two cell readings example 1 250 1 200 indicates a...

Page 61: ...5 23 Notes Read all of this manual to become thoroughly familiar with this vehicle Pay particular attention to all Notices Cautions Warnings and Dangers MAINTENANCE 5...

Page 62: ...5 24 MAINTENANCE Read all of this manual to become thoroughly familiar with this vehicle Pay particular attention to all Notices Cautions Warnings and Dangers Notes 5...

Page 63: ...ad all of this manual to become thoroughly familiar with this vehicle Pay particular attention to all Notices Cautions Warnings and Dangers TABLE OF CONTENTS FOR APPENDIX A TITLE PAGE NO DECLARATION O...

Page 64: ...A 2 APPENDIX A Read all of this manual to become thoroughly familiar with this vehicle Pay particular attention to all Notices Cautions Warnings and Dangers Notes...

Page 65: ...A 3 APPENDIX A Read all of this manual to become thoroughly familiar with this vehicle Pay particular attention to all Notices Cautions Warnings and Dangers DECLARATION OF CONFORMITY...

Page 66: ...APPENDIX A Read all of this manual to become thoroughly familiar with this vehicle Pay particular attention to all Notices Cautions Warnings and Dangers A 4 DECLARATION OF CONFORMITY CONTINUED...

Page 67: ...A 5 Notes Read all of this manual to become thoroughly familiar with this vehicle Pay particular attention to all Notices Cautions Warnings and Dangers APPENDIX A...

Page 68: ...A 6 APPENDIX A Read all of this manual to become thoroughly familiar with this vehicle Pay particular attention to all Notices Cautions Warnings and Dangers Notes...

Page 69: ......

Page 70: ...of Textron Inc Technical Communications Department E Z GO Division of Textron Inc 1451 Marvin Griffin Road Augusta Georgia 30906 3852 USA Service Parts Manuals as well as Repair and Service Manuals ar...

Reviews:

Related manuals for 626501