


C
HAPTER
3: C
ONFIGURING
THE
AXN
SYSTEM
57
Installing the Axonite
The Axonite (AXN/ITE/01U) and extender card (AXN/EXT/401) are transparent to the setup software and require
no configuration. (Refer to
before connecting the Axonite.)
For example, in the following figure, a module is first installed in slot 8 of the chassis. Then the module is moved to
the Axonite—which is connected to the extender card in slot 8. In both cases, when running Discover, the software
detects the module as being installed in slot 8 of the chassis.
Figure 15: Moving module from chassis to Axonite
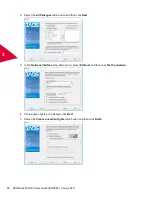
Setting the IP address of the AXN controller
Refer to the following to update the IP address of the AXN/BCU/40x controller module. The present IP address and
the new IP address are required to update the module.
1.
On the
Tools
menu, click
IP Address
.
The
IP Address Programmer
dialog box opens.
This tool supports reprogramming IP addresses across the entire range of Acra KAM-500, switches and AXN
products by selecting the corresponding protocol. For AXN, select
Axon Family Chassis
from the
Protocol
drop-down list.
Move AXN/ADC/401 from slot
8 of chassis to Axonite
Install AXN/EXT/401
in slot 8
Connect
AXN/CAB/001/01M from
extender card to Axonite
Summary of Contents for AXN
Page 1: ...AXN Quick Start Kit User Guide ...
Page 2: ......
Page 18: ...This page is intentionally blank ...