
Operation Manual of VR285 Digital Video Camera
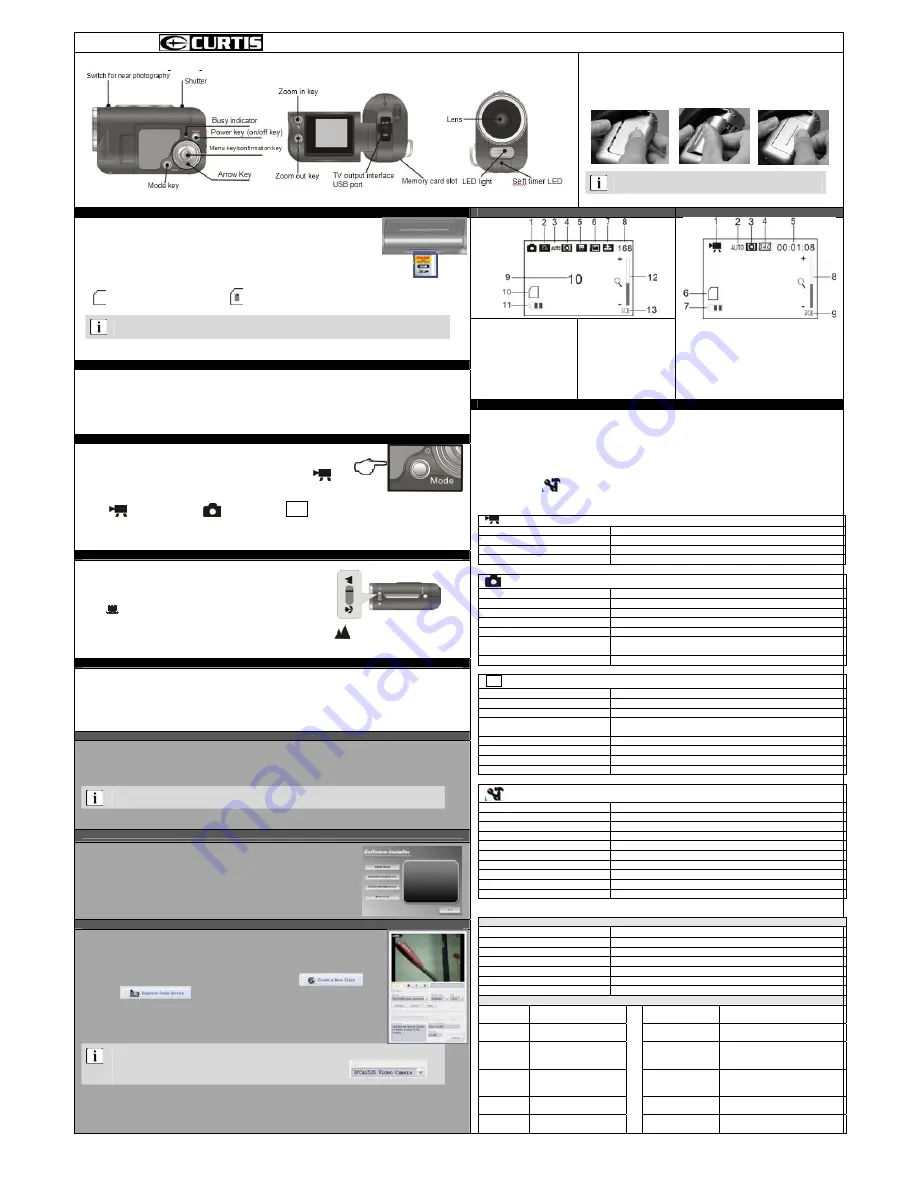
Appearance and Key Definition:
Battery Installation:
1. Open battery cover.
2. Install three AAA (7#) batteries according to positive and negative pole
instruction.
3. Install battery cover.
It is recommended to use high-quality alkaline battery.
Step 1
Shot mode
Record Mode
Install Memory Card:
1.According to instruction beside memory card slot, fully insert SD card or MMC card into
the slot.
2.
Slightly press the tail of memory card inwards, then the memory card will be popped up.
3.After memory card is inserted into the camera, LCD of camera will display memory card
icon.
General Memory Card Icon
Locked Memory Card Icon
1 There is no built-in storage in the camera, so please insert memory card before shooting;
2 The camera can support 8GB SDHC card to the great utmost.
Step 2
1.
Mode Icon (Shoot)
2.
Auto-shoot (Enable)
3.
White Balance
4.
Metering Mode
5.
Exposure Mode
6.
Resolution (Picture)
7.
Picture Quality
8.
Number of Picture Taken
9.
Auto-shoot Timer
10.
Memory Crad Icon
11.
Battery Capacity State
12.
Digital Zoom
Indicator
13.
LED State (Enable)
1.
Mode Icon (Record)
2.
White Balance
3.
Metering Mode
4.
Resolution (Record)
5.
Time (Record)
6.
Memory Card Icon
7.
Battery Capacity State
8.
Digital Zoom Indicator
9.
LED State (Enable)
Step 6
Power On/Off:
1.
Power on: Press power key and hold on for about 2 seconds under power-off mode until LED screen is lighted, then
the camera will be started up.
2.
Power off: Press power key under power-on mode (idle mode) to shut down the camera.
3.
Auto Off: The camera will be shut down automatically after being under idle mode for a certain time (1/3/5 minutes
can be set up) so as to save electric quantity.
Step 3
Mode Conversion:
Press MODE to change mode.
After power on, the camera will enter record mode and record mode icon (
) will display
on LCD; press MODE key to switch over among the following three modes:
Æ
Æ
Record Mode Shot Mode Play Mode
Step 4
Prepare to shot:
Press the macro shooting switch on the top of the camera, then micro distance
focus and general focus will be switched over.
Micro distance focus: It is suitable for shooting object 15cm-25cm away from
the camera lens. When application, please push macro shooting switch to the
end of
mark.
General focus: It is suitable for shooting object 1.4 meters away from the
camera lens. When application, please push macro shooting switch to the end of
mark.
Press the right key of arrow key to turn on LED fill light.
Under shot mode, press the left key of arrow key to turn on the 10 seconds’ auto-shot mode.
Step 5
Shot
Record: Under record mode, press the shutter on the top of camera to begin to record, then press the shutter again to stop
recording.
Shoot: Under shot mode, press the shutter on the top of camera to take a photograph or begin to take photograph
automatically (auto-shot mode).
Play: Under power-on mode, press MODE key to enter play mode, and pressing the left and right key of arrow key can
select to play other pictures.
Connect Camera to Computer
Install driver (camera mode).
There are two kinds of modes to connect camera to computer: Movable disk (MSDC) and camera mode (PC-CAM).
Movable disk mode is default connection mode. It is not necessary to install driver for operating system above
WINDOWS ME.
All files recorded by camera will be saved in “DCIM\ 100MEDIA” list of SD/SDHC card.
The camera driver can be found in attached installation disk.
Install Driver
1.
Place installation disk into CD-ROM drive of computer;
2.
WINDOWS window will pop up installation interface
automatically. Click “Install Driver” to install camera driver.
3.
Finish installation according to installation hint window.
4.
Reboot computer after installation is finished.
Camera Function
1.
Install camera driver according to the above-mentioned method.
2.
Install attached software “Video Impression 2”.
3.
Set up USB mode as “camera mode” through camera menu.
4.
Connect camera to computer.
5. Start up program “Video Impression 2”, and click
and
. Then, camera function can be realized as shown in
right figure.
If there is no image, please check whether the camera driver is installed correctly and check whether
the device name selected on window is
Menu Setup
Press Menu/Ok key to enter main menu; Under main menu, press the key to exit menu mode again.
Press arrow key (
/
) to select menu item; press (
) key to enter setup menu or submenu; press (
) key to
return main menu;
Press Menu/Ok key to confirm setup.
Pressing (
) key to return under submenu will not change last alteration.
System setup mode (
) menu can be invoked under all modes.
Each mode setup refers to as follows:
Record Mode Setup
Resolution (Record)
640x480 / 320x240
Frame Rate (Frame/second)
High/Low
Metering Mode
Central metering/ Multi spot metering/Spot metering
White Balance
Auto, Sunlight, Cloudy, Fluorescent, Tungsten light
Camera Mode Setup
Resolution (Picture)
1280x1024; 640x480
Image Quality
Super Good, Good, Normal
Metering Mode
Central metering/ Multi spot metering/Spot metering
White Balance
Auto, Sunlight, Cloudy, Fluorescent, Tungsten light
Exposure
Step length of +2.0~-2.0 is 0.3EV
Camera Mode
Close: 2 seconds,; Auto-shoot: 10 seconds; Auto-shoot: continuous
shots
Special Effect
Normal, Black & White, Classic, Negative film: Green and Blue
Play Mode Setup
Lock Picture
Lock/unlock file; Lock all, Unlock all
Delete Picture
Delete the file; Delete all
Slide Display
Start, Interval, Loop
Special Effect
Normal, Black & White, Classic, Negative film: Red, Green and Blue;
Binarization, Sunset; Warm, Cool, Solarization
Rotation
Rotation, Save and Back
Zoom-in
2048x1536 ; 1280x1024; 640x480
Sound Memorandum
Add; Delete
Set up as Startup Interface
Yes/No (only valid for picture)
System Setup
Sound
Set up shutter/power-on/off sound, key sound and volume
Power Frequency
50Hz / 60Hz
Auto-off 1minute/3minutes/5minutes
Date and Time
Set up date, time and display mode
Language
Select language type
TV PAL/TNSC
USB Movable
Disk/Camera
Stratup-screen Close;
System;
Custom
Format Yes/No
Default Yes/No
Appendix:
System Request
OS
Microsoft Windows 98 SE
、
Me
、
2000
、
XP
、
Vista
CPU
Intel Pentium III above 667MHz or CPU with same performance
Memory Above
128MB
Sound Card/Display Card
Support DirectX8 or higher version
CD Drive
4 times speed or quicker speed
Hard Disk
Residual space above 500MB
Other
1 standard USB1.1 or USB2.0 interface
Technical Parameters
Image
Sensor
0.3 mega pixels (CMOS)
Video Resolution
(pixel)
JPG: 1280x1024(1.3 mega)
640x480(0.3 mega)
Lens
Fix: F3.0, f=4.5mm
Video Resolution
(pixel)
AVI
:
VGA(0.3 mega) --- 30/15 FPS
QVGA(0.1 mega) ---30/15FPS
LCD
Display
Screen
1.44 inch TFT
White Balance
Auto/Manual
Memory
Medium
SD/SDHC(not include)
(128MB~8GB)
Digital Zoom
4 times
USB
Interface
USB2.0, TV Out
Size
94.6mm × 57.1mm ×40.5mm
Power
3 AAA alkaline battery
(not include)
Weight
76g (excluding battery)