background image

5

C63-36A-0001

OR

O

OU

(EE)

(DD)

(II)

(HH)

2-2

2-1

OR

o

ou

(FF)

(GG)

2-3

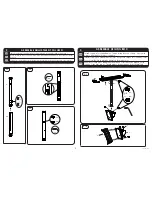
Slide column (A) into column (AA).  Adjust to desired length.  Lock into place with securing screws.

Deslice la columna (A) en la columna (AA). Ajuste a la longitud deseada. Bloqueo en su lugar con tornillos 

de fijación.

Se glisser la colonne (A) dans la colonne (AA). Ajuster à la longueur désirée. Lock en place avec des 

vis.

 2

ASSEMBLE ADJUSTMENT COLUMN

A

AA

Thread column into ceiling adapter.   Thread ceiling box onto column.  Secure with 

screws.  Attach mount plate to ceiling box.
Insertar columna en el adaptador de techo. Asegure la caja en la columna del techo. 

Fije con tornillos. Fije la placa de montaje a la caja de techo. 
Enfiler de colonne  dans l’adaptateur de plafond.  Fixer la boîte de plafond sur la 

colonne.  Fixez avec des vis.  Fixez la plaque de montage au boîtier de plafond.

3

ASSEMBLE CEILING BOX

3-1

OR

O

OU

(EE)

(DD)

3-2

T

C

Z

Summary of Contents for C63-36A

Page 1: ...product for any purpose not explicitly specified by Crimson AV Improper installa tion may cause property damage or personal injury If you do not understand these directions or have doubts about the s...

Page 2: ...M8 Washer U 12 Multiwasher V 4 Locking Pin Y 1 Lock Nut T 4 WEIGHT CAPACITY Maximum Weight Capacity Peso m ximo de pantalla Poids maximal de l cran 200lb 91kg CAUTION TOOLS REQUIRED Herramientas neces...

Page 3: ...ara hacer un 65mm 2 5 hoyo profundo en materia de marcas Utilisez un 4mm 5 32 bits du bois pour faire un 65mm 2 5 trou profond sur les marques WOOD JOIST INSTALLATION 1a 1 Ensure that holes are on cen...

Page 4: ...ur les surfaces de structure faite de b ton avec une densit d au moins 2000psi WARNING Use a 8mm 5 16 masonry bit to make a 32mm 1 25 deep hole on marks Uso un 8mm 5 16 broca de hormig n para hacer un...

Page 5: ...e Lock en place avec des vis 2 ASSEMBLE ADJUSTMENT COLUMN A AA Thread column into ceiling adapter Thread ceiling box onto column Secure with screws Attach mount plate to ceiling box Insertar columna e...

Page 6: ...d mount if needed Utilice espaciadores R S entre la televisi n y montar si es necesario Utiliser des entretoises R S entre le t l viseur et le support m tallique si n cessaire ATTACH MOUNT BRACKETS 4...

Page 7: ...AV LLC will not be liable for any damages arising out of the use of or inability to use Crimson AV LLC products Crimson AV LLC bears no responsibility for incidental or consequential damages This inc...

Page 8: ...paration de produits Crimson AV LLC par une personne ne travaillant pas pour Crimson AV LLC Les sp cifications sont sujettes changement sans pr avis GARANTIE NOTICE TO CUSTOMERS OUTSIDE THE UNITED ST...

Reviews: