background image


8  

  HD-SCALER-HD-E/HD-SCALER-VGA-E: HD Video Scalers 

Supplemental Guide – DOC. 7828C 

Configuring OSD Settings 

OSD settings can be configured to control the positioning and appearance of the OSD.  
To configure OSD settings, do the following: 


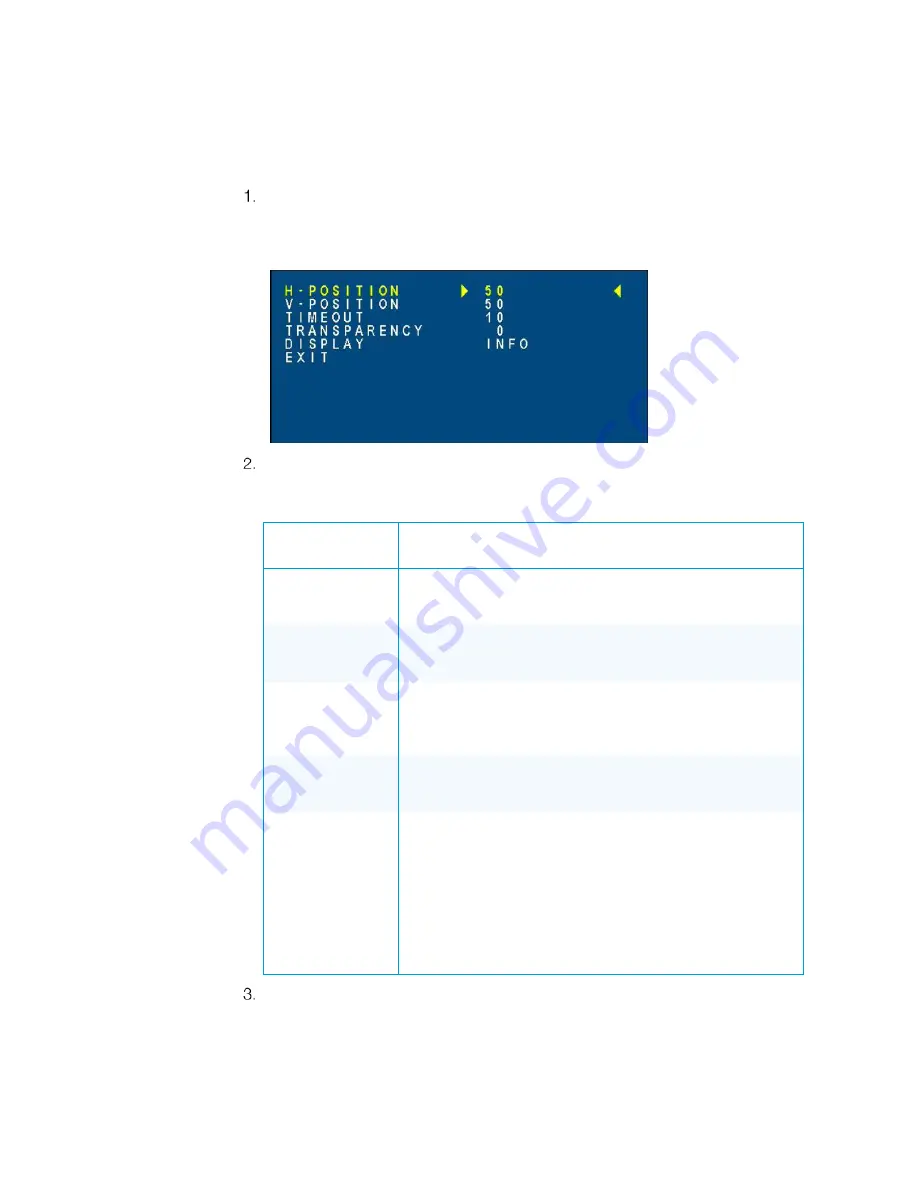
On the main menu of the OSD, select OSD. 

The OSD submenu opens. 

OSD Submenu 


Configure OSD settings as desired. Refer to the following table for information 
about the OSD submenu configuration items. 

OSD Submenu Configuration Items 

CONFIGURATION 

ITEMS 


DESCRIPTION 

H-POSITION 

Adjusts the horizontal position of the OSD. Available selections 
range from 

0

 to 

100

The default setting is 

50

V-POSITION 

Adjusts the vertical position of the OSD. Available selections 
range from 

0

 to 

100

The default setting is 

50

TIMEOUT 

Sets the time in seconds in which the OSD is visible after the 
last button is pressed. Available selections range from 

5

 to 

100


seconds. 
The default setting is 

10

 seconds. 

TRANSPARENCY 

Adjusts the display of background information through the 
OSD. Available selections range from 

0

 to 

100

The default setting is 

0

DISPLAY 

Controls the display of input and output signal information on 

the display device whenever the OSD is not visible. Available 

selections are as follows: 


INFO:

  Allows the information to be displayed for  

10 seconds 


ON:

  Allows the information to be displayed for as long 

as the OSD is not visible   


OFF:

  Prevents the information from being displayed 

The default setting is 

INFO


Exit the OSD submenu by selecting EXIT at the bottom of the submenu. The OSD 

returns to the main menu. 

Summary of Contents for HD-SCALER-HD-E

Page 1: ...HD SCALER HD E HD SCALER VGA E High Definition Video Scalers Supplemental Guide Crestron Electronics Inc ...

Page 2: ...ted States and or other countries HDMI and the HDMI logo are either trademarks or registered trademarks of HDMI Licensing LLC in the United States and or other countries Other trademarks registered trademarks and trade names may be used in this document to refer to either the entities claiming the marks and names or their products Crestron disclaims any proprietary interest in the marks and names ...

Page 3: ...tings 7 Configuring OSD Settings 8 Configuring Device Settings 9 Restoring Factory Default Settings 9 Configuring EDID Mode 10 Configuring the Output Timeout 11 Auto Adjusting RGB Video Settings HD SCALER VGA E Only 12 Device Information 13 Viewing Serial Number and Firmware Version 13 Viewing Input Signal Information 14 Viewing Output Signal Information 15 Firmware Upgrade 16 ...

Page 4: ......

Page 5: ...a display or other HDMI device This guide provides information about configuration of the video scalers using the OSD on screen display For additional information about the video scalers refer to the HD SCALER HD E HD SCALER VGA E DO Guide Doc 7778 OSD Operation The HD SCALER HD E and HD SCALER VGA E provide an OSD that appears on the connected output display device The OSD allows configuration of...

Page 6: ...OUT TRANSPARENCY DISPLAY EXIT OSD DETAILS INPUT OUTPUT RESTORE EDID MODE EXIT DEVICE EXIT RESOLUTION SIZE EXIT Applicable only to component video of the HD SCALER VGA E Also applicable to HDMI video of the HD SCALER HD E Applicable only to RGB video of the HD SCALER VGA E Applicable only to the audio input of the HD SCALER HD E Applicable only to PHASE CLOCK H POSITION and V POSITION settings for ...

Page 7: ...ation setting becomes yellow text Configuration The OSD allows configuration of the following types of settings Picture settings Output settings Audio settings OSD settings Device settings In addition the OSD of the HD SCALER VGA E allows the auto adjustment of certain RGB video settings Configuring Picture Settings Picture settings can be configured to improve picture quality as desired To config...

Page 8: ...s the intensity of the colors in the picture A higher saturation make the colors look more vivid A lower saturation turns the colors toward gray Available selections range from 0 to 100 The default setting is 50 SHARPNESS Applicable only to component video of the HD SCALER VGA E Also applicable to HDMI video of the HD SCALER HD E Adjusts the picture to look crisper or softer Available selections r...

Page 9: ...s 50 It is recommended that automatic adjustment of the PHASE CLOCK H POSITION and V POSITION settings be performed before manually adjusting the settings in the PICTURE submenu For information about automatic adjustment of the settings refer to Auto Adjusting RGB Video Settings HD SCALER VGA E Only on page 12 Exit the PICTURE submenu by selecting EXIT at the bottom of the submenu The OSD returns ...

Page 10: ...arged to fit the display If the image is larger than the total resolution of the display the image is reduced to fit the display FULL Depending on the input and output resolutions stretches the image horizontally vertically or both horizontally and vertically in order to fill the display The aspect ratio of the image is not maintained OVERSCAN Crops the edges of the image and scales the image to f...

Page 11: ...O Submenu Configuration Items CONFIGURATION ITEMS DESCRIPTION DELAY Sets the audio delay so that the audio is in sync with the video Available selections are as follows OFF 40 mS 110 mS 150 mS The default setting is OFF INPUT Applicable only to the HD SCALER HD E For the HD SCALER VGA E the audio input is always analog Available selections are as follows HDMI Sets the audio to HDMI digital ANALOG ...

Page 12: ...D Available selections range from 0 to 100 The default setting is 50 TIMEOUT Sets the time in seconds in which the OSD is visible after the last button is pressed Available selections range from 5 to 100 seconds The default setting is 10 seconds TRANSPARENCY Adjusts the display of background information through the OSD Available selections range from 0 to 100 The default setting is 0 DISPLAY Contr...

Page 13: ...lso displays device information For additional information refer to Device Information on page 13 Restoring Factory Default Settings To restore factory default settings do the following On the main menu of the OSD select DEVICE The DEVICE submenu opens DEVICE Submenu Select RESTORE The DEVICE submenu appears as shown below DEVICE Submenu with RESTORE Selected To restore factory default settings se...

Page 14: ...do the following On the main menu of the OSD select DEVICE The DEVICE submenu opens DEVICE Submenu Select EDID MODE The DEVICE submenu appears as shown below DEVICE Submenu with EDID MODE Selected Set EDID MODE to either of the following DEFAULT The video scaler sends the predefined Creston EDID to the input device COPY The video scaler copies the EDID of the display device and then sends the EDID...

Page 15: ...elect DEVICE The DEVICE submenu opens DEVICE Submenu Select OUTPUT TIMEOUT The DEVICE submenu appears as shown below DEVICE Submenu with OUTPUT TIMEOUT Selected Enable or disable the output timeout By default the output timeout is disabled To enable the output timeout select the number of minutes that no sync is detected at the inputs before the HDMI and AUDIO outputs turn off Available selections...

Page 16: ...f the settings refer to Configuring Picture Settings on page 3 for information By default automatic adjustment of those settings is disabled To allow the video scaler to adjust those settings automatically do the following 1 On the main menu of the OSD select AUTO ADJUST 2 Select YES The video scaler automatically adjusts the PHASE CLOCK H POSITION and V POSITION settings NOTE If additional adjust...

Page 17: ...Input signal information Output signal information Viewing Serial Number and Firmware Version To view serial number and firmware version do the following On the main menu of the OSD select DEVICE The DEVICE submenu opens DEVICE Submenu Select DETAILS The serial number and firmware version of the video scaler are displayed as shown in the example below Sample Display of Serial Number and Firmware V...

Page 18: ... input signal information do the following On the main menu of the OSD select DEVICE The DEVICE submenu opens DEVICE Submenu Select INPUT DEVICE Submenu with INPUT Highlighted Once INPUT is selected status information specific to the input signal is displayed as shown in the example below Sample Input Signal Information ...

Page 19: ...utput signal information do the following On the main menu of the OSD select DEVICE The DEVICE submenu opens DEVICE Submenu Select OUTPUT DEVICE Submenu with OUTPUT Highlighted Once OUTPUT is selected status information specific to the output signal is displayed as shown in the example below Sample Output Signal Information ...

Page 20: ... zip file the represents the respective filename Copy the BIN file to the root directory of a USB flash drive NOTE The USB flash drive must use FAT32 NOTE Ensure that the latest firmware file BIN is the only firmware file in the root directory Disconnect the power pack from the video scaler Press and hold the MENU ENTER button on the video scaler while doing the following a Reconnect the power pac...

Page 21: ...Supplemental Guide DOC 7828C HD SCALER HD E HD SCALER VGA E HD Video Scalers 17 This page is intentionally left blank ...

Page 22: ...Crestron Electronics Inc Supplemental Guide DOC 7828C 15 Volvo Drive Rockleigh NJ 07647 2045131 Tel 888 CRESTRON 01 17 Fax 201 767 7576 Specifications subject to www crestron com change without notice ...

Reviews: