background image


24  

  DM Lite HD(I)-MD Auto-Switchers and Extenders 

Supplemental Guide – DOC. 7797D


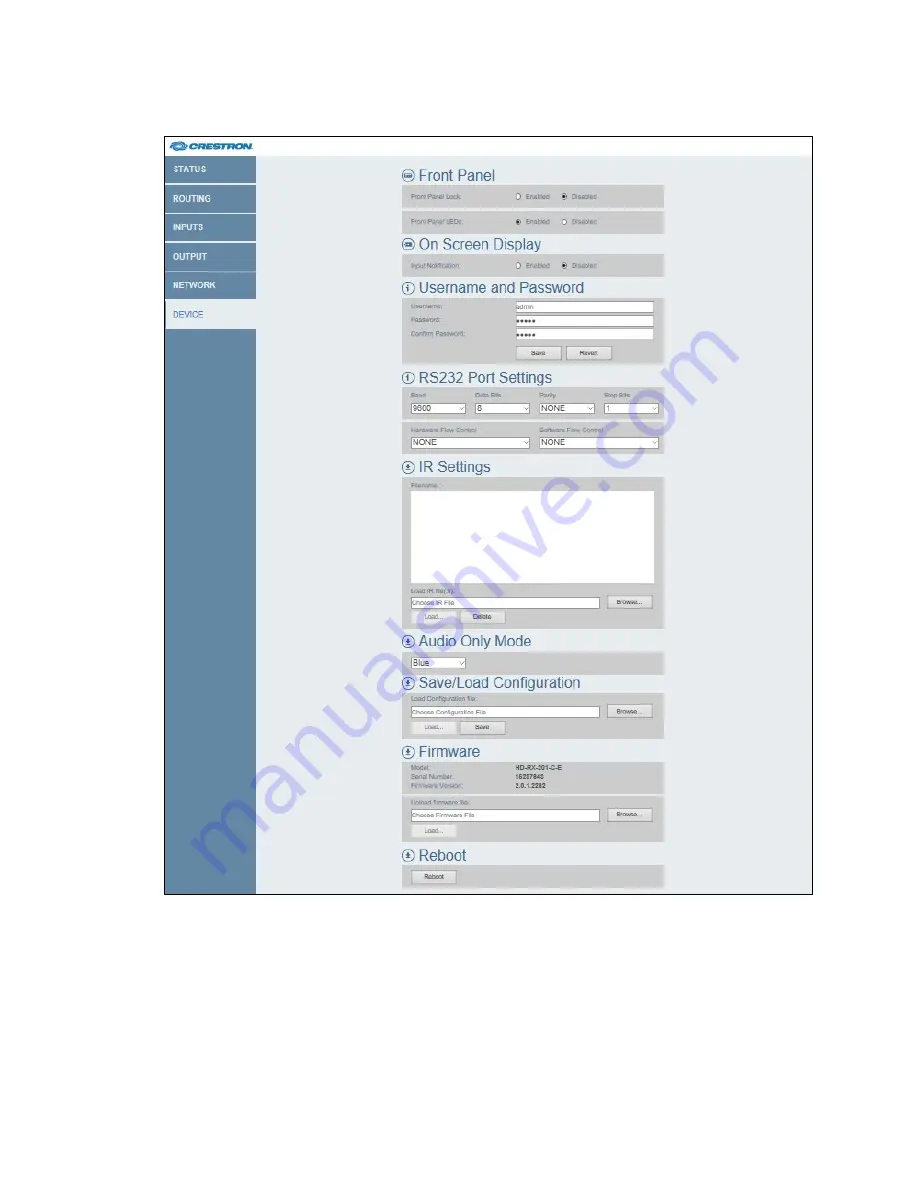
Sample Device Page 


Enable or Disable the Front Panel 

By default, the front panel of the transmitter and receiver is unlocked, allowing the push 

buttons to function. When the front panel is locked, pressing any of the push buttons—

with the exception of the SETUP push button—has no effect. In addition, the LEDs on 

the front panel are enabled by default. When the front panel LEDs are disabled, the 

LEDs—with the exception of the SETUP LED—do not light. Although front panel push 

buttons and LEDs may be disabled, the device continues to function. 

Summary of Contents for HD-MD-400-C-E

Page 1: ...DM Lite HD I MD Auto Switchers and Extenders Supplemental Guide Crestron Electronics Inc...

Page 2: ...rds Association in the United States and or other countries Dolby Digital is either a trademark or registered trademark of Dolby Laboratories in the United States and or other countries DTS is either...

Page 3: ...nfigure Device Settings 23 Enable or Disable the Front Panel 24 Display the Selected Input on the HDMI Output 25 Change the Username and Password 26 Configure RS232 Port Settings 26 Configure IR Setti...

Page 4: ......

Page 5: ...Using CAT5e or higher cable the switchers can extend 1080p signals up to 230 feet 70 meters Consisting of a transmitter and receiver the switchers automatically scale input signals to match the nativ...

Page 6: ...ures Deep Color 3D Auto Manual Switching and Priority Routing Deep Color 3D Auto Manual Switching and Priority Routing Deep Color 3D Auto Manual Switching and Priority Routing Deep Color 3D Auto Manua...

Page 7: ...o 8 channels Dolby Digital Dolby Digital EX DTS DTS ES DTS 96 24 LPCM up to 8 channels Dolby Digital Dolby Digital EX DTS DTS ES DTS 96 24 LPCM up to 8 channels Dolby Digital Dolby Digital EX DTS DTS...

Page 8: ...component video are supported via a VGA input using a suitable adapter or breakout cable 3 DVI is supported via HDMI output using a suitable adapter or interface cable 4 EDID and HDCP management is av...

Page 9: ...interface View status information Route an input to the HDMI output Configure input settings Configure output settings Configure network settings Configure device settings NOTE Unless otherwise indic...

Page 10: ...username and password are case sensitive For enhanced security it is recommended that the default username and password be changed For information about changing the username and password refer to Ch...

Page 11: ...ut to the HDMI Output on page 10 Clicking INPUTS accesses the Input page which allows the desired EDID to be sent to the inputs For more information refer to Configure Input Settings on page 11 Clicki...

Page 12: ...on of a switcher can be viewed The current network settings such as hostname and IP address can also be viewed To view status information In the navigation bar click STATUS The Status page opens NOTE...

Page 13: ...HD MD 300 C E HDI TX 301 C 2G E for the HDI MD 400 C 2G E HD TX 101 C E for the HD MD 200 C E HD TX 101 C 1G E for the HD MD 200 C 1G E Serial Number NOTE For the HD TX 101 C E and HD TX 101 C 1G E t...

Page 14: ...Route a Local Inputs section and a Remote Transmitter section The name of the transmitter that is displayed varies For the HD MD 400 C E the transmitter is the HD TX 301 C E For the HD MD 300 C 3 the...

Page 15: ...orresponding input radio button The input is routed to the output To manually disconnect the route of a local or remote input click the clear Route radio button in the Local Inputs section of the page...

Page 16: ...the desired EDID file cedid select the file and then click Open The selected EDID file appears in the Load CEDID file field c Click Load A prompt appears asking for confirmation that the EDID file be...

Page 17: ...llowing i In the Send EDID to All inputs drop down list select the desired built in EDID file or a custom EDID file The built in EDID files are as follows 1 DM Default EDID 16 DM Default VGA EDID Outp...

Page 18: ...rop down list select the priority level for routing of the input NOTE In order for a priority level to be selected the Priority Routing radio button in the Priority Routing Support section of the Inpu...

Page 19: ...tton LED is green when an active input is routed and is blue when no inputs are connected to the HD MD 400 C E Standard Operates according to the SIMPL program refer to the SIMPL Windows help file for...

Page 20: ...output if desired The default name is OUTPUT To save the new name click Save Name 3 In the Resolution drop down list select the desired output resolution A list of the available selections follows NOT...

Page 21: ...rmation refer to Configure Power Off Settings and Configuring Power On Settings that follow Configure Power Off Settings If Automatic Power Settings is set to Enable configure automatic power off sett...

Page 22: ...nd 6 and proceed to step 7 If Custom is selected continue with step 5 5 Applicable only when Send command is set to CEC Custom or to RS232 Do the following a Select the Hex or Ascii radio button to sp...

Page 23: ...and proceed to step 3 If IR is selected skip steps 2 and 3 and proceed to step 4 2 Applicable only when Send command is set to CEC In the CEC drop down list select one of the following to turn on the...

Page 24: ...mmand If the command is successful click Save to save the power on settings Configure Analog Audio Settings Configure analog audio settings in the Analog Audio Settings section of the Output page Outp...

Page 25: ...play and Output Signal Information The following information is displayed in the Connected Display section of the page Sink Detected Specifies whether the HDMI signal is detected by the connected disp...

Page 26: ...of the switcher is to be assigned by a DHCP server To set the IP address click either of the following radio buttons Obtain an IP address automatically Default setting Allows the IP address of the sw...

Page 27: ...ce settings consist of the following Enabling or disabling the front panel Displaying the selected input on the HDMI output Changing the username and password Configuring RS232 port settings Configuri...

Page 28: ...ing the push buttons to function When the front panel is locked pressing any of the push buttons with the exception of the SETUP push button has no effect In addition the LEDs on the front panel are e...

Page 29: ...the Enabled radio button default setting To disable the LEDs excluding the SETUP LED click the Enabled radio button Display the Selected Input on the HDMI Output By default the HDMI output is configu...

Page 30: ...e 1 In the Username text box enter the desired username 2 In the Password text box enter the desired password 3 In the Confirm Password text box reenter the desired password to confirm the password 4...

Page 31: ...n the Stop Bits drop down list select the number of stop bits Available values are 1 and 2 The default setting is 1 5 In the Hardware Flow Control drop down list select the hardware flow control Avail...

Page 32: ...pears indicating that the selected file is an invalid file type Select a valid IR file 3 Click Load A prompt appears asking for confirmation that the IR file be loaded 4 Click OK to load the IR file T...

Page 33: ...a switcher The file can then be saved to the local hard drive of a PC A configuration file can also be loaded to a switcher Save or load a configuration file in the Save Load Configuration section of...

Page 34: ...ation file is loaded to the switcher a message appears indicating that the XML restore process is finished The web interface then returns to the Login page Upgrade Firmware Upgrade firmware in the Fir...

Page 35: ...bout the push buttons that can be used to route an input to the HDMI output on the receiver Push buttons are located on the receiver and on the HD MD 400 C E HD MD 300 C E and HDI MD 400 C 2G E transm...

Page 36: ...ns as follows AUTO LED When automatic routing is enabled the AUTO LED lights green When automatic routing is disabled the AUTO LED turns off INPUT LED For each input the INPUT LED indicates whether th...

Page 37: ...sh button To route the HDMI signal corresponding to the HDMI 3 input on the transmitter press the INPUT 3 push button To route the RGB VGA or component video input signal with an analog audio signal c...

Page 38: ...inputs press the AUTO push button Pressing the button toggles automatic routing on and off Automatic routing is enabled by default To switch from the default setting of automatic routing to any of the...

Page 39: ...omatic routing on and off Automatic routing is enabled by default To switch from the default setting of automatic routing to any of the inputs on both the transmitter and receiver press the INPUT SEL...

Page 40: ...Crestron Electronics Inc Supplemental Guide DOC 7797D 15 Volvo Drive Rockleigh NJ 07647 2045740 Tel 888 CRESTRON 11 18 Fax 201 767 7576 Specifications subject to www crestron com change without notice...

Reviews: