


Digital Video Processor
Crestron
CNX-DVP4
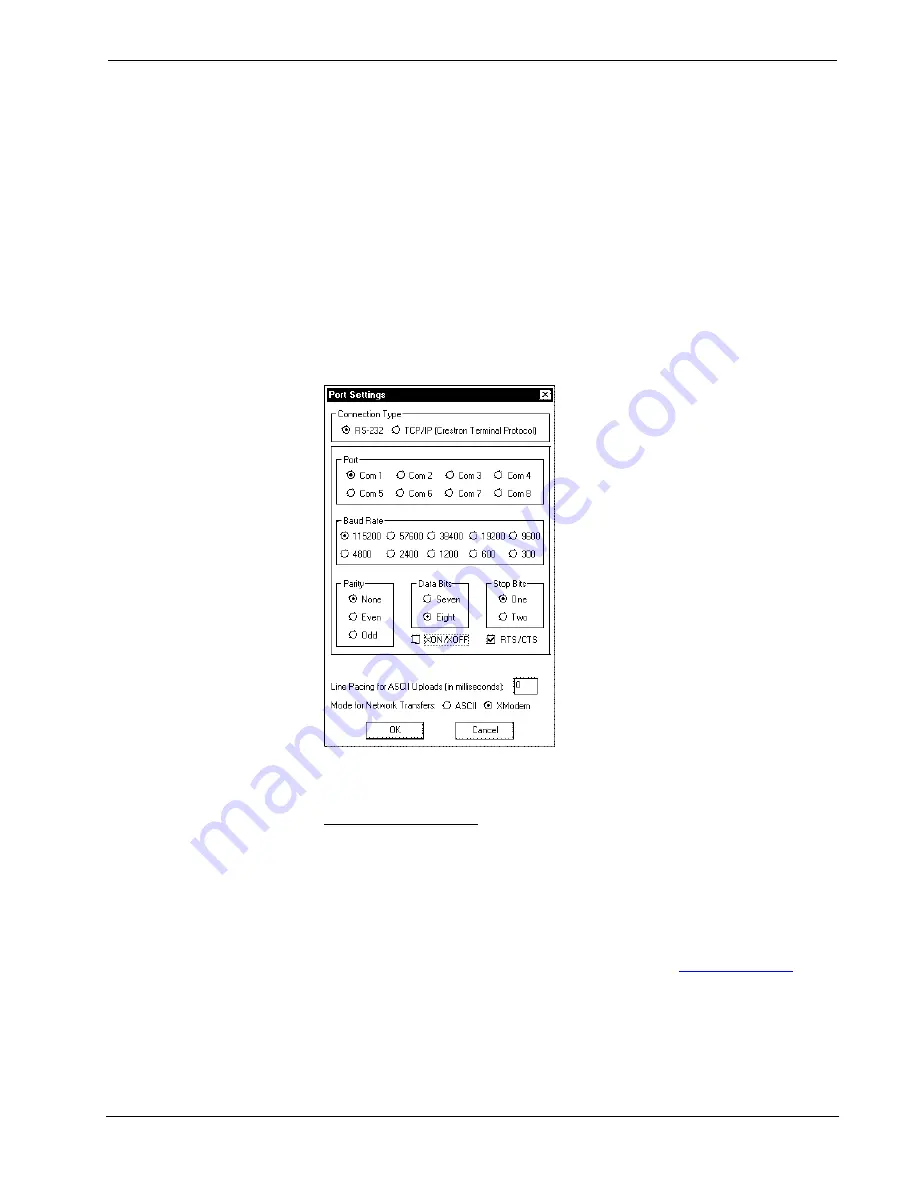
The PC communication settings specified here should match the protocol that the
CNX-DVP4 expects. The settings (defaults) are as follows:
•
Port = COM 1 through COM 8. Select the correct COM port on the PC.
•
Baud rate = 115200 (use with new .cuz files, version 3.0.17 and higher)
57600 (use with older .cuz files)
You can set the PC and the control system to a different baud rate, by using
the
Functions | Set Baud Rate
command.
•
Parity = None.
•
Number of data bits = 8.
•
Number of stop bits = 1.
•
Hardware handshaking (RTS/CTS) selected (must be enabled).
•
Software handshaking (XON/XOFF) not selected.
“Port Settings” Window:
Default Settings for RS-232 Communication with the CNX-DVP4
To verify communication, click
Diagnostics | Establish Communications (Find
Rack)
. This displays a window that gives the COM port and baud rate.
TCP/IP Connection
Before you can communicate with the CNX-DVP4 over TCP/IP, you must use the
RS-232 connection just described to configure the unit’s TCP/IP settings.
1. Open Viewport and click
Functions | Set Control System IP Information.
2. Enter the IP address, IP mask and default router in the text fields. (All of
these terms are explained in detail in the latest version of Crestron’s e-
Control Reference Guide, Doc. 6052, available as a PDF on the Downloads
| Product Manual section of the Crestron website (
3. Click
OK
to set the new IP information.
Once you have assigned the IP settings, you can continue to communicate with the
CNX-DVP4 using the RS-232 connection, or you can establish a TCP/IP connection.
For TCP/IP, use CAT5 cables with 8-pin RJ45 connectors to connect the LAN port
on the CNX-DVP4 and the LAN port on the PC to the Ethernet hub. Alternatively,
Operations Guide – DOC. 8170A
50
•
Digital Video Processor: CNX-DVP4


