background image


Page 6 of 24 


6.


Viewer and USB Driver Installation 


Note: If you have a previous version of the Credential Cam Pro USB camera software installed on your 

computer, you should first remove this. To remove an older version, go to Start and select all programs 

Find the Credential Cam Pro Cameras folder and select the Uninstall Viewer option. 


6.1.


Viewer Installation (All Models) 

Insert the CD labeled USB Viewer Software. Click the executable file named SetupCred.exe.  


Credential Cam Pro's viewer software automatically checks which operating system is running and loads 

the appropriate drivers (32bit or 64bit). 


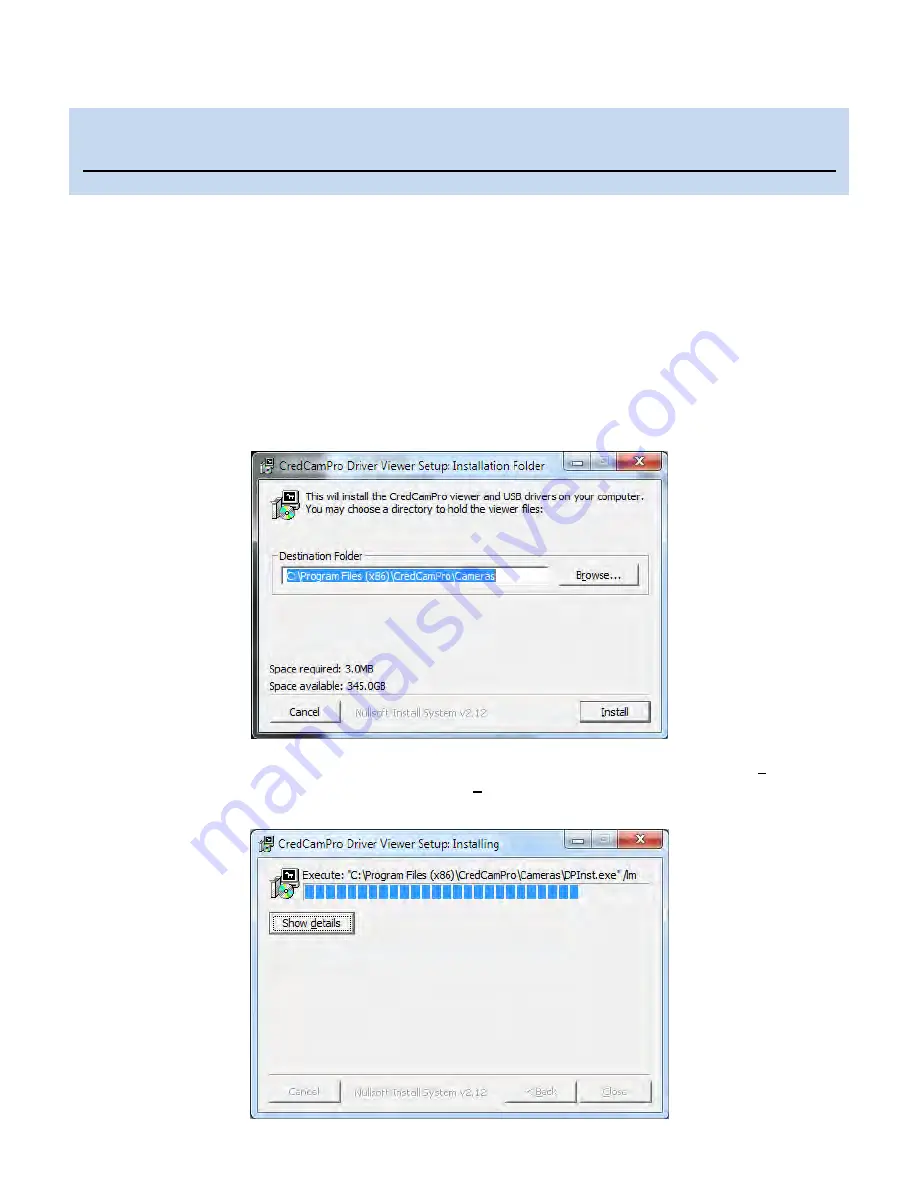
The following screen will appear: 


If you wish to install the viewer in a location other than the default directories, click on the Browse button 

and specify the desired location, otherwise click on the Install Button and the following screens will 

appear: 


Please install the software first. 

Do not connect the camera to the computer before installing the software.  

Summary of Contents for cam pro

Page 1: ...Revision A USB Photo ID Flash Camera Instruction Manual for Credential Cam Pro Need Help Just Ask 800 321 4405 Shop Online www IDWholesaler com ...

Page 2: ...ices Limited Warranty Hardware and Software ANY USE OF THE SOFTWARE OR HARDWARE IS AT YOUR OWN RISK THE SOFTWARE IS PROVIDED FOR USE ONLY WITH CREDENTIAL CAM PRO HARDWARE THE SOFTWARE IS PROVIDED FOR USE AS IS WITHOUT WARRANTY OF ANY KIND TO THE MAXIMUM EXTENT PERMITTED BY LAW VIDEOLOGY DISCLAIMS ALL WARRANTIES OF ANY KIND EITHER EXPRESS OR IMPLIED INCLUDING WITHOUT LIMITATION IMPLIED WARRANTIES O...

Page 3: ...ck Light Compensation BLC Control 14 8 1 2 Capture Format 15 8 1 2 1 Video Capture Pin Properties 15 8 1 3 Zoom Pan Properties 17 8 1 4 Advanced Options 18 8 1 4 1 Isochronous and Bulk transfer modes 18 8 1 5 Factory Reset 19 8 1 6 Still Image Capture Snap Feature 20 8 1 7 Control 20 8 1 8 Help About Menu 20 8 1 9 Taking Flash Pictures 21 8 1 9 1 Adjusting the Flash intensity 21 9 Using the TWAIN ...

Page 4: ... has two exe files 1 SFT 13001 Viewer software and USB drivers SetupCred exe 2 SFT 10012 TWAIN data source SetupGTDS exe The Credential Cam Pro viewer can operate this camera without a need for any third party software It will auto recognize that the camera is plugged in and will show the corresponding controls and features for the camera Note All cameras stream video and have a still capture mode...

Page 5: ...ipod can be used 20 mount 5 Minimum System Requirements A PC with USB 2 0 compatible port MAC is not supported USB 1 1 is not supported Preview only PIII 1 1GHz or above 128MB of RAM 256MB preferred Windows XP for USB2 0 DirectX DirectShow 9 0c or later Windows XP Service Pack 1 Service Pack 2 Preferred Windows 2000 Service Pack 4 Preview and capture at the same time Full D1 MPEG 2 P4 2 4GHz or ab...

Page 6: ...e CD labeled USB Viewer Software Click the executable file named SetupCred exe Credential Cam Pro s viewer software automatically checks which operating system is running and loads the appropriate drivers 32bit or 64bit The following screen will appear If you wish to install the viewer in a location other than the default directories click on the Browse button and specify the desired location othe...

Page 7: ...Page 7 of 24 Click Next to continue Next the Windows Security window opens informing the drivers are not Microsoft digitally certified ...

Page 8: ...Page 8 of 24 Window XP Windows 7 Click Continue Anyway or Install ...

Page 9: ...B device has been detected and will proceed to install the driver Each time the camera is connected to a different USB port the driver will be installed this will be done only once for each port Please refer to section 8 Using the Viewer for launching the USB Credential Cam Pro viewer The camera is now ready for use Note CredCamPro Ensure that the cable connecting the camera to the flash module is...

Page 10: ...htly different depending on the revision level of the software The following window will appear If the viewer is to be installed in a location other than the default directories click on the Browse button and specify the desired location otherwise click on the Install Button and the following screens will appear The TWAIN driver installation is now complete Click Close to exit the hardware wizard ...

Page 11: ... up stating that Windows is installing the device drivers Upon completion a second window will state the driver software installed successfully NOTE There is no auto focus feature in these cameras Once camera is focused the user can modify the settings see section 8 1 Using the Viewer The camera is now ready for use ...

Page 12: ... on the Desktop A window will appear displaying the camera image 8 1 1 Camera Settings The Camera Settings gain shutter speed etc can be selected via Options Camera Settings 8 1 1 1 Video Capture Filter Properties When Camera Settings is selected the Video Capture Filter Properties window is opened There are two tabs within the Video Capture Filter Properties Camera Properties and Zoom Pan Propert...

Page 13: ...pe of shutter different parts of the sensor are exposed at different times which can result in distortion of moving objects There is also an automatic setting AUTO in which the shutter speed is adjusted automatically according to the overall light level Note Faster shutter speeds should not be used when operating the camera under fluorescent lighting The intensity of the light varies at the AC lin...

Page 14: ...Control Under normal lighting conditions with the Electronic Iris control activated the camera will automatically adjust the image brightness so that all parts of the image are visible However when the background illumination is very bright as when someone is standing in front of a window for example the shutter speed will automatically be reduced causing the foreground image to appear darkened Wi...

Page 15: ...o Capture Pin Properties When Camera Format is selected the Video Capture Pin Properties window is opened Figure 1 Video Capture Pin Properties Frame Rate The Frame rate will vary depending upon the screen resolution Color Space Compression The Color Space Compression is fixed to UYVY and cannot be varied ...

Page 16: ...Frame Rate for various screen resolutions Resolution pixels Maximum Frame rate 320 x 240 default 15 fps 320 x 240 15 fps 640x 480 15 fps 1280 x 1024 15 fps 1024 x 768 15 fps 800 x 600 15 fps 320 x 240 640 x 400 800 x 600 1024 x 768 1280 x 1024 ...

Page 17: ... The red square is the area of interest The zoom feature enables the user to change where the viewing area is located This area is dependent on what output size is selected within the Video Capture Pin Properties section 8 1 2 1 Zoom Pan Box ...

Page 18: ...data will not be re transmitted This mode is typically used for time sensitive data such as video and speech where there is little utility in repeating lost information With Bulk Transfer mode there is no fixed upper or lower limit to the available bandwidth and data is simply transmitted whenever the bus is available Bulk transfer includes error correction and dropped data packets which are retra...

Page 19: ...chronous to Bulk it is necessary to close the application unplug and reconnect the camera and restart the application 8 1 5 Factory Reset Factory Reset will bring up a dialog box If OK is selected the camera will be reset the next time it is plugged into the PC ...

Page 20: ...Folder button is used to change the location where snapshot images will be saved The files are saved to the user s desktop by default and are stored as Bitmap BMP files Filename Still_DATE_TIME_NUMBER bmp If using flash please see section 8 1 9 Taking Flash Pictures for option instructions 8 1 7 Control Control setting is inactive with 1 3 Megapixel Cameras 8 1 8 Help About Menu The Help feature s...

Page 21: ...r of the flash module is on Re charging between flash pictures takes only a second or two To take flash pictures click on the Take Snapshot option from the file menu You will see the flash light come on and a still image frame will be captured and stored in the assigned snapshot folder Please refer to section 8 3 7 for still image capture instructions 8 1 9 1 Adjusting the Flash intensity If the f...

Page 22: ...ith any TWAIN Compliant Application The TWAIN interface will attach itself to the first Credential Cam Pro camera it finds connected to the computer For best operation run the TWAIN Interface on a system that has only one Credential Cam Pro camera installed Any application that supports a TWAIN Data Source as a capture device can access the camera The camera s image will appear as shown below ...

Page 23: ...ment provides enough overall light Additionally a solid light grey backdrop is preferred for headshots 10 5 Reflections Take care that the camera lens is at approximately the same height as the subject s nose There should not be a high light point source in the ceiling angled in to the subjects face This may cause glasses to reflect or shadows to appear on the face A hot white dispersed light aime...

Page 24: ...tomatically Browse the CD files and double click on the CredUSB2 exe file to run it Note The auto run application runs or not when media CD inserted depend on the auto insert notification option checked in the properties of your CD drive The method of changing this setting depends on what exact version of Windows you have For information on how to do this do a search in Windows Help for auto inser...

Reviews: