BACK
PANEL
Auto-tune creates special “electric voice” effect by intentionally setting the key to a different
key.
A
,
b
,
c
,
d
,
e
,
f
,
9
represent the A, B, C, D, E, F, G keys.
Select Minor/Major by sliding the switch accordingly.
• represents flat tone
The auto-tune keys ranging from C Major – B Minor are represented as follows:
Reverb/Delay Amount
Control reverb amount using knob and reverb delay amount using knob respectively.
Below are the reverb/delay amount ranging from
0. –
+48V Phantom Power Switch
Press down to 48V phantom
power supply to the XLR connectors.
Refer to “Phantom Power & Microphone
Connectivity” section for details.
Important: When +48V phantom power
is enabled, both XLR connectors will be
supplied with +48V. Phantom power is
applicable to condenser microphones
which support phantom power, applying
+48V on microphones that do not support
phantom power may cause damage to such
microphones.
Line In/Mobile
In Volume Knob
Rotate to control the volume of Line In or
Mobile In.
SoundBoard Switch
Press to enable soundboard clips selection.
LED and will display and and
-.
briefly to indicate Soundboard mode.
Reverb Amount Knob becomes sound
clip selector, LED display options
I
-
6
,
I
-Entrance,
2
-Cheers,
3
-Baby,
4
-Laughter,
5
-Gunshots,
6
-Crow.
Rotate Knob to select desired sound clip,
press knob to playback selected sound
clip.
Press SoundBoard switch to exit and return
to Reverb Select and Auto-tune Select mode,
LED and will display and briefly to
indicate control is back to Reverb Select and
Auto-tune mode.
Microphone 2 & Guitar
Volume Knob
Rotate to control the gain of Microphone
2 and Guitar input.
Microphone 1 Volume Knob
Rotate to control the gain of Microphone 1
input.
Bass & Treble Knob
Rotate to control the amount of Bass and
Treble for Microphone inputs.
Voice-Over Switch
Suppress background music when speaking
through the microphones. Return to
original music volume when there is no
microphone input. Press to enable
Voice-Over, press again to disable.
Reverb Select & Reverb
Amount Knob
Rotate to select between different types of
reverb,LED display on the right indicates
the reverb selected (
-
,
1
-
), (
-
) indicate
Reverb is OFF.
To adjust Reverb Amount and Reverb Delay,
press down this button, LED and will
display and briefly to indicate control is
switch to Reverb Amount and Reverb Delay
mode. LED subsequently display
0
.
-
(with
a • at the bottom of the number). Use the
Reverb Select & Reverb Amount Knob
and Auto-tune Key & Reverb Delay Knob
to adjust reverb amount and reverb delay
accordingly.
Press knob again to switch back to
Reverb and Auto-tune Select function.
LED and will display and briefly
to indicate control is back to Reverb and
Auto-tune Select mode. LED subsequently
display the current selected Reverb number
and Auto-tune key.
Reverb Select/Amount
Display
Displays the selected reverb type or amount
respectively.
Auto-tune/Reverb
Delay Display
Displays the selected Auto-tune key or
Reverb Delay amount respectively.
Minor/Major Switch
Switch between Minor and Major key.
Auto-tune Key & Reverb
Delay Knob
Rotate to select from 24 base key tunes,
LED display on the left indicates the key
selected(
-
,
A-9
)from A – G,
-
indicate
Auto-tune is OFF, • at the bottom of
character represents flat key. Refer to
“Auto-tune Keys” section for details.
To control Reverb Delay amount, press
down Reverb Select & Reverb Amount
knob , the LED display on the left
switches to
0.-
(with a • at the bottom of
the number). Press Reverb Select & Reverb
Amount knob again to switch back to
Auto-tune Select function.
Mixing ON/OFF
Mixes microphone and other inputs (Line
In, USB, Guitar) and output to internet or
computer for recording.
Monitoring ON/OFF
Press to hear your own voice through the
headphone.
Monitoring FX ON/OFF
Press to hear your own voice with effects
through the headphone.
Mixing FX ON/OFF
Enable microphone with effects and output
to internet or computer for recording.
Mobile Out Volume Knob
Rotate to control the output of output to
mobile device.
Headphone 1, 2
Volume Knob
Rotate to control the output volume of
Headphone 1 and Headphone 2.
Monitor Off +
Monitor Fx Off
Monitor On +
Monitor Fx Off
Monitor Off +
Monitor Fx On
Monitor On +
Monitor Fx On
Mixing
Off +
Mixing Fx
Off
Record: Original
mic only
Monitor: No mic,
only other inputs
Record: Original
mic only
Monitor: Original
mic, with other
inputs
Record: Original
mic only
Monitor: Mic
with effects, with
other inputs
Record: Original
mic only
Monitor: Original
mic + effects, with
other inputs
Mixing
On +
Mixing Fx
Off
Record: Original
mic, with other
inputs
Monitor: No mic,
only other inputs
Record: Original
mic, with other
inputs
Monitor: Original
mic, with other
inputs
Record: Original
mic, with other
inputs
Monitor: Mic
with effects, with
other inputs
Record: Original
mic, with other
inputs
Monitor: Original
mic + effects, with
other inputs
Mixing
Off +
Mixing Fx
On
Record: Mic with
effects only
Monitor: No mic,
only other inputs
Record: Mic with
effects only
Monitor: Original
mic, with other
inputs
Record: Mic with
effects only
Monitor: Mic
with effects, with
other inputs
Record: Mic with
effects only
Monitor: Original
mic + effects, with
other inputs
Mixing
On
+ Mixing
Fx On
Record: Mic with
effects, with
other inputs
Monitor: No mic,
only other inputs
Record: Mic with
effects, with
other inputs
Monitor: Original
mic, with other
inputs
Record: Mic with
effects, with
other inputs
Monitor: Mic
with effects, with
other inputs
Record: Mic with
effects, with
other inputs
Monitor: Original
mic + effects,
with other inputs
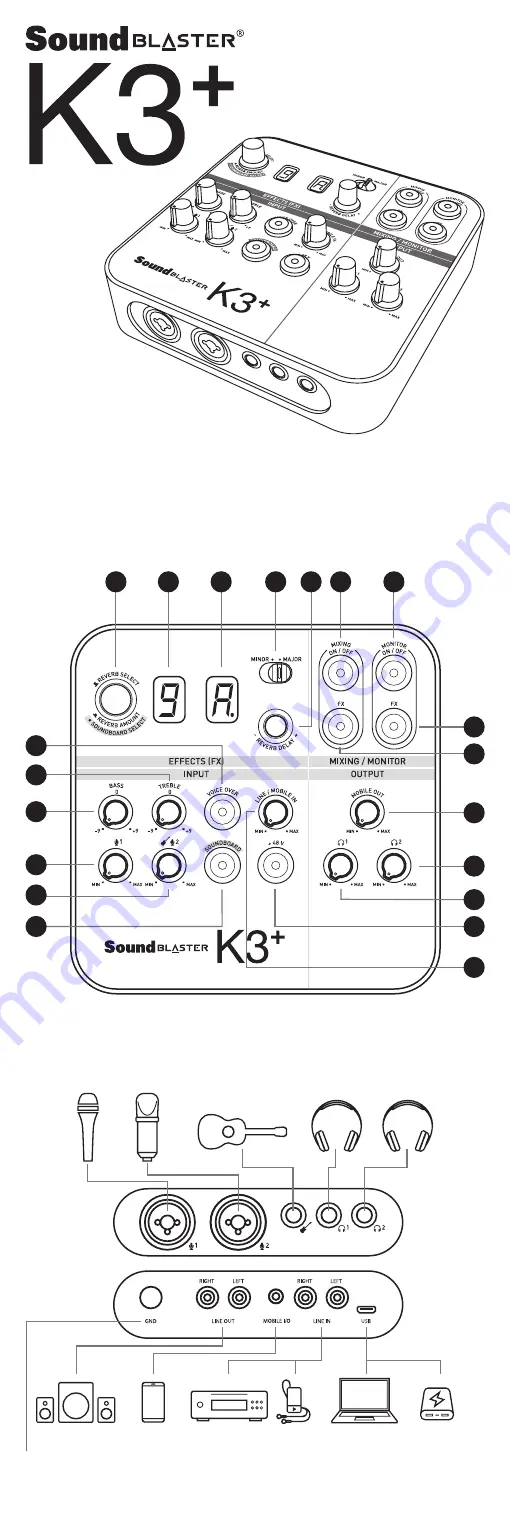
2. CONNECTIVITY
3. DESCRIPTION OF FUNCTIONS
Ground Terminal
Connect a ground cable (not provided) from this terminal to the metal surface at the back of
the computer to eliminate humming noise.
FRONT
PANEL
1. FUNCTIONS LABELLING
Model No: SB1720
PN 03SB172000001 Rev B
© 2018 Creative Labs Pte. Ltd. All rights reserved. Creative, the Creative logo, Sound Blaster and the Sound Blaster logo are trademarks or registered
trademarks of Creative Technology Ltd in the United States and/or other countries. All other trademarks are the property of their respective owners and are
hereby recognized as such. All specifications are subject to change without prior notice. Actual product may differ slightly from images shown. Use of this
product is subject to a limited warranty. The software included in this packaging may not be used separately from the hardware. Before using the software,
you must agree to be bound by the terms and conditions of the end user license agreement.
PRODUCT REGISTRATION
Registering your product ensures you receive the most appropriate service and
product support available. You can register your product during installation or at
register.creative.com.
Please note that your warranty rights are not dependent on registration.
TECHNICAL & CUSTOMER SUPPORT SERVICES
Go to support.creative.com to resolve and troubleshoot technical queries at Creative’s
24-hour self-help Knowledge Base. You can also find Customer Support Services and
other helpful information here.
OTHER INFORMATION
Supplementary documentation for this product includes a detail
and safety and regulatory information. These documents can be
the support.creative.com site.
KEEP THIS DOCUMENT FOR FUTURE REFERENCE
5. OPERATION MODE
6. MIXING/MONITORING OPERATION BEHAVIOR
4. PHANTOM POWER & MICROPHONE
CONNECTIVITY
8. REVERB SETTING
Sound Blaster K3 supports 6 modes of operation:
The above behaviour assumes that the Reverb Select or Auto-tune is enabled, if not, no effects
can be heard even if Monitor FX and Mixing FX are turned on.
The Sound Blaster K3 supports both dynamic and condenser microphones that are different
in various operating voltages (XLR +48V, TRS +1.5V) and connectors, therefore it is paramount
to ensure proper connection and usage of microphones. Below table illustrates the possible
microphone usage scenarios:
Reverb Select
Below are the reverb settings ranging from 1-9.
Important: +48V should be “On” ONLY when condenser mic requires 48V phantom power,
ap48V on microphones that do not require 48V phantom power may cause permanent
damage to the microphone. Always ensure that +48V power is “OFF” before inserting or
removing phantom power condenser mic.
Music Playback
Normal playback/streaming without effects and no monitoring. As Mic Monitoring is not
turn on, microphone input will not be heard, however microphone input signal can still be
captured by computer.
Control: Monitor and Mixing buttons at “Off” position.
Chat
Voice communication without effects.
Control: Monitor button at “On” position.
Wet Monitor-Dry Record
Vocal monitoring with effects & other inputs, internet/computer recording is dry (vocal
without music).
Control: Monitor Fx at “On” position.
Wet Monitor-Wet Record, Karaoke
Vocal monitoring and internet/computer recording are with effects and music (wet).
Control: Monitor Fx, Mixing, Mixing Fx at “On” position.
Voice-Over
During singing session, music volume is suppressed automatically when there is vocal input,
music level will be restored when there is no vocal input. This feature is important for room
host or DJ/KJ when they need to intervene during the session.
Control: Voice-Over switch, Monitor Fx, Mixing and Mixing Fx at “On” position.
Host
This is for station/channel broadcasting host. User can chose to apply reverb/broadcasting
effect during the session.
Control: Mixing, Mixing Fx, Monitor Fx, Voice-Over and Soundboard switch at “On” position.
Voice-Over
Mixing On
Mixing Fx
Monitor On
Monitor Fx
Music
Chat
Wet Monitoring,
Dry Recording
Wet Monitoring,
Wet Recording
(Karaoke)
Voice-Over
Host
8
9
13
14
17
19
18
20
15
16
6
6
6
6
7
7
7
7
8
8
8
8
9
9
9
9
Mic 2
+48V
Condensor Mic
Dynamic Mic
Mic with built-in
battery
Mic
1
+48V
Condensor Mic
Mic 1: XLR
Mic 2: XLR
Mic 1: XLR
Mic 2: TRS
Mic 1: XLR
Mic 2: TRS
Dynamic Mic
Mic 1: TRS
Mic 2: XLR
Mic 1: XLR or TRS
Mic 2: XLR or TRS
Mic 1: XLR or TRS
Mic 2: XLR or TRS
Mic with built-in
battery
Mic 1: TRS
Mic 2: XLR
Mic 1: XLR or TRS
Mic 2: XLR or TRS
Mic 1: XLR or TRS
Mic 2: XLR or TRS
2
1
1
2
3
5
3
1
1
1
7
2
3
4
5
6
1
5
Reverb
-
Reverb OFF
1
Room
4
Stadium
7
Delay
2
Hall
5
Concert
8
Echo
3
Plate
6
Chorus
Cathedral
Reverb Amount/Delay Amount
0.
0% (Min)
100% (Max)
7. AUTO-TUNE KEYS
10. STATUS/MODE DISPLAY
10
11 12
Press and hold Reverb Adjust button until LED and display and
1
2
3
11. RESET TO FACTORY SETTINGS
Below are the soundboard settings.
9. SOUNDBOARD SETTING
LED
LED
Electronic
Tone
-
Auto-tune OFF
-
Auto-tune OFF
c
C Major
c
C Minor
d
D-Flat Major
d
D-Flat Minor
d
D Major
d
D Minor
e.
E-Flat Major
e.
E-Flat Minor
e
E Major
e
E Minor
f
F Major
f
F Minor (A-Flat Major)
9.
G-Flat Major
9.
G-Flat Minor
9
G Major
9
G Minor
a.
A-Flat Major (F Minor)
a.
A-Flat Minor
a
A Major
a
A Minor
b
B-Flat Major
b
B-Flat Minor
b
B Major
b
B Minor
2
2
1
1
1
2
3
3
LED
22
LED
22
Reverb Amount
Reverb Delay
Reverb Select
Auto-tune
Sound Board
-
2
3
14
13
1
18
15
19
16
20
8
11
10
9
12
17
2
3
4
5
6
7
1
Entrance
3
Baby
5
Gunshots
2
Cheers
4
Laughter
6
Crow