

TR
Genel Bakýþ
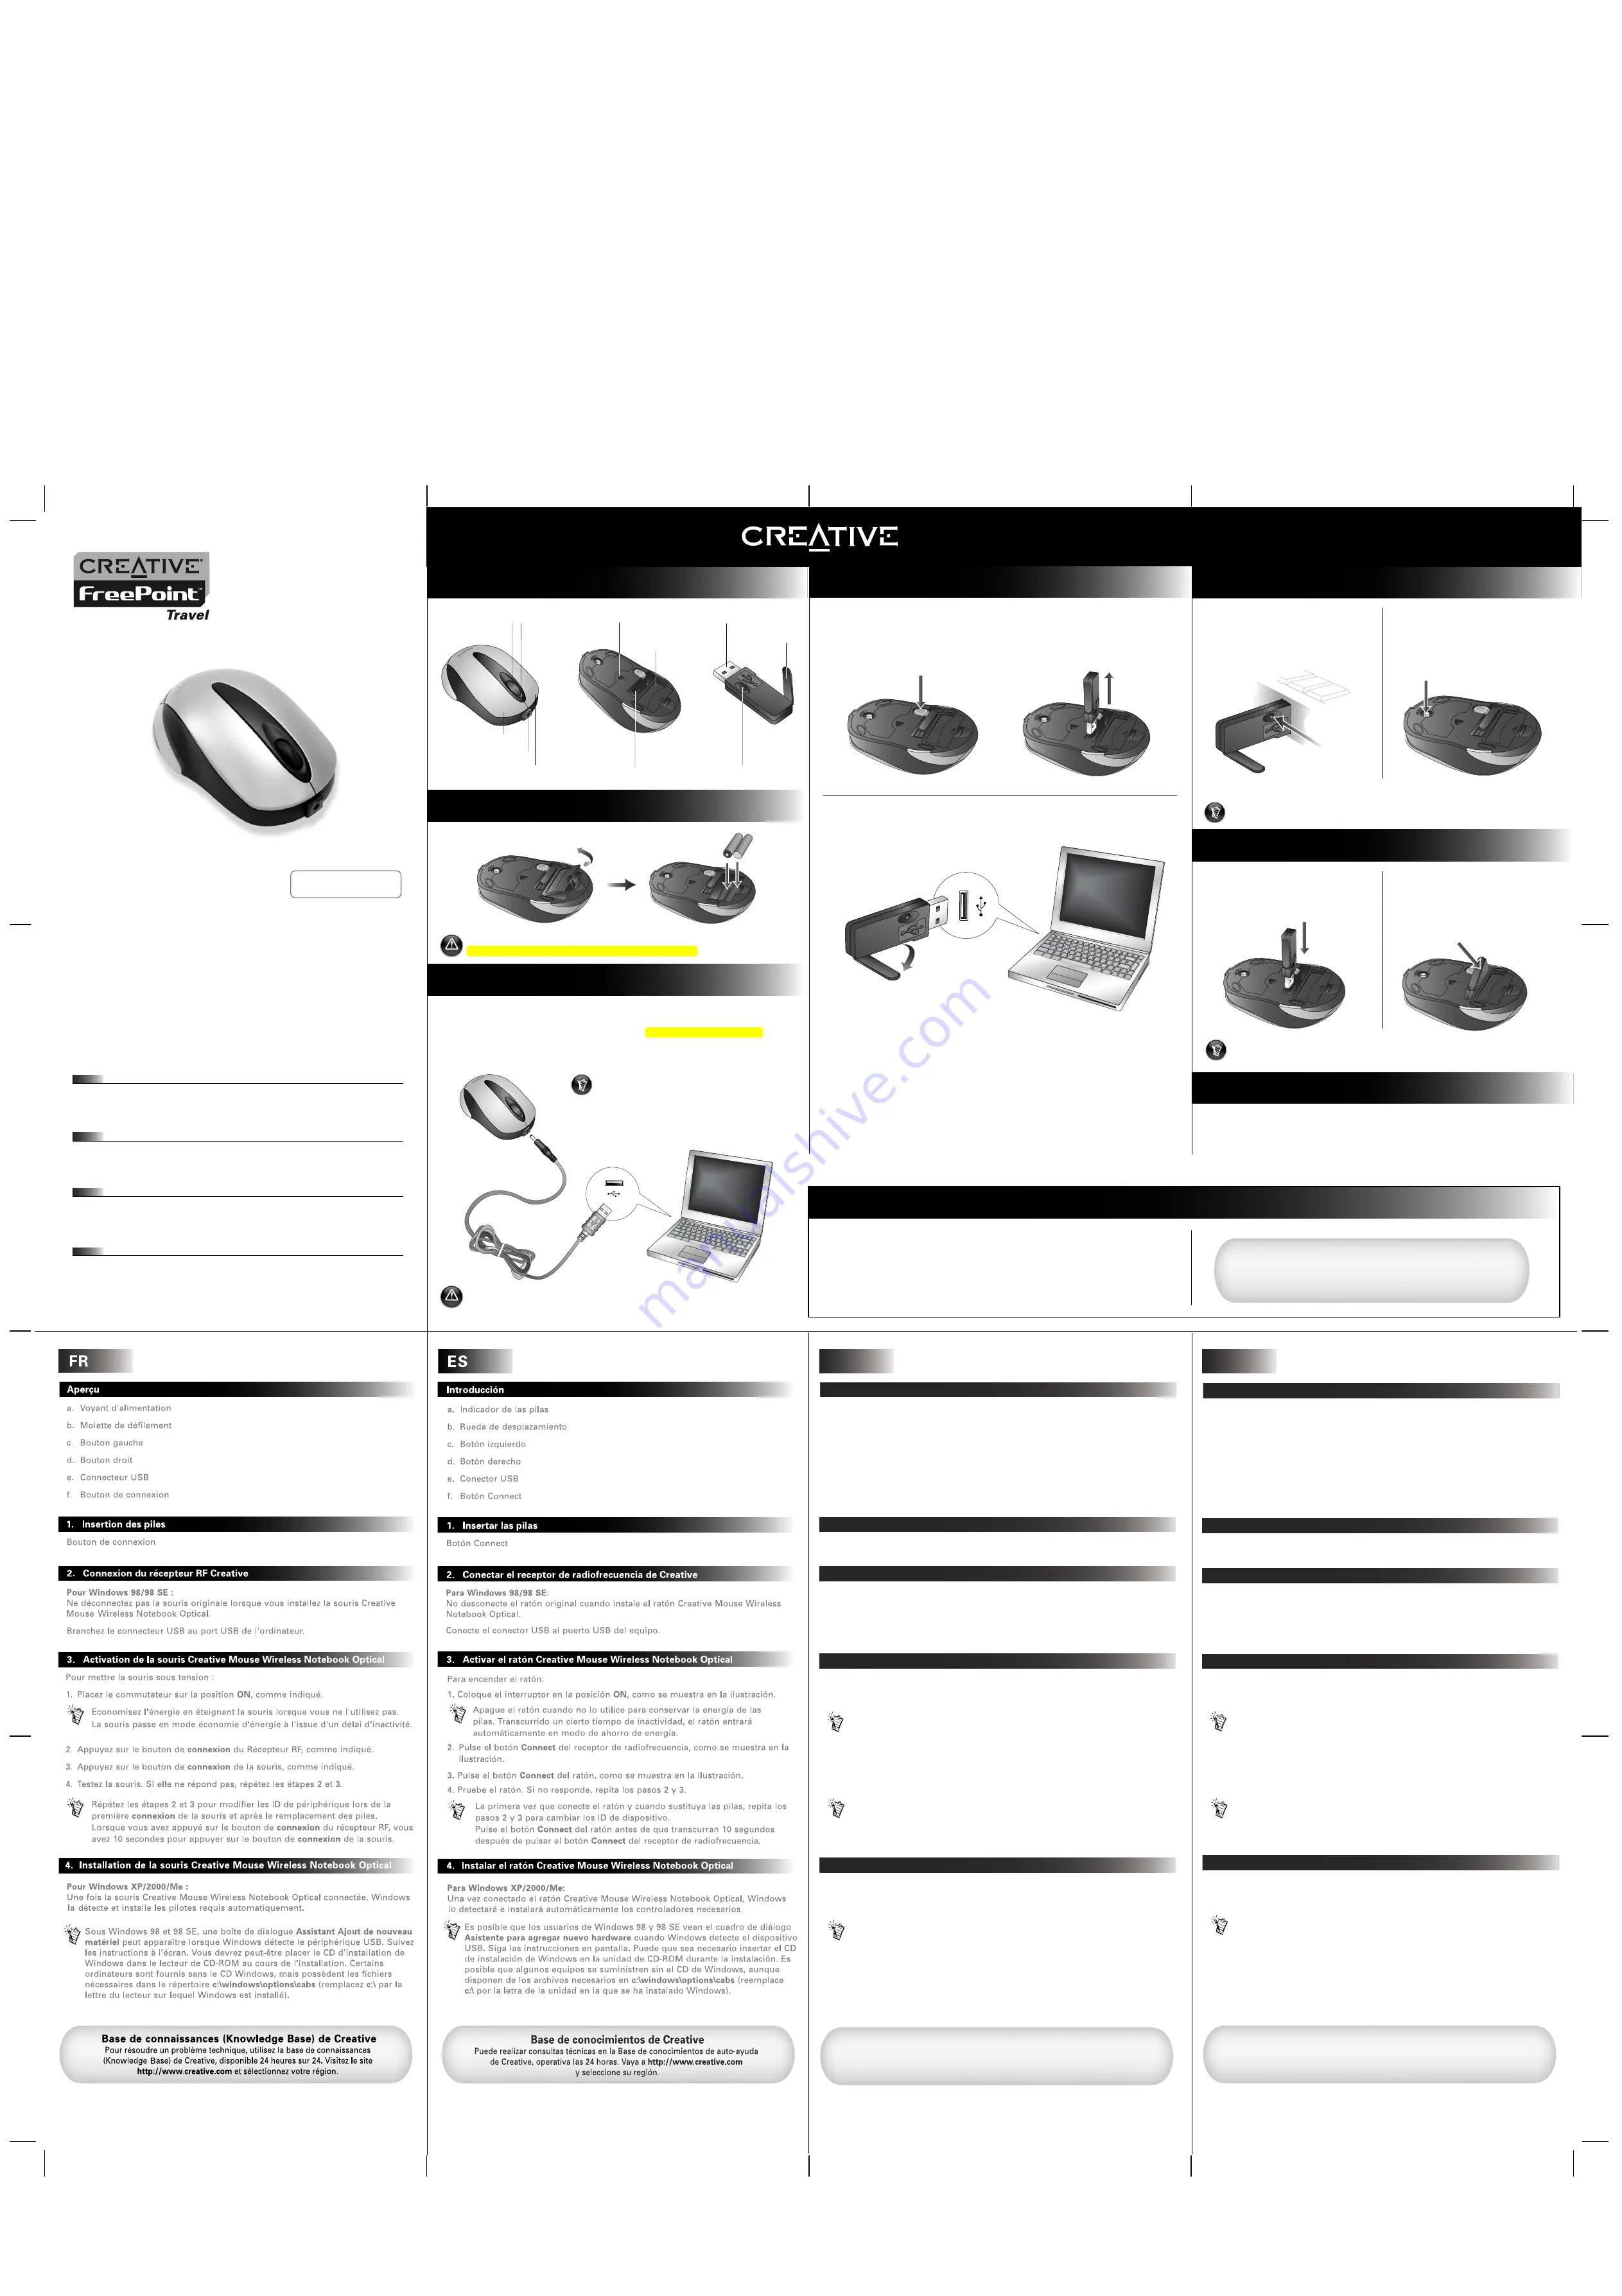
a. Pil göstergesi
b. Kaydýrýcý
c. Sol týklatma düðmesi
d. Sað týklatma düðmesi
e. USB Baðlayýcýsý
f. Connect düðmesi
1. Pillerin Takýlmasý
Connect düðmesi
2. Creative RF Receiver’ýn Baðlanmasý
Windows 98/98 SE için:
Creative Mouse Wireless Notebook Optical’ý baðlarken normal farenizi çýkarmayýn.
USB baðlantýsýný bilgisayarýnýzýn USB baðlantý noktasýna takýn.
3. Creative Mouse Wireless Notebook Optical’ýn Etkinleþtirilmesi
Kullanmadýðýnýz zaman fareyi kapatarak pilin boþa harcanmasýný önleyin.
Fareniz belirli bir süre kullanýlmadýðýnda da güç tasarruf moduna geçer.
Fareyi ilk kez baðlarken ve pilleri deðiþtirdikten sonra, adým 2 ve 3’ü
tekrarlayarak aygýt bilgilerini deðiþtirin.
Farenin üzerindeki
Connect
düðmesine, RF Receiver üzerindeki
Connect
düðmesine bastýktan sonra 10 saniye içinde bastýðýnýzdan emin olun.
2. RF Receiver üzerindeki
Connect
düðmesine, gösterildiði gibi basýn.
3. Fare üzerindeki
Connect
düðmesine, gösterildiði gibi basýn.
4. Fareyi test edin. Yanýt vermezse, adým 2 ve 3’ü yeniden deneyin.
Farenizi açmak için:
1. Düðmeyi þekildeki gibi
AÇIK
konumuna getirin.
Creative Bilgi Tabaný
Teknik sorunlarýnýzý Creative’in 24 saat hizmet veren otomatik yardýmlý Bilgi Tabanýnda çözün.
www.creative.com adresine gidin ve bölgenizi seçin.
4. Creative Mouse Wireless Notebook Optical’ý yükleme
Windows XP/2000/Me için:
Creative Mouse Wireless Notebook Optical’ý baðladýktan sonra, Windows fareyi
otomatik olarak algýlar ve gerekli sürücüleri yükler.
Windows USB aygýtýný algýladýðýnda, Windows 98 ve 98 SE kullanýcýlarý,
Yeni
Donaným Ekleme Sihirbazý
iletiþim kutusu ile karþýlaþabilir. Ekrandaki
yönergeleri izleyin. Yükleme sýrasýnda, Windows Yükleme CD’sini CD-ROM
sürücüsüne yerleþtirmeniz istenebilir. Bazý bilgisayarlar Windows CD’si ile
saðlanmamýþ olabilir fakat gerekli dosyalar
c:\windows\options\cabs
(Windows’un yüklü olduðu sürücü etiketine baðlý olarak,
c:
\ harfini deðiþtirin)
dizininde bulunur.
BP
Visão Geral
a. Indicador de bateria
b. Roda de rolagem
c. Botão esquerdo do mouse
d. Botão direito do mouse
e. Conector USB
f. Botão Conectar
1. Inserindo as baterias
2. Conectando o receptor Creative RF
Para o Windows 98/98 SE:
Não desconecte o mouse original quando instalar o Creative Mouse Wireless
Notebook Optical.
Conecte o conector USB à porta USB do seu computador.
3. Ativando o Creative Mouse Wireless Notebook Optical
Knowledge Base da Creative
Resolva e pesquise dúvidas técnicas no Knowledge Base 24 horas de auto-ajuda da
Creative. Vá para
http://www.creative.com
e selecione a sua região.
4. Instalando o Creative Mouse Wireless Notebook Optical
Para o Windows XP/2000/Me:
Após conectar o Creative Mouse Wireless Notebook Optical, o Windows detectará
o mouse e instalará automaticamente os drivers necessários.
Os usuários do Windows 98 e 98 SE poderão visualizar uma caixa de
diálogo do
Assistente para Adicionar Novo Hardware
quando o Windows
detectar seu dispositivo USB. Siga as instruções na tela. Poderá ser
necessário inserir o CD de Instalação do Windows na unidade de CD-ROM
durante a instalação. Alguns computadores poderão não vir acompanhados
do CD do Windows, porém os arquivos necessários estarão armazenados
em
c:\windows\options\cabs
(substitua
c:\
pela letra da unidade onde o
Windows estiver instalado).
Botão Conectar
Para ativar o mouse:
1. Passe o interruptor para a posição
ON
conforme mostrado.
Economize a bateria, desligando o mouse quando não estiver em uso.
O mouse entrará no modo econômico, após um período de inatividade.
2. Pressione o botão
Conectar
no receptor RF, conforme mostrado.
3. Pressione o botão
Conectar
no mouse, conforme mostrado.
4. Teste o mouse. Caso não responda, repita as etapas 2 e 3 novamente.
Repita as etapas 2 e 3 para alterar as IDs do dispositivo, ao conectar o
mouse pela primeira vez e após a troca de baterias.
Pressione o botão
Conectar
do mouse dentro de 10 segundos após
pressionar o botão
Conectar
no receptor RF.
Overview
FreePoint
TM
Travel Mouse
a. Scroll wheel b. Low-battery
indicator
(under
Scroll
wheel)
1. Inserting Batteries
2. Charging Batteries (Optional)
If you use non-rechargeable alkaline batteries, skip this step and proceed to
Step 3 Connecting the RF Receiver
.
DO NOT
attempt to charge non-rechargeable
alkaline batteries. The batteries may leak and damage your mouse.
3. Connecting the RF Receiver
2. Remove the RF Receiver.
Resolve and troubleshoot technical queries
at Creative's 24-hour self-help Knowledge Base.
Go to
www.creative.com
and select your region.
Creative Knowledge Base
e. Right-click button
c. Left-click button
d. Charging port
i. USB connector
j. Antenna
k. Connect button
f. Optical sensor
h. USB slot
g. Battery
compartment
4. Activating Your Travel Mouse
5. Storing Your Travel Mouse
More Information
1. Press the
Connect
button on the RF
Receiver.
1. Insert the RF Receiver into the USB
slot.
2. Press the
RESET
button on your
mouse.
Make sure you press the
RESET
button on the mouse within 10
seconds of pressing the
Connect
button on the RF Receiver.
3. Test your mouse. If it does not respond, repeat steps 1 and 2 again.
Your mouse turns off when the RF Receiver is fully inserted. Conserve battery
power by turning off your mouse when it is not in use.
2. Rotate and press the RF Receiver as
shown.
The
EJECT
button clicks and the RF
Receiver is held in place for
convenient storage.
1. Press the
EJECT
button at the back of
your mouse.
The RF Receiver is released and the
red Optical sensor lights up to
indicate that the mouse is turned on.
Register your product!
Enjoy a host of benefits by registering your product during installation, or at
www.creative.com/register
. Benefits include:
•
Service and product support from Creative
•
Exclusive updates on promotions and events
Please note that your warranty rights are not dependent on product registration.
3. Rotate the RF Receiver's antenna and connect the RF Receiver to an available
USB port on your computer.
1. Connect the USB charging cable to the USB port on your computer and the
Charging port on your mouse as shown.
2. Fully charge the batteries for about four hours (initial charge: eight hours).
3. Disconnect the mouse from the charging cable.
When the Low-battery indicator blinks in red, repeat steps 1 and 2 to charge the batteries.
EJECT
OPEN
+ AAA Battery -
+ AAA Battery -
EJECT
EJEC
T
OPEN
EJECT
OPEN
OPEN
EJECT
OPEN
EJECT
OPEN
EJE
CT
For Windows 98 SE:
Users may be prompted by an
Add New Hardware Wizard
dialog box when
Windows detects the USB device. Make sure the original mouse is connected and
follow the instructions on the screen. You may need to insert the Windows
Installation CD into the CD-ROM drive. Some computers may be supplied without
the Windows CD, but have the necessary files stored in
c:\windows\options\cabs
(replace
c:\
with the drive letter your Windows has been installed on).
For Windows XP/2000/Me:
After you have connected the USB device, Windows will detect the USB device and
install the required drivers automatically.
Repeat steps 1 and 2, when replacing batteries.
OPEN
EJEC
T
Your mouse is supplied with two rechargeable AAA batteries.
DO NOT
mix batteries of different brands and capacities.
Keep your mouse connected to the USB port
on your computer, and proceed to
Step 3
Connecting the RF Receiver
to:
•
Use your mouse and charge the batteries at
the same time.
•
Use your mouse without batteries.
Frequently Asked Questions
My mouse seems to be experiencing interference. Is there anything I can do?
You can reset your mouse.
1. Press and hold the
RESET
button on your mouse for five seconds.
2. Press the
Connect
button on the RF Receiver.
Copyright © 2004 Creative Technology Ltd. All rights reserved. The Creative logo, Creative MediaSource and FreePoint
are trademarks or registered trademarks of Creative Technology Ltd. in the United States and/or other countries.
Microsoft, Windows and the Windows logo are registered trademarks of Microsoft Corporation. All other products
are trademarks or registered trademarks of their respective owners and are hereby recognized as such. All specifications
are subject to change without prior notice. Actual contents may differ slightly from those pictured.
FR
ES
BP
TR
PN 0300000000306 Rev.A
Quick Start


