


8. Remove the transducer from the chilled-water transducer valve.
9. Use absorbent rags to clean up any water.
2.20.2 Install a Redesigned Water Pressure Transducer
Prerequisites
Tools Required:
7/8-in. wrench
1 1/16-in. wrench
Absorbent rags
Teflon tape
Time Required:
15 minutes
Procedure
1. Hand tighten the new transducer onto the chilled-water transducer valve.
2. Hold the valve in place with the 7/8-in. wrench.
3. Once the valve is secure, tighten the pressure transducer with two to three turns of the 1 1/16-in wrench.
4. Open the chilled-water transducer valve to inspect for leaks.
If leaks are found, tighten the tranducer with the wrench until the leak steps.
5. Reconnect the control cable to the transducer.
6. Slide the protective foam cover over the valve and secure the cover with Velcro.
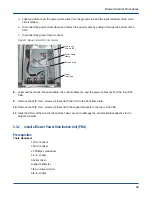
7. Power up all of the cabinets in the row.
a. For blower cabinets, place the MAIN DISCONNECT switch on the rear panel of the blower cabinet PDU
in the ON (up) position.
b. For cabinets, place main circuit breakers CB1 and CB2 in the ON (up) position.
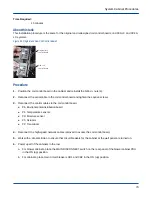
Figure 78. Circuit Breakers for Cabinet (left) and Blower (right)
a. Close the rear door of the cabinet.
b. Enter the following command in a terminal window on the SMW:
System Cabinet Procedures
85