background image


Understanding C.A.S.T. 

As C.A.S.T. is all analogue, it cannot be reconfigured depending on what task is required by the 
end user. As such, it is important to recognise what C.A.S.T. port does what on the 500R8. To 
Aid in this process, Cranborne Audio’s product and graphic design team has taken great care 
to add visual cues that will assist in their recognition.  
 
Each of the 4 paths on all C.A.S.T. ports are labelled either T (Transmit), or R (Receive) 
depending on their function relating to the featured device. A socket that is labelled TTRR will 
transmit balanced audio over its first two paths (TT), and will receive balanced audio on its 
second two paths (RR). The box will also have a white header colour to display that it is an 
output. 
 
Other C.A.S.T. ports labelled RRTT will receive balanced audio on its first two paths (RR) and will 
transmit balanced audio over its second two paths (TT). These boxes will have a clear header to 
display that it is an input. In addition to the path labelling, C.A.S.T. ports may also feature 
identification labels such as A, B,C, or D, or ’link’ to provide further clarity as to their function or 
provide differentiation between several C.A.S.T. ports on the same product. 
 
500R8 can integrate with a number of our C.A.S.T. enabled products. These products allow you 
to relocate the I/O where it’s needed as well as headphone and monitoring capabilities for you 
musicians.  

N22 

N22 is our simplest C.A.S.T. device and provides connectivity to C.A.S.T. A, B, C, or D ports 
onboard the 500R8. N22 features 2 combi jack inputs that feed directly into modules ‘x’ and 
‘x+1’ on 500R8 as well as XLR outputs to receive the Aux bus generated from 500R8. 
 
N22 can also be used as a standalone device by connecting 2 together using both C.A.S.T. In 
and Out ports. This will enable you to connect analogue I/O from one location into one N22 and 
run it to another N22 elsewhere in your studio/venue. N22 is completely passive and requires 
no power in order to be used. 

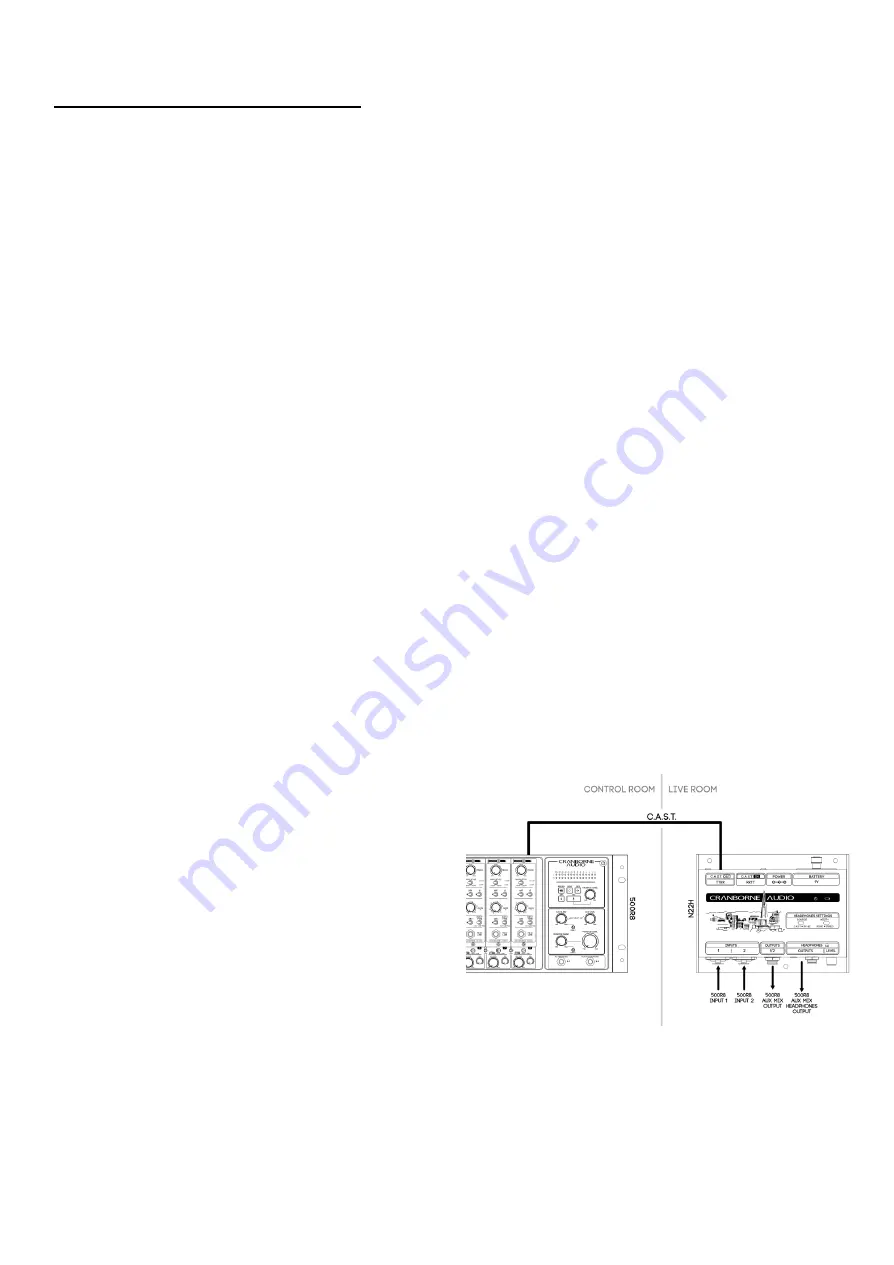
N22H 

N22H is very similar to N22 in that is can be used 
passively to send audio into the modules of a 
connected 500R8. N22H however features a 
built-in headphone amp as well as a level control 
that receives the Aux bus of a connected 500R8 
and amplifies it to the correct level and 
impedance for driving headphones.  
 
N22H allows you to distribute input and 
headphone connectivity to and from a remote 
location using just a single Cat 5 cable. It is 
powered via a standard ‘pedalboard-friendly’ 9v 
DC power supply or via an internal 9v battery. Power is only drawn when the headphone 
output has been plugged-in to preserve battery life and when the headphone amp is not 
required, you can simply use the combi jack inputs as passive input connections. 
 
When the C.A.S.T. port of N22H is not connected, it acts as a standard headphone amp by 
sending the two built-in inputs to L and R respectively of the headphone amp. 
 

500R8 User Manual

-Page 49- 

©201

9​

 Cranborne Audio Ltd


Summary of Contents for 500 Series

Page 1: ...500R8 Analogue Digital Hybrid USB Audio Interface Summing Mixer and 500 Series Rack User Manual 500R8 User Manual Page 1 201 9 Cranborne Audio Ltd ...

Page 2: ...ng the highest quality and truly innovative new ways of working and achieving that sound that we all desire Cranborne Audio for us means so much more than metal boxes with components in them These are our labours of love that embody and demonstrate our demand for excellence By distilling what matters and putting our soul into these tools we hope to help other people make magic and express themselv...

Page 3: ...only is 500R8 the new home for 8 of your favourite 500 series modules it is also your new 26 in 28 out channel USB audio interface monitor controller 16 in 16 out ADAT interface and 8 to 2 high headroom analogue summing mixer When digital is required each and every component inside 500R8 has been carefully considered to ensure that every nuance of your 500 series modules are translated into the be...

Page 4: ...p 15 Software Setup 16 Windows Configuration 16 Sample Rate Selection In Windows 16 MacOS X Configuration 17 Sample Rate Selection in MacOS 17 Configuring 500R8 in Your DAW 17 Feature Overview 18 500 Series Rack 18 Module Inputs 18 Inserts 18 Module Direct Outputs 19 Slot Bypass Switch 19 Source Switch 20 Chain Switch 21 500 Series Signal Flow 21 Summing Mixer 22 Mix Level Pan 22 Summing Mixer Out...

Page 5: ...guring Clock Source on Windows 33 Configuring Clock Source on macOS 33 Clock Settings DIP switch 33 MIDI I O 34 C A S T 34 C A S T IN A B C D RRTT 35 C A S T Requirements 36 Cranborne Audio USB Control Panel 36 Windows 37 macOS 38 Application Guides 38 Using 500R8 without 500 series modules 39 Sending Audio From Your DAW into the 500 Series modules on 500R8 40 Using 500R8 With Hardware Inserts In ...

Page 6: ...ments 52 44 1 48kHz 53 88 2 96kHz 54 176 4 192kHz 54 Technical Specifications 55 Digital Performance 55 Analogue Performance 56 System Performance 57 Power 57 Environmental 58 Dims Weights 58 Troubleshooting 59 Important Safety Instructions 59 General Safety 59 Installation notes 60 Power Safety 60 CE Certification 61 FCC Certification 61 RoHS Notice 61 Instructions for disposal of WEEE by end use...

Page 7: ...usts the main level of the Aux bus to the Aux Headphones and Aux Output 1 4 jack outputs on the rear panel 5 Power Switch Safely powers on and off 500R8 as well as any inserted 500 series module Tap to power on press and hold to power off 12 DAW Select Switches Assigns an alternate pair of DAW playback returns into the Blend controls for Aux and Monitor busses DAW 2 is accessed using USB outputs 2...

Page 8: ...m power is always ON Dynamic or Condenser mics can be used 5 ADAT I O Interfaces 16 in 16 out ADAT optical lightpipe channels directly into 500R8 s USB interface 14 Power Provides 500R8 with power via the provided external 24v 5A DC power supply No other power supply should be used 6 S PDIF I O Interfaces 2 in 2 out S PDIF and AES3 directly into 500R8 s USB interface 15 C A S T link Enables linkin...

Page 9: ... The following items can be found in the packaging alongside 500R8 External power adapter IEC cable 16 module fixing screws crosshead 4 40 thread size Allen key 2 5mm Quickstart Guide Note To reduce environmental waste 500R8 does not ship with a USB cable to connect it to a host device for recording playback To use 500R8 as a USB audio interface you will need to source a USB Type A to Type B cable...

Page 10: ...ed to reorientate the rack ears and position the rubber feet to best suit your application by using the supplied 2 5mm allen key Default Shipping Configuration Standard rack ear configuration used for rack mounting 500R8 into standard 19 rack If you would like to secure 500R8 into a 19 rack the rubber feet should be removed from the unit using the allen key provided Note Whilst 500R8 features plen...

Page 11: ...ure the rack ears with the 8x rack ear screws using the allen key provided Handle Configuration Creates a convenient carry handle for short distance transportation To position the rack ears in this configuration remove both of the rack ears and reposition them back to back onto the left side of 500R8 Secure them into place using 4x rack ear screws and the allen key provided Store the leftover rack...

Page 12: ... to provide a secure connection to the chassis with protection against accidental removal Connecting Power Align the metal pins and plastic locator of the plug with the power inlet Once located push the connector firmly into the socket whilst holding the plug s outer housing and not the cable itself Disconnecting Power Grip the body of the plug firmly and pull the body of the connector back from t...

Page 13: ...ds before continuing 2 Firmly touch the metal chassis of 500R8 to discharge any built up static electricity 3 Carefully pick up your 500 series module and locate its conductive edge into the backplane connector of 500R8 4 Once located push the module into place and secure the module into the rack using the supplied 4 40 screws be careful not to over tighten and strip the screw or thread Removing M...

Page 14: ...o monitors 5 Configure the front panel monitor controls to match the provided diagram The Aux and Monitor Blend controls should be set to 12 o clock and the DAW Select switch should be set into the up position Note Once 500R8 is connected to your speakers the Monitor Level control may seem sensitive with small movements causing large changes in volume In order to get the most out of 500R8 s Monito...

Page 15: ...ault drop down menu and select Default Device Once configured press play in any of your applications including Spotify Tidal iTunes or similar and the audio will be sent directly into 500R8 s DAW return and Monitor Outputs Increase the Monitor Level control for more volume Note If you are still unable to hear audio through 500R8 please ensure that the Speaker B Mute and Dim keys are switched off o...

Page 16: ...ED meter is indicating signal please check that the downstream connections are correct and the speakers are switched on Sample Rate Selection in MacOS Audio MIDI Setup for macOS enables you to adjust the Sample Rate settings of 500R8 when it is playing audio from Spotify Youtube and iTunes Simply select the Format drop down menu to display the possible Sample Rates from 44 1 to 192kHz When a DAW i...

Page 17: ...t on the front panel it is advised to check with the manufacturer of the module to determine which input should be used for your desired application Inserts Each 500 series slot features a dedicated Insert connection that utilises a TRS jack socket in a similar configuration that is commonly found on mixing consoles This Insert point allows external audio equipment such as 19 rackmount compressors...

Page 18: ...ons you can connect the module inputs and outputs of 500R8 to a patchbay to allow convenient re ordering of modules as well as advanced channel strip creation without accessing the rear panel Slot Bypass Switch The Slot Bypass switch is located on the backplane connector by each 500 series slot and can be used to bypass the slot if no 500 series modules are inserted Bypassing the slot allows you t...

Page 19: ...RRTT section of this manual ANLG This configures the 500 series slot to receive signal via the corresponding rear Module Input XLR connection USB This configures the 500 series module to receive signal via the corresponding USB channel from 500R8 s built in USB Audio Interface For a detailed explanation of the USB routing for each slot please read the USB Channel Labelling And Assignment s section...

Page 20: ...can record the USB output of slot 3 to record the summed result of all 3 modules record the USB output of slot 2 to record just the preamp and EQ or record the USB output of slot 1 to print the dry effect You can also record all 3 parts of the chain simultaneously for more flexibility later on in the mix stage 500 Series Signal Flow Each 500 series slot is connected to multiple sources and destina...

Page 21: ...trol with a range of to 10dB Pan Adjusts the pan position of the 500 series slot into the Summing Mixer Pan is a variable control with a centre detent that operates a 4 5dB pan law Summing Mixer Outputs The stereo output of the Summing Mixer is sent to two different locations internally for dual recording in different circumstances USB Input 9 10 The Summing Mixer and its stereo output is sent dir...

Page 22: ...ming Mixer output are combined with 500R8 s own Summing Mixer and sent directly to USB Inputs 9 10 and physical Mix Outputs of 500R8 In this configuration 500ADAT doubles the system s Summing Mixer channels to 16 The same two receive paths of the C A S T LINK connector featuring 500ADAT s Summing Mixer output are also sent into 500R8 s Aux and Monitor Blend controls to enable musicians to monitor ...

Page 23: ...500 series slot The Mix is typically comprised of live sources but can also feature channels being sent into the modules via USB DAW Comprises of the playback that is generated from within the DAW and sent into 500R8 via USB DAW is typically comprised of pre recorded elements click tracks and VSTs from within the connected DAW but can also feature live instruments by utilising software monitoring ...

Page 24: ...d outputs into the DAW 2 unbalanced jack inputs Aux Monitor Level Aux Level Adjusts the overall level of the Aux bus including the Aux Headphone output and the Aux Output jacks on the rear panel Monitor Level Adjusts the overall level of the Monitor bus including the currently active Speaker Outputs A or B as well as the Monitor Headphones output Aux Outputs The Aux Bus is fed to multiple location...

Page 25: ... meter displays the level of the Summing Mixer being sent into its A D converter If the meter is clipping at 0dBFS then the Summing Mixer needs to be attenuated using the Mix Level controls beneath each 500 series slot Turn the Monitor Blend control clockwise to the DAW position and the meter displays the level of the audio incoming via the DAW return and its dedicated D A converter If the meter i...

Page 26: ...ion and Talkback Mono buttons continue to function as normal into the Aux and Monitor Headphone Outputs Dim Key The Dim key attenuates the Monitor Bus by 12dB in order for the control room to be temporarily dimmed in volume for conversation The Dim key affects both the currently active Speaker Outputs A B as well as the Monitor Headphones output Using the Dim key rather than the volume control all...

Page 27: ...ed to enable dynamic or condenser microphones to be used Talkback Level The Talkback Level control is a variable gain control with 30dB of level on tap that is used to set the level of the talkback signal globally to its multiple destinations Talk Key The Talk key operates in a momentary push to talk fashion and is used to activate the talkback feature and send the talkback signal onwards to its a...

Page 28: ...compatible with 500R8 provided USB adapters are used that do not truncate the USB stream USB Inputs 500R8 sends up to 28 sources into the connected DAW via the built in USB Audio interface USB Inputs Channel Size Description Notes 1 8 8 500 Series Slot Outputs Post Insert 9 10 2 Summing Mixer Outputs 11 26 16 ADAT Inputs 27 28 2 S PDIF Inputs Note S PDIF is not operational on v0 9 firmware USB Out...

Page 29: ...esired sample rate To change the alternate setting using Audio MIDI Setup 1 Select the Spotlight Search function displayed as a magnifying glass icon on the top right corner of the screen search for Audio MIDI Setup and open the application 2 Select 500R8 listed in the audio device column 3 Select your desired Sample Rate using the Format dropdown box a To set your DAW session to record at a Sampl...

Page 30: ...Hz will be available in a forthcoming firmware update S PDIF S PDIF or Sony Philips Digital Interface is an audio protocol that transports 2 channels of audio down an unbalanced coaxial cable with RCA connectors S PDIF is based on the AES3 standard and is compatible with AES3 connections via XLR provided the correct cable is used XLR to RCA 500R8 features a pair of S PDIF inputs and outputs that w...

Page 31: ...k must be connected to the Word Clock Input port of 500R8 and Word Clock set to the default clock source from within your DAW or system preferences menus Note When slaving 500R8 from an external clock its own internal clock syncs to the incoming timing information and recovers its own improved clock For the best results and the highest quality conversion we recommend using 500R8 as the clock maste...

Page 32: ... machine that you would like to be clocked from USB ADAT Recovered Allows 500R8 to slave from a device connected to the ADAT stream This setting should be used if you need 500R8 to slave off of the device that is connected via ADAT Word Clock Allows 500R8 to slave from a device connected to the Word Clock Input connector This setting should be used if you need to clock 500R8 off of an external clo...

Page 33: ...d using the USB control panel for windows or Audio MIDI setup for macOS MIDI I O 500R8 features a full complement of MIDI I O integration via standard 5 pin DIN connections MIDI allows live performance and synth based workflows to integrate seamlessly with 500R8 500R8 essentially converts MIDI information and sends it down USB into the host device for recording of midi note or program change infor...

Page 34: ...ring solutions as well as I O relocation without sacrificing signal quality C A S T IN A B C D RRTT The C A S T IN A B C D ports are designed to relocate the rear connections of 500R8 around the studio space and enable convenient access to 500R8 s I O from remote locations The four available paths are divided into two discrete mono receive paths as well as a stereo transmit path Receive Receives t...

Page 35: ...mon off the shelf cat 5 cables without any loss of audio quality As a recommendation we suggest using shielded Cat5 cables with robust connectors to ensure that the C A S T connection is secure and will remain impervious to RF and crosstalk For improved performance you can consider Cat 6 or Cat 7 cabling which features individual shields for each twisted pair resulting in even greater crosstalk pe...

Page 36: ... parameters of 500R8 to enable setup with complex systems and configuration for particular applications We have worked hard to keep the panel as lightweight and simple as possible to reduce CPU load and improve latency performance where possible There are 3 available tabs Status Settings and Info Status The Status tab displays the connectivity status and ASIO settings of the connected 500R8 The Co...

Page 37: ...te We recommend only enabling Quali mode if the connected device has sufficient CPU to operate without pops clicks and other audio artefacts The Clock Source drop down sets 500R8 s current Clock Source The Locked indicator displays the current status of the clock and will light Green when it is connected and synced or Red if dropouts are detected Info The Info tab displays the currently installed ...

Page 38: ...en if a slot is bypassed the Input XLR Insert Module Direct Output and Mix Level Pan controls are still active and can be used as normal The Slot Bypass switch is positioned after the Source switches on the front panel If you switch the Source switch to USB you are then able to send audio out from your DAW and into the 500 series slot apply outboard processing using the module insert points and th...

Page 39: ...onitor Blend control of 500R8 to its Mix position 5 Press play in your DAW and adjust the Monitor Level control so that you can clearly hear the audio passing through the compressor inserted into 500 series slots 7 8 6 With the stereo track playing adjust the compressor settings to taste 7 Create a new stereo track in your DAW and set its input to receive USB Inputs 7 8 Set the output level of the...

Page 40: ... remains in phase and in time throughout your project and external hardware If the DAW does not facilitate this you may be able to enter the delay in manually Hardware Inserts In Pro Tools Using 500R8 s 500 series slots as hardware inserts within Pro Tools couldn t be simpler Pro Tools automatically assigns all of 500R8 s I O paths as numbered hardware inserts meaning that all you need to do is in...

Page 41: ... in ms that it takes for the audio to pass through the hardware inserts Pro Tools can then compensate by applying that time delay to all of the other tracks in the project effectively shifting all of the other tracks so that they are in time with the track passing through the hardware insert The issue with this concept is that there is no solid latency figure that we can provide you Latency varies...

Page 42: ... into the power amplifier 2 Reduce the speaker amplifier volume to its minimum setting 3 Play source material reference music out of 500R8 s DAW returns and position the front panel monitor controls to the 12 o clock position as detailed in the following diagram a The LED meter should be showing good level and flickering around 9 to 12dBFS 4 With the music playing slowly increase the volume of you...

Page 43: ...end controls are set fully anti clockwise to the Mix position 2 Connect a pair of headphones to the Aux Headphones port of 500R8 and hand them to the musician make sure the Aux Level control is set conservatively at around 10 11 o clock 3 Press and hold the Talk key to communicate with the musician via talkback raise the Talkback Level control until musician s can clearly hear the talkback bus 4 A...

Page 44: ... to the DAW position so that you can now hear the recorded take without having to continuously mute and unmute live channels Adding Reverb Into The Monitor Mix Reverb is a frequent component of monitor mixes in major project and home studios to help put a musician into a space and provide a feeling that can inspire great performances 500R8 allows you to insert a physical reverb of your choice into...

Page 45: ... required to expand your system by 8 channels at 44 1 or 48kHz sample rates 1 Connect the ADAT OUT port of the ADAT expander to the ADAT IN 1 port of 500R8 2 Connect the ADAT IN port of the ADAT expander to the ADAT OUT 1 port of 500R8 3 Configure the ADAT expander to clock from the ADAT stream If the device does not support this operation you can clock the unit via word clock by connecting the Wo...

Page 46: ...rs can be linked their Aux Mixes can be merged Talkback is cleverly managed between the two units and there are some advanced routing capabilities that allow more monitoring facilities Each unit features 2 ADAT IN and 2 ADAT OUT ports that can be used to achieve 8 channels of expansion from 44 1kHz to 96kHz When the two units are connected you are able to patch to and from 500ADAT by using the ADA...

Page 47: ...ummed and sent out of USB output 9 10 as well as the physical Mix Output of 500R8 Artist Monitoring The Aux bus on 500R8 is also sent via the C A S T LINK port and directly into 500ADAT s Aux 1 and Aux 2 Blend controls This enables musicians connected to 500ADAT to blend the 500R8 s Aux mix featuring the DAW returns Summing Mixer and Talkback signals with 500ADAT s own summing mixer directly into ...

Page 48: ...0R8 to allow you to play sources from your interface and out into your 500 series modules installed into 500R8 Artist Mixer Connect the Monitor Output of your audio interface into the DAW 2 Input jacks of 500R8 and switch the DAW Select switch on the front panel to the Daw 2 position This will allow you to use the front panel blend controls to balance between the playback incoming via the DAW 2 In...

Page 49: ...abilities for you musicians N22 N22 is our simplest C A S T device and provides connectivity to C A S T A B C or D ports onboard the 500R8 N22 features 2 combi jack inputs that feed directly into modules x and x 1 on 500R8 as well as XLR outputs to receive the Aux bus generated from 500R8 N22 can also be used as a standalone device by connecting 2 together using both C A S T In and Out ports This ...

Page 50: ...by switching the Input source switch to C A S T A R1 R2 on slots 1 and 2 This is the perfect setup when a vocal booth or isolation booth is required as you can send the monitor mix to the vocalist whilst also receiving 2 analogue inputs by using just a single Cat 5 cable Talkback is also managed by C A S T as 500R8 sends the talkback signal down C A S T to enable you to speak to the musician at th...

Page 51: ...nd Built In Inputs Selecting them first assigns them to USB channels 1 and 2 4 After the built in I O has been selected select 500R8 as the last audio device 5 Select the Clock Source dropdown menu and assign 500R8 as the Clock Source and select your desired Sample Rate using the Sample Rate drop down 6 Engage Drift Correction for the Built in I O and ensure Drift Correction is off for 500R8 Withi...

Page 52: ...SLOT 5 6 SLOT 6 SLOT 6 7 SLOT 7 SLOT 7 8 SLOT 8 SLOT 8 9 MIX L DAW L 10 MIX R DAW R 11 IN 11 OUT 11 ADAT 1 12 IN 12 OUT 12 ADAT 2 13 IN 13 OUT 13 ADAT 3 14 IN 14 OUT 14 ADAT 4 15 IN 15 OUT 15 ADAT 5 16 IN 16 OUT 16 ADAT 6 17 IN 17 OUT 17 ADAT 7 18 IN 18 OUT 18 ADAT 8 19 IN 19 OUT 19 ADAT 9 20 IN 20 OUT 20 ADAT 10 21 IN 21 OUT 21 ADAT 11 22 IN 22 OUT 22 ADAT 12 23 IN 23 OUT 23 ADAT 13 24 IN 24 OUT ...

Page 53: ...AT 1 12 IN 14 OUT 14 ADAT 2 13 IN 15 OUT 15 ADAT 3 14 IN 16 OUT 16 ADAT 4 15 IN 17 OUT 17 ADAT 5 16 IN 18 OUT 18 ADAT 6 17 IN 19 OUT 19 ADAT 7 18 IN 20 OUT 20 ADAT 8 176 4 192kHz USB Input Label USB Output Label Assignment 1 SLOT 1 SLOT 1 2 SLOT 2 SLOT 2 3 SLOT 3 SLOT 3 4 SLOT 4 SLOT 4 5 SLOT 5 SLOT 5 6 SLOT 6 SLOT 6 7 SLOT 7 SLOT 7 8 SLOT 8 SLOT 8 9 MIX L DAW L 10 MIX R DAW R 500R8 User Manual Pa...

Page 54: ... 1dB 2 2Hz to 80kHz 0 05dB 20Hz to 20kHz THD N 0 00032 110dB 4dBFS 20Hz 40kHz 1kHz A weighted 0 00065 104dB 1dBFS 20Hz 40kHz 1kHz A weighted THD 0 00014 117 5dB 8dBFS 20Hz 40kHz 1kHz A weighted 0 00023 113dB 4dBFS 20Hz 40kHz 1kHz A weighted 0 0006 105dB 1dBFS 20Hz 40kHz 1kHz A weighted Dynamic Range 121dB A weighted AES17 method 20Hz 20kHz Max Input Level 24dBu D A Conversion Test Signal Path 500 ...

Page 55: ... 1dB 1Hz to 70kHz THD N 0 0016 24dBu 1kHz Dynamic Range 109dB A weighted AES17 method 20Hz 20kHz Noise Floor 92 5dBu A weighted 20Hz 20kHz Unity Gain Talkback Input Gain 30dB Fixed Gain Preamp 20dB Analogue Trim Phantom Power Always On Summing Mixer Test Signal Path XLR Input Summing Mixer Bus Unity A D Converter 9 10 APx555 ASIO Freq Response 1dB 2 25Hz to 80kHz 3dB 1 2Hz 0 5dB 3Hz THD N 0 0007 2...

Page 56: ...r Bus unity Monitor Bus Speaker A Output APx555 Line In Phase 3 6 20Hz 22 20kHz Test Signal Path XLR Input Empty 500 Series Slot Summing Mixer Bus unity Mix Output APx555 Line In Phase 1 5 20Hz 11 20kHz Test Signal Path XLR Input Camden 500 Preamp Mic Mode 6dB Gain Summing Mixer Bus unity Speaker A Output APx555 Line In Phase 3 20Hz 13 5 20kHz Preamp mic mode 6dB Gain Digital Round trip Performanc...

Page 57: ...orage Conditions 20 to 50 degrees Celsius Dims Weights Unit Width 481mm 19 Rackmount Height 185mm 7 4u Depth 219m 8 6 Unit Weight 7kg Shipping Carton Width 550mm 21 7 Height 280mm 11 Depth 335m 13 2 Weight 7 5kg 500R8 User Manual Page 57 201 9 Cranborne Audio Ltd ...

Page 58: ... in the Software Setup section of this manual I can t patch to 500 series modules 1 2 on Logic Pro X This is a known bug in Logic Pro X that means that USB Output 1 2 cannot be patched to once the Stereo Output has been reassigned from within the I O assignments page on Logic Pro X Please follow the detailed guide to configure Logic Pro X in the Custom Configuring For Logic Pro X section of this m...

Page 59: ...nused for long periods of time Refer all servicing to qualified service personnel Servicing is required when the apparatus has been damaged in any way such as power supply cord or plug is damaged liquid has been spilled or objects have fallen into the apparatus the apparatus has been exposed to rain or moisture does not operate normally or has been dropped Do NOT modify this unit altercations may ...

Page 60: ...rsonnel When servicing disconnect all power sources before removing any panels CE Certification This unit is CE compliant Note that any cables supplied with Cranborne Audio equipment may be fitted with ferrite rings at each end This is to comply with the current regulations and these ferrites should not be removed FCC Certification Do not modify this unit This product when installed as indicated i...

Page 61: ... There may be some potential safety hazard if the apparatus is operated at altitude exceeding 2000m Evaluation of apparatus based on the temperate climate conditions only There may be some potential safety hazard if the apparatus is operated in tropical climate conditions Electromagnetic Compatibility EN 55032 2015 Class B EN 55016 2 1 2009 A1 2011 EN 55016 2 3 2010 A1 2010 EN 55035 2017 EN 61000 ...

Reviews: