background image

ENglISh

2

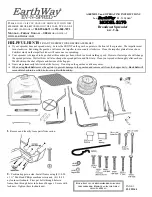
ASSEMBLY 

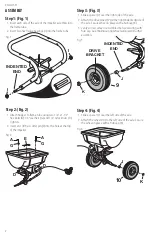
Step 1: (Fig. 1)

1.  Insert each side of the axle of the impeller assembly into 

the frame tube. 

2.  Insert two hex flange bearings (I) into the frame tube.

Step 2: (Fig. 2)

1.  Attach hopper to frame tube using two 1/4" x 1-1/2" 

hex bolts (A), 1/4" washers (G), and 1/4" nylock nuts (D). 
Tighten.

2.  Insert an 1/8" hair cotter pin (E) into the hole at the top 

of the impeller

Step 3: (Fig. 3)

1.  Slide a spacer (J) over the right side of the axle.
2.  Attach the drive wheel (9) to the right (indented) side of 

the axle. Secure wheel in place with a hub cap (K)

3.  Verify correct wheel is assembled before securing with 

hub cap. Assembling wrong wheel will prevent further 
assembly

Step 4: (Fig. 4)

1.  Slide a spacer (J) over the left side of the axle.
2.  Attach the wheel (10) to the left side of the axle. Secure 

the wheel in place with a hub cap (K)

Fig. 2

Fig. 3

Fig. 1

Fig. 4

I

I

INDENTED 

END

D

D

A

A

G

G

E

K

J

DRIVE 

BRACKET

INDENTED 

END

9

K

N

J

10

Summary of Contents for CMXGZBF7124322

Page 1: ...AS 38 5 KG CARRO ESPARCIDOR CMXGZBF7124322 IFYOUHAVEQUESTIONSORCOMMENTS CONTACTUS POURTOUTEQUESTIONOUTOUTCOMMENTAIRE NOUSCONTACTER SITIENEDUDASOCOMENTARIOS CONTÁCTENOS 1 888 331 4569 WWW CRAFTSMAN COM INSTRUCTIONMANUAL GUIDED UTILISATION MANUALDEINSTRUCTIONES ...

Page 2: ... safety warnings instructions illustrations and specifications provided with this tool Failure to follow all instructions listed below may result in fire and or serious injury SAVE ALL WARNINGS AND INSTRUCTIONS FOR FUTURE REFERENCE Safety Warnings a Read the towing vehicle owners manual and towing vehicle safety rules Know how to operate your tractor before using the broadcast spreader attachment ...

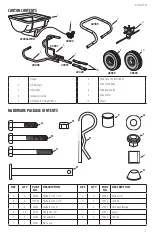
Page 3: ...EF QTY PART NO DESCRIPTION A 2 43648 Hex Bolt 1 4 x 1 1 2 B 4 1509 69 Hex Bolt 1 4 x 1 3 4 C 4 46699 Hex Bolt 1 4 x 2 D 10 47189 Nylock Nut 1 4 E 2 43343 Hair Cotter Pin F 3 44481 Plastic Cap REF QTY PART NO DESCRIPTION G 2 43088 Washer 1 4 H 1 47623 Hitch Pin I 2 47963 Hex Flange Bearing J 2 47851 Spacer K 2 44663 Hub Cap A C D E F G I J K H B 1 3 4 9 10 5 6 7 8 2 47994LRED 49088 49087 49091 2444...

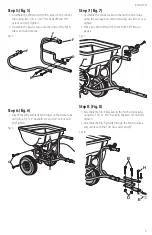
Page 4: ... impeller Step 3 Fig 3 1 Slide a spacer J over the right side of the axle 2 Attach the drive wheel 9 to the right indented side of the axle Secure wheel in place with a hub cap K 3 Verify correct wheel is assembled before securing with hub cap Assembling wrong wheel will prevent further assembly Step 4 Fig 4 1 Slide a spacer J over the left side of the axle 2 Attach the wheel 10 to the left side o...

Page 5: ...four 1 4 x 2 hexbolts C and 1 4 nylock nuts D Tighten Step 7 Fig 7 1 Assemble the control cable to the hitch control tube using the carriage bolt and nylon wing nut Do not over tighten 2 NOTE See ADJUSTING THE FLOW RATE SETTING on page 4 Step 8 Fig 8 1 Assemble the hitch brackets to the hitch control tube using two 1 4 x 1 3 4 hex bolts B and 1 4 nuts D Tighten 2 Assemble the hitch pin H through t...

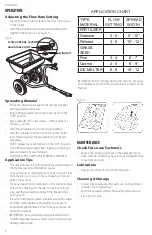
Page 6: ...evious one so some overlapping of spread pattern does occur For easiest application spread across the shortest edges of lawn first making two header strips for a turning area and then spreading between the header strips See figure 10 If lawn is odd shaped spread a border around the edges and then spread between the border See figure 10 Keep wheel approximately 4 feet from any area you do not wish ...

Page 7: ...ty information contained in the packaging call the local company or see website for warranty information FREE WARNING LABEL REPLACEMENT If your warning labels become illegible or are missing call 1 888 331 4569 for a free replacement CRAFTSMAN is a registered trademark of Stanley Black Decker Inc used under license es una marca registrada de Stanley Black Decker Inc utilizada bajo licencia est une...

Page 8: ...ire du véhicule relativement au fonctionnement sécuritaire sur les pentes Rester à l écart des pentes abruptes i Suivre les instructions d entretien et de lubrification tel que stipulé dans ce manuel AVERTISSEMENT lire tous les avertissements de sécurité et toutes les directives Le non respect des avertissements et des directives pourrait se solder par un choc électrique un incendie et ou une bles...

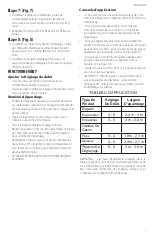
Page 9: ...ur et en arrêtant ou en tournant pour empêcher l excès de déversement d engrais NE PAS DÉPASSER 9 KM H 6 MI H EN REMORQUANT L ÉPANDEU Conseils d application Cette unité couvrira une zone d une largeur de 1 22 à 2 43 m 4 à 8 pi selon le matériel utilisé et la vitesse de remorquage Pour éviter de rater des endroits ou de faire des stries faire chaque passe à environ 1 5 m 5 pi de la précédente pour ...

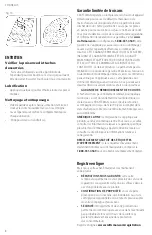
Page 10: ...LS OU CONSÉCUTIFS Certaines provinces ne permettent pas de limitation sur la durée de la garantie implicite ou l exclusion ou la limitation de dommages indirects alors ces limitations peuvent ne pas s appliquer à vous Cette garantie vous donne des droits légaux particuliers et vous pouvez avoir d autres droits qui varient selon les états ou les provinces GARANTIE DE REMBOURSEMENT DE 90 JOURS Si l ...

Page 11: ...onunciadas i Siga las instrucciones de mantenimiento y lubricación que se detallan en este manual ADVERTENCIA Lea todas las advertencias de seguridad e instrucciones El incumplimiento de las advertencias e instrucciones puede provocar descargas eléctricas incendios o lesiones graves ADVERTENCIA Nunca modifique la herramienta eléctrica ni tampoco ninguna de sus piezas Podría producir lesiones corpo...

Page 12: ...A Ponga siempre la palanca de control en la posición OFF Apagado al llenar el esparcidor y cuando se detenga o gire para evitar esparcir una cantidad excesiva de fertilizante NO SUPERE LAS 6 MPH 9 6 KM H AL REMOLCAR EL ESPARCIDOR Consejos de aplicación Esta unidad cubrirá una superficie de 4 a 8 pies 1 2 a 2 4 m de ancho dependiendo del producto que se utilice y la velocidad de arrastre Para evita...

Page 13: ...iten limitaciones sobre la duración de una garantía implícita o la exclusión o limitación de daños incidentales o en consecuencia por lo que estas limitaciones pueden no aplicarse en su caso Esta garantía le da derechos legales específicos y puede tener otros derechos que varían en ciertos estados o provincias GARANTÍA DE REEMBOLSO DE SU DINERO POR 90 DÍAS Si no está completamente satisfecho con e...

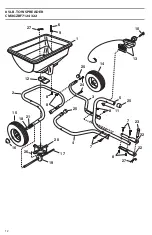
Page 14: ...12 12 85 LB TOW SPREADER CMXGZBF7124322 1 27 6 2 4 3 5 12 15 14 16 26 18 19 20 21 22 22 25 27 23 8 9 8 24 7 8 7 8 13 10 11 25 25 17 ...

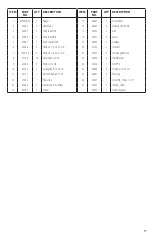
Page 15: ...riage Bolt 1 4 20 x 2 11 47141 1 NylonWing Nut 1 4 20 12 47983 1 Flow Slide 13 49820 1 Control Cable Assembly 14 46503 1 Wheel ITEM PART NO QTY DESCRIPTION 15 48865 1 DriveWheel 16 44663 2 Hub Cap Push Nut 17 40903 1 Axle 18 47851 2 Spacer 19 40904 1 Gearbox 20 47124 1 Impeller 21 47963 2 Hex Flange Bearing 22 24446 2 Hitch Bracket 23 47623 1 Hitch Pin 24 46699 4 Hex Bolt 1 4 20 x 2 25 44481 3 Vin...

Page 16: ...strada de Stanley Black Decker Inc utilizada bajo licencia est une marque déposée de Stanley Black Decker Inc utilisée sous licence 2018 CRAFTSMAN Product Manufactured by Producto fabricado por Produit fabriqué par Agri Fab Inc 809 South Hamilton Street Sullivan Illinois 61951 USA U S Canada Only É U et Canada seulement ...

Reviews: