05-10473
JUNE 2007
Sunshade Kit A-11318
MOUNTING INSTRUCTIONS
Preparation of Machine
1. Park machine on level surface. Engage parking brake. Shut off engine.
Assemble Sunshade
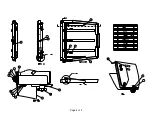
1. Install the side brackets to the sunshade. See detail A and B on the
assembly print. The neck on the top rubber washers goes through the holes
in the sunshade. The neck on the inner rubber washers goes through the
holes in the side brackets. Do not tighten at this time.
2. Install the rear mount assembly to the side brackets. See detail B on the
assembly print. The bolted connection should be tightened so that the rear
mount assembly can still be pivoted. Install and tighten the knobs with rubber
washers so the washer is slightly compressed into either of the slots in the
side brackets. The sunshade will be adjusted so that it is level with the
ground after it is installed onto the rollbar.
3. When the rear mount has been installed, tighten the side bracket mounting
hardware. They should be tightened so the rubber washers are slightly
compressed.
Do not overtighten.
Install Sunshade
1. Place the sunshade onto the rollbar and attach with the center U-bolt. U-bolts
are provided for either 2 x 2 or 2 x 3 tubing. Leave the nuts loose enough to
adjust the sunshade so it is centered on the rollbar.
2. With the sunshade centered on the rollbar install the other (2) U-bolts using
whatever set of holes line up with the radius of the rollbar.
3. Tighten all hardware.
4. Remove the knobs from the slots on the side brackets and adjust the
sunshade so that it is level with the ground. Install the knobs in the correct
notch in either of the slots on the side brackets to maintain the sunshade in a
level position.
Page 2 of 4
Summary of Contents for A-11318
Page 3: ...05 10473 JUNE 2007 Page 3 of 4 ...
Page 4: ...Page 4 of 4 ...


