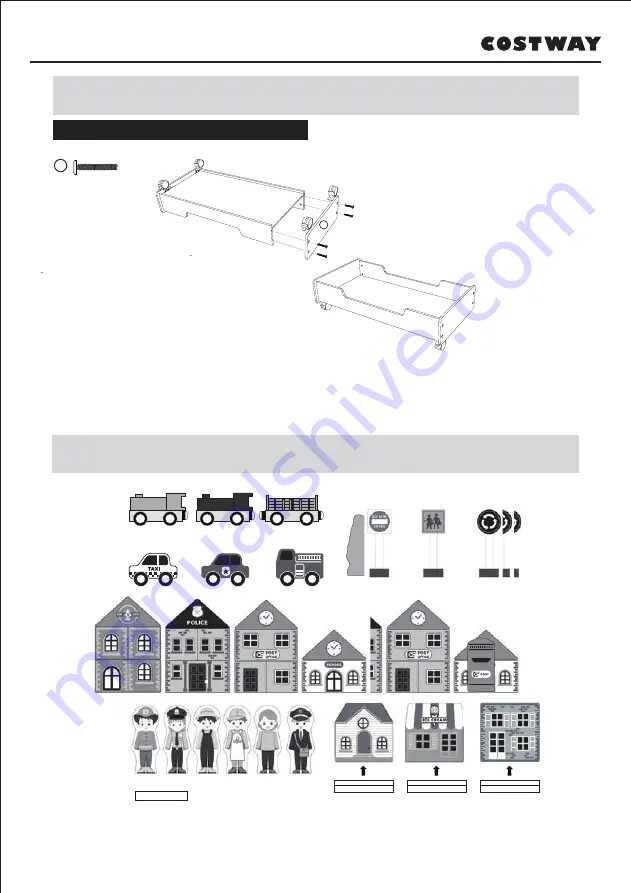
Étape 5
x4
A
x10
Instructions d’assemblage
Accessoires
30
6
5. Fixez l’autre extrémité de la plaque
(N° 6) avec de longues vis.
Page 1: ......
Page 2: ...EN DE FR ES IT PL Train Track Table Toy Set TM10001 ...
Page 3: ...n adult Read through each step carefully and follow the proper order Remove all packaging separate and count all parts and hardware Please ensure that all parts are correctly installed incorrect installation can lead to a danger We recommend that where possible all items are assembled near to the area in which they will be placed in use to avoid moving the product unnecessarily once assembled Ensu...
Page 4: ...is essential Toy to be assembled by a responsible adult Remove all packaging before giving to your child Young children in play are unaware of potential hazards and dangers therefore responsible adult supervision is essential Warning Not suitable for children under 36 months due to small parts choking hazard Caution Product should be used only for the purpose for which it was designed Children sho...
Page 5: ...x12 C x2 D1 x16 A x16 B x2 D2 Table Parts Table Drawer 1 x2 2 x2 7 x2 6 x2 5 3 8 4 04 ...
Page 6: ...ep 2 x8 B x4 A 2 2 1 2 2 05 1 Put the round screw with the tooth side up and put it into the reserved hole of the No 2 board in parallel 2 Put the No 2 board into the No 1 board vertically and fix it with long screws ...
Page 7: ... 1 1 2 2 3 06 3 Place the No 3 board between the two No 2 boards 4 Put the other end of the No 2 boards into the No 1 board vertically and fix it with long screws 5 Put the No 4 and No 5 desktop panels in order from left to right 5 4 ...
Page 8: ... 6 D1 D2 07 1 Put the round screw with the tooth side up and put it into the reserved hole of the No 7 board in parallel 2 Fix the wheels on the inner side of the No 6 board 3 Put the No 7 board into the No 6 board vertically and fix it with long screws 4 Insert the No 8 desktop panel 7 7 7 ...
Page 9: ...Step 5 x4 A 6 Accessories x4 x10 x4 08 5 The No 6 board at the other end is fixed with long screws ...
Page 10: ...C C J E C C Tracks A I B G H K D E J F C X3 X5 X11 X1 X2 X1 X1 108 mm 54 mm X20 X1 X1 X1 Tracks Parts H C C C C C C C B B B B A A A D G E I F K B B 09 ...
Page 11: ...Table and Tracks table Wipe clean with a damp cloth only Important ensure no parts are damaged loose lost or broken 10 ...
Page 12: ...to assemble this product and giving us valuable feedbacks With your inspiring rating COSTWAY will be more consistent to offer you EASY SHOPPING EXPERIENCE GOOD PRODUCTS and EFFICIENT SERVICE US office Fontana California UK office Ipswich Reward Points Exclusive Customer Service Personalized Recommenda ons Permanent Shopping Cart Order History 11 ...
Page 13: ... zu korrigieren und besser zu machen Wenden Sie sich zunächst an unseren freundlichen Kundendienst Ersatz für fehlende oder beschädigte Teile wird so schnell wie möglich versendet EN DE FR ES IT PL Eisenbahnset und Spieltisch TM10001 12 ...
Page 14: ...eren und zählen Sie alle Teile und Hardware vor der Montage oder Verwendung Bitte beachten Sie darauf alle Teile richtig anzubringen eine falsche Montage kann zu einer Gefährdung führen Wir empfehlen wenn möglich alle Artikel in der Nähe des Einsatzortes zu montieren um eine unnötige Bewegung der Artikel zu vermeiden Achten Sie auf einen sicheren Untergrund während des Aufbaus stellen und stellen ...
Page 15: ...m Produkt stehen oder klettern Bitte bewahren Sie diese Verpackung als Referenz auf da sie wichtige Informationen enthält Montage für Erwachsene erforderlich Bitte lesen Sie vor Gebrauch die beiliegende Anleitung Kleinkinder im Spiel sind sich potenzieller Gefahren und Gefahren nicht bewusst daher ist eine verantwortungsvolle Aufsicht durch Erwachsene unerlässlich Spielzeug das von einem verantwor...
Page 16: ...x2 7 x2 6 x2 5 3 8 4 Bitte überprüfen Sie ob Sie alle unten aufgeführten Teile und Zubehörteile haben Hinweis Die angegebenen Mengen sind für eine ordnungsgemäße Montage erforderlich In einigen Fällen wird möglicherweise mehr Zubehör als erforderlich geliefert Zubehör 15 ...
Page 17: ...en 16 2 2 1 2 2 1 Setzen Sie die runde Schraube mit der Zahnseite nach oben ein und stecken Sie sie parallel in das reservierte Loch der Platte Nr 2 2 Setzen Sie die Platte Nr 2 senkrecht in die Platte Nr 1 ein und befestigen Sie sie mit langen Schrauben ...
Page 18: ...3 Legen Sie die Platte Nr 3 zwischen die beiden Platten Nr 2 4 Setzen Sie das andere Ende der Platte Nr 2 senkrecht in die Platte Nr 1 ein und befestigen Sie sie mit langen Schrauben 5 Bringen Sie die Tischplatte Nr 4 und Nr 5 in der Reihenfolge von links nach rechts an 5 4 ...
Page 19: ...etzen Sie die runde Schraube mit der Zahnseite nach oben ein und stecken Sie sie parallel in das reservierte Loch der Platte Nr 7 2 Befestigen Sie die Räder an der Innenseite der Platte Nr 6 3 Setzen Sie die Platte Nr 7 senkrecht in die Platte Nr 6 ein und befestigen Sie sie mit langen Schrauben 4 Setzen Sie die Tischplatte Nr 8 ein 7 7 7 ...
Page 20: ...Schritt 5 x4 A x4 x10 x4 Montageanleitungen Zubehör 19 6 5 Die Platte Nr 6 am anderen Ende wird mit langen Schrauben befestigt ...
Page 21: ...C C J E C C A I B G H K D E J F C X3 X5 X11 X1 X2 X1 X1 108 mm 54 mm X20 X1 X1 X1 H C C C C C C C B B B B A A A D G E I F K B B Bahn Teile der Bahn Montageanleitungen 20 ...
Page 22: ...Befestigungselemente um sicherzustellen dass keine Teile beschädigt locker verloren oder gebrochen sind Seien Sie vorsichtig wenn Sie den Tisch bewegen Erwachsene sollten das Produkt regelmäßig auf Beschädigungen oder beschädigte Teile überprüfen Warnung Nicht für Kinder unter 36 Monaten geeignet Erstickungsgefahr Kleine Teile 21 ...
Page 23: ...auen und uns wertvolle Bewertung zukommen zu lassen Mit Ihrer inspirierenden Bewertung wird COSTWAY konsistenter sein um Ihnen EIN SCHÖNES EINKAUFSERLEBNIS GUTE PRODUKTE und EFFIZIENTEN SERVICE zu bieten DE office FDS GmbH Neuer Höltigbaum 36 22143 Hamburg Deutschland Belohnungspunkte Exklusiver Kundendienst Personalisierte Empfehlungen Permanenter Einkaufswagen Bestellverlauf 5 Sterne Bewertung 2...
Page 24: ...Table de Circuit de Train TM10001 CE MANUEL D INSTRUCTIONS CONTIENT DES INFORMATIONS IMPORTANTES SUR LASÉCURITÉ VEUILLEZ LIRE ET CONSERVER POUR LARÉFÉRENCE FUTURE EN DE FR ES IT PL 23 ...
Page 25: ...tape et suivez l ordre correct Retirez tous les emballages séparez et comptez toutes les pièces et le matériel Veuillez vous assurer que toutes les pièces sont correctement installées une installation incorrecte peut entraîner un danger Nous recommandons que dans la mesure du possible tous les articles soient assemblés à proximité de la zone dans laquelle ils seront utilisés afin d éviter de dépla...
Page 26: ...ivent pas se tenir debout ou grimper sur le produit Veuillez conserver cet emballage à titre de référence car il contient des informations importantes Assemblage par un adulte requis Veuillez lire les instructions ci jointes avant l utilisation Les jeunes enfants qui jouent ne sont pas conscients des dangers et des risques potentiels c est pourquoi la surveil lance d un adulte responsable est esse...
Page 27: ...z vérifier que vous disposez de toutes les pièces et accessoires énumérés ci dessous Remarque Les quantités indiquées ci dessous correspondent à la quantité correcte pour compléter l assemblage Dans certains cas le nombre des accessoires fournis peut être supérieur à celui requis Accessoires 26 ...
Page 28: ...ngen Table Étape 1 Instructionsd assemblage 27 2 2 1 2 2 1 Insérez la vis ronde avec le côté denté vers le haut dans le trou réservé de la plaque N 2 en parallèle 2 Placez la plaque N 2 dans la plaque N 1 verticalement et fixez la avec de longues vis ...
Page 29: ...28 2 2 1 1 1 2 2 3 3 Placez la plaque N 3 entre les deux plaques N 2 4 Placez l autre extrémité des plaques N 2 dans la plaque N 1 verticale ment et fixez la avec de longues vis 5 Placez les plaques de bureau N 4 et N 5 dans l ordre de gauche à droite 5 4 ...
Page 30: ... D2 D2 7 7 6 D1 D2 1 Insérez la vis ronde avec le côté denté vers le haut dans le trou réservé de la plaque N 7 en parallèle 2 Fixez les roulettes sur le côté intérieur de la plaque N 6 3 Placez la plaque N 7 dans la plaque N 6 verticalement et fixez la avec de longues vis 4 Insérez la plaque de bureau N 8 7 7 7 ...
Page 31: ...Étape 5 x4 A x4 x10 x4 Instructionsd assemblage Accessoires 30 6 5 Fixez l autre extrémité de la plaque N 6 avec de longues vis ...
Page 32: ...C C J E C C A I B G H K D E J F C X3 X5 X11 X1 X2 X1 X1 108 mm 54 mm X20 X1 X1 X1 H C C C C C C C B B B B A A A D G E I F K B B Circuit Pièces de circuit Instructionsd assemblage 31 ...
Page 33: ...r qu aucune pièce n est endommagée desserrée perdue ou cassée Faites attention lorsque vous déplacez la table Le produit doit être régulièrement inspecté par un adulte pour vérifier qu il n y a pas de pièces cassées ou endommagées Avertissement Ne convient pas aux enfants de moins de 36 mois Risque d étouffement Petites pièces Général Entretien 32 ...
Page 34: ...roduit et nous donner des commentaires précieux Avec votre évaluation inspirante COSTWAY sera plus professionnel pour vous offrir une BONNE EXPÉRIENCE D ACHATS de BONS PRODUITS et un SERCIVE EFFICACE FR office 26 RUE DU VERTUQUET 59960 NEUVILLE EN FERRAIN FRANCE Points de Récompense Service à la Clientèle Exclusif Recommanda ons Personnalisées Panier Permanent Historique des Commandes merci 33 ...
Page 35: ...Mesa del Circuito de Tren TM10001 ESTE MANUALDE INSTRUCCIONES CONTIENE IMPORTANTES INFORMACIONES DE SEGURIDAD POR FAVOR LO LEAY GUARDE PARAREFERENCIAS FUTURAS EN DE FR ES IT PL 34 ...
Page 36: ...te todas las piezas y los accesorios Asegúrese de que todas las piezas estén instaladas correctamente una instalación incorrecta puede provocar un peligro Recomendamos que cuando sea posible todos los artículos se ensamblen cerca del área en la que se colocarán en uso para evitar mover el producto innecesariamente una vez ensamblado Asegúrese de que esté en una superficie segura durante la constru...
Page 37: ...o Los niños no deben ponerse de pie ni subirse al producto Conserve este embalaje como referencia ya que contiene las informaciones importantes Se requiere el montaje de un adulto Lea las instrucciones adjuntas antes de utilizar Los niños pequeños que juegan no son conscientes de los riesgos y peligros potenciales por lo que la supervisión de un adulto responsable es esencial Este juguete debe ser...
Page 38: ...x2 6 x2 5 3 8 4 Compruebe que dispone de todas las piezas y accesorios enumerados a continuación Nota Las cantidades indicadas a continuación son las correctas para completar el montaje En algunos casos pueden suministrarse más accesorios de los necesarios Accesorios 37 ...
Page 39: ...n Mesa Paso 1 Instruccionesde Montaje 38 2 2 1 2 2 1 Coloque el tornillo redondo con el lado de ranura hacia arriba y colóquelo en el orificio reservado del panel en paralelo 2 Coloque el panel en el panel vertical mente y fije con los tornillos largos ...
Page 40: ...e Montaje 39 2 2 1 1 1 2 2 3 3 Coloque el panel entre los dos paneles 4 Coloque el otro extremo de los paneles en el panel verticalmente y fije con lso tornillos largos 5 Coloque los paneles de sobremesa y en orden de izquierda a derecha 5 4 ...
Page 41: ...2 D2 D2 7 7 6 D1 D2 1 Coloque el tornillo redondo con el lado de ranura hacia arriba y colóquelo en el orificio reservado del panel en paralelo 2 Fije las ruedas en el lado interior del panel 3 Coloque el panel en el panel verticalmente y fije con los tornillos largos 4 Inserte el panel de sobremesa 7 7 7 ...
Page 42: ...Paso 5 x4 A x4 x10 x4 Instruccionesde Montaje Accesorios 41 6 5 El panel en el otro extremo se fija con los tornillos largos ...
Page 43: ...C C J E C C A I B G H K D E J F C X3 X5 X11 X1 X2 X1 X1 108 mm 54 mm X20 X1 X1 X1 H C C C C C C C B B B B A A A D G E I F K B B Circuito Piezas del Circuito Instruccionesde Montaje 42 ...
Page 44: ...para asegurarse de que no haya piezas dañadas sueltas perdidas o rotas Tenga cuidado al mover la mesa El producto debe ser inspeccionado regularmente por un adulto en busca de piezas rotas o dañadas Advertencia No es adecuado para los niños menores de 36 meses Peligro de asfixia Piezas pequeñas General CuidadoyMantenimiento 43 ...
Page 45: ...nsamblar este producto y brindarnos valiosos comentarios Con su calificación inspiradora COSTWAY será más consistente para ofrecerle EXPERIENCIA DE COMPRA CONVENIENTE BUENOS PRODUCTOS y SERVICIO EFICIENTE EE UU Fontana California Reino Unido Ipswich Puntos de recompensa Servicio al cliente exclusivo Recomendaciones personalizadas Carrito de compras permanente Historial de pedidos Gracias 44 ...
Page 46: ...za clienti Sostituzioni per parti mancanti o danneggiate saranno spedite al più presto MANUALE UTENTE QUESTOMANUALEDIISTRUZIONICONTIENEIMPORTANTIINFORMAZIONISULLASICUREZZA SIPREGADILEGGEREECONSERVAREPERRIFERIMENTOFUTURO Vi preghiamo di darci la possibilità di fare bene e fare di meglio EN DE FR ES IT PL 45 ...
Page 47: ...to e utilizzato sotto la supervisione di un adulto Leggere attentamente ogni passo e seguire l ordine corretto Rimuovere tutti gli imballaggi separare e contare tutte le parti e l hardware Assicurarsi che tutte le parti siano installate correttamente un installazione errata può comportare un pericolo Raccomandiamo che ove possibile tutti gli articoli siano assemblati vicino all area in cui verrann...
Page 48: ...rogettato I bambini non devono stare in piedi o arrampicarsi sul prodotto Si prega di conservare questa confezione come riferimento poiché contiene informazioni importanti È richiesto il montaggio di un adulto Leggere le istruzioni allegate prima dell uso I bambini piccoli che giocano non sono consapevoli dei potenziali pericoli pertanto la supervisione responsabile di un adulto è essenziale Quest...
Page 49: ...x2 2 x2 7 x2 6 x2 5 3 8 4 Si prega di verificare di avere tutte le parti e gli accessori elencati di seguito Nota Le quantità specificate sono necessarie per un corretto montaggio In alcuni casi possono essere forniti più accessori di quelli richiesti Accessori 48 ...
Page 50: ...avolo Passo 1 IstruzionidiMontaggio 49 2 2 1 2 2 1 Mettere la vite rotonda con il dente rivolto verso l alto e metterla nel foro riservato del pannello N 2 in parallelo 2 Mettere il pannello N 2 nel pannello N 1 verticalmente e fissarla con le viti lunghe ...
Page 51: ... 2 2 1 1 1 2 2 3 3 Posizionare il pannello N 3 tra i due N 2 pannelli 4 Mettere l altra estremità del pannello N 2 nel pannello N 1 verticalmente e fissarlo con le viti lunghe 5 Posizionare i pannelli del piano N 4 e N 5 in ordine da sinistra a destra 5 4 ...
Page 52: ...D2 7 7 6 D1 D2 1 Mettere la vite rotonda con il dente rivolto verso l alto e metterla nel foro riservato del pannello N 7 in parallelo 2 Fissare le ruote sul lato interno del pannello N 6 3 Mettere il pannello N 7 nel pannello N 6 verticalmente e fissarlo con le viti lunghe 4 Inserire il pannello del piano N 8 7 7 7 ...
Page 53: ...Passo 5 x4 A x4 x10 x4 IstruzionidiMontaggio Accessori 52 6 5 Il pannello N 6 all altra estremità è fissato con le viti lunghe ...
Page 54: ...C C J E C C A I B G H K D E J F C X3 X5 X11 X1 X2 X1 X1 108 mm 54 mm X20 X1 X1 X1 H C C C C C C C B B B B A A A D G E I F K B B Piste Parti delle Piste IstruzionidiMontaggio 53 ...
Page 55: ...rarsi che nessuna parte sia danneggiata allentata persa o rotta Fare attenzione quando si sposta il tavolo Gli adulti dovrebbero controllare regolarmente il prodotto per vedere se ci sono danni o parti danneggiate Avvertenza Non adatto a bambini di età inferiore a 36 mesi Rischio di soffocamento Piccole parti Generale CuraeManutenzione 54 ...
Page 56: ...assemblare questo prodo o e fornirci preziosi feedback Con il tuo commento stimolante COSTWAY continuerà a offrirti FACILITÀ DI ACQUISTO FACILE PRODOTTI BUONI e SERVIZIO EFFICIENTE US ufficio Fontana California UK ufficio Ipswich Pun del premio Servizio dei clien esclusivo Raccomandazioni personalizzate Carrello permanente Storia degli ordini Grazie 55 ...
Page 57: ...nym działem obsługi klienta Ewentualne braki elementów zostaną uzupełnione najszybciej jak to możliwe INSTRUKCJA OBSŁUGI NINIEJSZAINSTRUKCJAZAWIERAISTOTNEINFORMACJEDOTYCZĄCEBEZPIECZEŃSTWA PROSIMYOZAPOZNANIESIĘZNIĄIZACHOWANIEJEJDOWGLĄDUWPRZYSZŁOŚCI W razie kłopotów skontaktuj się z nami EN DE FR ES IT PL 56 ...
Page 58: ...zęści i elementy montażowe Upewnij się że wszystkie części są poprawnie połączone nieprawidłowa instalacja może prowadzić do wypadku Zalecamy aby w miarę możliwości wszystkie elementy były montowane w pobliżu miejsca w którym będą używane aby uniknąć niepotrzebnego przenoszenia produktu po złożeniu Zapewnij bezpieczną przestrzeń roboczą podczas montażu i upewnij się że produkt znajduje się na płas...
Page 59: ...celu do którego został zaprojektowany Dzieci nie powinny stawać ani wspinać się na produkt Prosimy o zachowanie tej instrukcji na przyszłość ponieważ zawiera ważne informacje Montażu dokonuje osoba dorosła Przed użyciem zapoznaj się z załączoną instrukcją Małe dzieci nie są świadome niebezpieczeństw i potencjalnych zagrożeń dlatego niezbędny jest odpowiedzialny nadzór osoby dorosłej Zabawka musi b...
Page 60: ...tolik Szuflady 1 x2 2 x2 7 x2 6 x2 5 3 8 4 Sprawdź czy posiadasz wszystkie wymienione poniżej części i akcesoria Podane ilości są wymaganymi do poprawnego montażu W niektórych przypadkach elementów może być więcej niż potrzeba Elementy montażowe 59 ...
Page 61: ...tageanleitungen Stół Krok 1 Instrukcjemontażu 60 2 2 1 2 2 1 Wkręć okrągłą śrubę zębami do góry i włóż ją równolegle do zarezerwowanego otworu w części nr 2 2 Zamontuj część nr 2 do części nr 1 pionowo i przykręcić za pomocą długich śrub ...
Page 62: ...montażu 61 2 2 1 1 1 2 2 3 3 Umieść część nr 3 między dwiema częściami nr 2 4 Drugi koniec części nr 2 włóż pionowo do części nr 1 i przykręcić za pomocą długich śrub 5 Zamontuj panele pulpitu nr 4 i 5 w kolejności od lewej do prawej 5 4 ...
Page 63: ... D1 D1 D1 x2 D2 D2 D2 7 7 6 D1 D2 1 Wkręć okrągłą śrubę zębami do góry i włóż ją równolegle do zarezerwowanego otworu w części nr 7 2 Zamocuj koła po wewnętrznej stronie części nr 6 3 Włóż część nr 7 do części nr 6 pionowo i przykręcić za pomocą długich śrub 4 Włóż panel pulpitu nr 8 7 7 7 ...
Page 64: ...Krok 5 x4 A x4 x10 x4 Instrukcjemontażu Akcesoria 63 6 5 Przykręć część nr 6 na drugim końcu za pomocą długich śrub ...
Page 65: ...C C J E C C A I B G H K D E J F C X3 X5 X11 X1 X2 X1 X1 108 mm 54 mm X20 X1 X1 X1 H C C C C C C C B B B B A A A D G E I F K B B Tor kolejki Elementy toru Instrukcjemontażu 64 ...
Page 66: ...zona poluzowana zgubiona lub złamana Zachowaj ostrożność podczas przesuwania stołu Osoba dorosła powinna dokonywać wszelkich regularnych przeglądów produktu celem sprawdzenia czy żadne części nie uległy złamaniu lub uszkodzeniu Ostrzeżenie Nie nadaje się dla dzieci poniżej 36 miesiąca życia RYZYKO ZADŁAWIENIA Małe części Informacje ogólne KONSERWACJA 65 ...
Page 67: ...edzenia go w przyszłości Twoja ocena nas inspiruje Dzięki niej COSTWAY będzie dążył do zaoferowania ci WYDAJNEJ OBSŁUGI DOBRYCH PRODUKTÓW I BEZPROBLEMOWYCH ZAKUPÓW PL office Gdańsk punkty lojalnościowe doskonała obsługa klienta personalizowane rekomendacje karta stałego klienta historia zamówień Pięciogwiazdkowa Ocena 66 ...