INSTRUCTION MANUAL
Keep the instructions for future reference
QUARTZ GLASS TUBE PATIO HEATER
0063
18
Page 1: ...INSTRUCTION MANUAL Keep the instructions for future reference QUARTZ GLASS TUBE PATIO HEATER 0063 18 ...
Page 2: ...icinity of this or any other applianceˊ 2 An LP cylinder not connected for use shall not be stored in the vicinity of this or any other applianceˊ WARNlNG 1 For use outdoors or in amply ventilated areas 2 An amply ventilated area must have a minimum of 25 of the surface area open 3 The surface area is the sum of the walls surface WARNING Improper installation adjustment alteration service or maint...
Page 3: ...ind particular attention must be taken against tilting of the appliance Keep the appliance at least 1m from the gas cylinder The injector in this appliance is not removable and the injector is only assembled by manufacture This appliance is forbidden to convert from one gas pressure to another pressure Do not connect the gas cylinder directly to the appliance without regulator Use only the type of...
Page 4: ... OF CONTENTS Caution 1 Heater Stand and Location 2 Gas Requirements 2 Leakage Test 2 Operation and Storage 3 Cleaning and Care 4 Parts and Specifications 4 Assembly Parts and Procedures 6 Problems Check List 9 ...
Page 5: ...ter does not reach temperature The burner makes popping noise during use a slight noise is normal when the burner is extinguished Smell of gas in conjunction with extreme yellow tipping of the burner flames The LP regulator hose assembly must be located out of pathways where people may trip over it or in area where the hose will not be subject to accidental damage Any guard or other protective dev...
Page 6: ...dented rusted or damaged tank may be hazardous and should be checked by your tank supplier Never use a tank with a damaged valve connection The tank must be arranged to provide for vapor withdrawal from the operating cylinder Never connect an unregulated tank to the heater LEAKAGE TEST Gas connections on the heater are leak tested at the factory prior to shipment A complete gas tightness check mus...
Page 7: ... maximum Warning check that no broken on the glass is found before operation Igniter Off the heater stop work Hi maximum temperature position Lo minimum temperature position Variable control knob regulator 60 ...
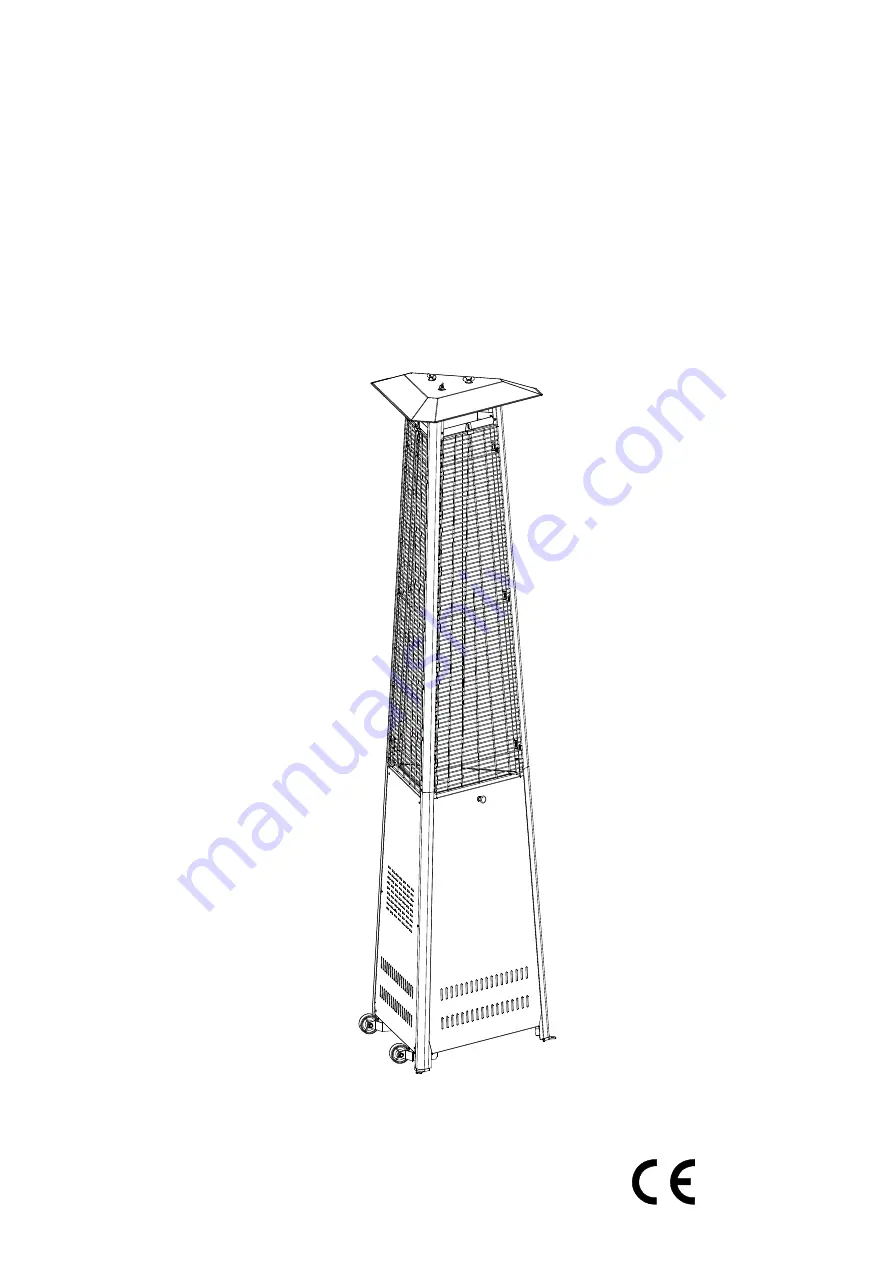
Page 8: ...corrosive Remove debris from the burner to keep it clean and safe for use Cover the burner unit with the optional protective cover when the heater is not in use PARTS AND SPECIFICATIONS 4 2340 mm 940 mm 600 mm 660 mm Reflector Glass Tube Protective Guard Upper Support Front Panel Side Panel Lower Support Bottom plate Wheel Assy ...
Page 9: ...ed hose in 0 6m length APPLIANCE CATEGORY TYPES OF GAS Butane Propane GAS PRESSURE 28 30mbar 37 mbar 30 mbar 50mbar 37mbar TOTAL HEAT INPUT Hs Qn 13kW G30 945g h G31 929g h INJECTOR SIZE The marking for example 1 88 on the injector indicates that the size of injector is 1 88mm 1 88 mm for main burner 0 18 mm for pilot burner 1 55 mm for main burner 0 18 mm for pilot burner 1 65 mm for main burner ...
Page 10: ... Wheel Assembly Front Panel Bottom plate P N O A B E F D C G H I P M O N O I T P I R C S E D T R A P QUANTITY A Reflector 1 B Mesh 1 1 C Top Plate Glass Tube Fixer D Upper Support Long E Protective Guard Glass Tube F Side Panel 1 1 3 3 1 2 G 1 H 3 I Gas Hose Lower Support Short Black Silicone Ring Control Box Assembly 1 J K L M 1 Block Belt N L K J 1 Ceramic Fiber Q Q ...
Page 11: ...l Flat Washer Qty 6 DD EE JJ KK LL M5 x 12 mm Screw Qty 35 M4 x 6 mm Screw Qty 1 Chain Qty 1 CC Stud Qty 3 Phillips Screwdriver Qty 1 M6 x 12 mm Bolt Qty 8 FF GG II Fixing Bracket Qty 3 Wrench Qty 1 Knob Qty 1 HH Long Stem Lighter Qty 1 MM AA Battery 1 5 V Qty 1 ...
Page 12: ... the lower holes of the three lower supports K Insert the hoods of control box assembly J to the upper holes of the three lower support K Note Make sure align the side of bottom plate O with the holes with the side of control box assembly J with the magnet 2 Insert three upper supports E to the three lower supports K J K O E MM AA Battery 1 5 V ...
Page 13: ...en the control box assembly J and the bottom plate O with M5 x 12 mm screws DD 4 Use Phillips screwdriver LL to secure the top plate D to the upper supports E with M5 x 12 mm screws DD DD DD D DD LL x 9 Phillips Screwdriver M5 x 12 mm Screw x 1 DD LL x 6 Phillips Screwdriver M5 x 12 mm Screw x 1 ...
Page 14: ... mm Screw x 1 Hardware Used EE N O DD L K EE KK x 8 Wrench M6 x 12 mm Bolt x 1 5 Using wrench KK to assemble the wheel assembly N to the bottom plate O with M6 x 12 mm bolts EE 6 Use Phillips screwdriver LL to secure the block belt L to the lower supports K with M5 x 12 mm screws DD ...
Page 15: ...nto the three clips of the control box assembly J DD D G J C Q DD x 3 M5 x 12 mm Screw LL Phillips Screwdriver x 1 8 Assembly the glass tube fixer C Insert the ceramic fiber Q to the quarzt tube fixer Press the glass tube fixer to the glass tube Make sure the ceramic fiber is outside of glass tube Use Phillips screwdriver LL to secure the glass tube fixer C to the top plate D with M5 x 12 mm screw...
Page 16: ... H DD 9 Hardware Used DD FF x 3 x 3 x 1 Fixing Bracket LL Phillips Screwdriver M5 x 12 mm Screw F B DD FF 9 Assebmly the protective guard and mesh Insert the hooks of protective guard F to the holes of upper supports E Put the mesh B on the top plate D Make sure the screw holes align the holes of top plate D Use Phillips screwdriver LL to secure the mesh B and protective guard F to the top plate D...
Page 17: ...y return the assembly to the upright position Hardware Used AA BB x 3 x 6 Small Flat Washer Wing Nut A AA CC BB CC x 3 Stud 11 11 Install the knob GG to M4x10 screw HH Hang the chain II to the hole on the control box assembly J and put the pothook of front panel to the holes of bottom plate J HH II GG Hardware Used x 1 GG Knob HH LL x 1 x 1 Philips screwdriver Screw M4 X 6 x 1 II Chain ...
Page 18: ...half and half solution of liquid soap and water onto all joints and connections of the regulator hose manifolds and valves Bubbles will indicate a gas leak Either tighten the loose joint or have the part replaced with one recommended by the Customer Care department and have the patio heater inspected by a certified gas installer If the leak cannot be stopped immediately shut off the gas supply disco...
Page 19: ...ns Thermocouple bad Replace thermocouple Gas leak in line Check connections Lack of fuel pressure Tank near empty Refill LPG tank B If the appliance is in case of any defaults or problems of assembly or useˈplease don t try to modify it by yourselfˈ contact your supplier or distributor to solve it urner will not light Pressure is low Tank near empty Refill LPG tank Opening blocked Remove and clean...