background image

Assembling the Unit

Installing the Unit

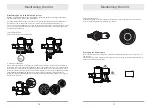
1. Installing the Electric Brush and Electrical Extensio Tube

When connecting, please hold the electric brush with 

your left hand in the direction shown in the right figure. 

Insert the installation hole under the electrical extension 

tube component vertically into the electric brush 

connector and align the conducting needles until the 

"click" sound is heard.

2. Installing the Main Unit and Electrical Extension Tube 

Align the electric needle of the electrical extension tube 

with the suction nozzle adapter and push upward 

forcefully until the "click" locking sound is heard.

Assembling the Unit

Installing the Accessories

IIn order to use conveniently, this product is equipped with a variety of accessories. You can connect 

them to the product directly as needed.

1. Connecting main unit to power brush

Please align the circular adapter of the brush with the dust cup suction inlet of the main unit and 

insert it into the stop position in the direction shown in Figure 1.

2. Connecting wall mount to main unit

Slip the main unit into the wall mount until it is secure.

6

7

1

2

Summary of Contents for K8

Page 1: ...joyed developing it www corvan com my All rights reserved User Manual Corvan Service Centre A 3 9 10 Boulevard Lebuhraya Sprint 47400 Petaling Jaya Selangor Malaysia Tel 603 7728 8166 Email crm corvan com my www corvan com my Corvan are registered trademarks of Corvan Asia Sdn Bhd Thank You For Purchasing Corvan Products Please visit www corvan com my to keep up to date on all amazing products com...

Page 2: ...ctric shock please do not tear down or repair the vacuum by yourself if it s damaged Please return the damaged unit to our service centre Please use the product with caution and avoid getting hair cloths or any part of your body too close to the suction inlet Do not suck flaming ash cigar butt match flammable liquid such as gasoline Please do not use the product if the dust bin is not fitted on th...

Page 3: ...utton Main Unit Power brush Electrical extension tube 2 in 1 crevice tool Mattress Cleaning Tool What s in box Main Unit Power brush 2 in 1 crevice tool Dusting brush Wall mount Electrical extenstion tube Screws Charger Expansi Mattress Cleaning Tool X1 X1 X1 X1 X1 X1 X2 X1 X2 X1 Wall mount Dusting brush Charger Parts List Parts Name ...

Page 4: ... Align the electric needle of the electrical extension tube with the suction nozzle adapter and push upward forcefully until the click locking sound is heard Assembling the Unit Installing the Accessories IIn order to use conveniently this product is equipped with a variety of accessories You can connect them to the product directly as needed 1 Connecting main unit to power brush Please align the ...

Page 5: ...ing function If the brush roll stops working due to stuck hair or other items the brush motor power will be cut off to prevent motor damage Using accessories 1 2 in 1 crevice nozzle the soft bristle is adjustable Suitable for cleaning crevices and corners 2 Dusting brush the front head can be rotated at 360 degree Suitable for cleaning bed sofa and curtain 3 Electrical mite removal brush the elect...

Page 6: ...4 until a click sound is heard Then press the battery pack release button and pull it back to take it out 1 Cleaning the dust bin Press the release button to empty the bin 2 Cleaning the HEPA filter Put the main engine above the garbage can hold the air inlet interface of the unit pull the switch of the dust bin and rotate in the direction shown in figure 1 then pull up the motor bin and separate ...

Page 7: ... Remove the dust inside the bin or filters Battery pack is damaged Unit charging fuction lost Main unit is poorly connected with charger Ensure good connection between main unit and charger Yellow light flashing when starting unit Replace battery pack with a new one Yellow light flashing when charging If the vacuum still doesn t work following the steps above please contact our after sales service...

Page 8: ...tion on warranty card without authorization 6 Item no on warranty card and the mismatch between returned product 7 Damage caused by force majeure Technical support If you face any issues when using our product our service hot line is available for further technical support Service hot line 03 7728 8166 Service centre address A 3 9 Block Allamanda 10 Boulevard Lebuhraya Sprint PJU6A 47400 Petaling ...

Reviews: