background image

Section 5

Menu Function

12

5

CooperSurgical, Inc.

Tune

The TUNE option is for 

calibration

 of the 

displayed temperature

.

If there is an offset between the value on the display and any measurements made with a high 

precision external temperature sensor, this can be corrected.
The new temperature reading will be kept as the displayed value, with temperature control 

conducted on this basis.
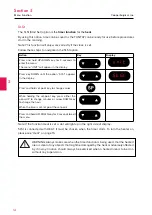
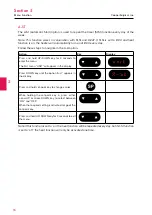
Follow these steps to navigate in the TUNE option.

Action

Key

Display

Press and hold UP+DOWN key for 3 seconds to 

enter the menu.
The menu “USER” will appear in the display.

Press DOWN key until the option “TUNE” appears 

in the display.

Press and hold set-point key to change values.

While holding the set-point key in, press either the 

arrow UP or arrow DOWN key to select the value 

temperature.
When the required setting is activated, let go of the 

set-point key.

Press and hold UP+DOWN key for 3 seconds to exit 

the menu.

Note: Any change in the factory set calibration should always be based on very  certain 

temperature measurements. CooperSurgical only recommends the  use of a high quality  

PT-100 sensor that is calibrated with the precision instrument  used for measuring according to 

the manufacturers specifications. Also ensure an  optimal contact between the sensor and the 

place measured. Use only a sensor type that is correct for the purpose and of correct size. If in 

doubt contact your local CooperSurgical distributor.

INT.T

Should only be performed by an authorized K-System engineer. The INT.T (Integral Time) option 

is for changing the 

base value

 for the 

PID controller

. If set at a different level the controlling 

principle will be affected. From the factory it is set to a closely calculated value specific for the 

model.

t u n E

CAUTION: Do not change the value here. If by mistake any changes are made or 

doubts occur if the value are correct please set the REST function in the menu for 

the restore of the defaults.

Summary of Contents for K-Systems T45

Page 1: ...02 02 sales coopersurgical com fertility coopersurgical com CooperSurgical Inc 95 Corporate Drive Trumbull CT 06611 USA Document K33083 2 DRF 5384 10 November 2020 1639 K Systems Warming Plate T45 T47 User Manual ...

Page 2: ......

Page 3: ...4 General Description 4 SECTION 4 BASIC OPERATION 5 Features and Operation 5 Assembling the T45 T47 5 Connection to the Mains 5 Start of Apparatus 5 Keyboard Functions 5 Operating the Heated Area 5 Temperature Setting and Control 6 Combination Keys 6 Temperature Alarm 6 Warming Up 7 Heated Area 7 SECTION 5 MENU FUNCTION 8 Overview of Options 9 Unit 10 RS232 11 Tune 12 INT T 12 TI St 13 Contents Co...

Page 4: ...ronic equipment 20 SECTION 7 TROUBLESHOOTING 21 SECTION 8 TECHNICAL DATA 22 SECTION 9 WARRANTY INFORMATION AND LIMITS ON LIABILITY 23 SECTION 10 RETURNING PRODUCT 24 Returned Goods Policy 24 Customer Service Contact Details 25 US Only Customers Contact Details 25 SECTION 1 1 CUSTOMER SERVICE CONTACT INFORMATION 26 European Service Representatives 26 US Service Representatives 26 CONTENTS CooperSur...

Page 5: ...perSurgical Inc products should not hesitate to contact us if there are any unclear points or ambiguities in this manual CooperSurgical Inc Phone 1 203 601 9818 International Phone 45 46 79 02 02 sales coopersurgical com fertility coopersurgical com CooperSurgical Inc 95 Corporate Drive Trumbull CT 06611 USA If the equipment is used in a manner not specified by this manual the safety of the user m...

Page 6: ...uctions for use for important cautionary information such as warnings and precautions that cannot for a variety of reasons be presented on the medical device itself Manufacturer Date of manufacture Catalogue or Part number Serial number Do not dispose of product with normal waste Dispose of in accordance with the EU WEEE Directive See Care and Maintenance section This way up Fragile handle with ca...

Page 7: ...es 24 volts main adapter PSU Order code K51122 Mains Cable Order code 1212807 Optional Equipment Optionalequipmentconsistsofarangeofwarmingblocks PleasecontactyourlocalCooperSurgical distributor or CooperSurgical Inc for details about the full range of warming blocks Examples of different types of warming blocks Warming block B01 Holds seven tubes Ø17mm Falcon 352001 Order code 26001 Warming block...

Page 8: ...temperature of test tube syringe warming blocks or similar or for warming media General Description The anodized aluminium surface maintains a set point temperature in the range ambient to 42 0 C The temperature is electronically controlled and can be read on the display in increments of 0 1 C Heated surface PSU socket RS232 connector No longer supported ...

Page 9: ...ficate Connection to the Mains The mains voltage is automatically regulated to the correct level by the main adapter PSU Connect the T45 T47 to the mains supply using the enclosed PSU Start of Apparatus To power up the unit press the heat ON OFF button on the keyboard The display will indicate the current temperature Keyboard Functions 8888 Alarm Heat ON OFF LED Display Set point Arrow keys UP DOW...

Page 10: ...ination Keys Action Key Display Press alarm and UP key The keyboard is locked Press alarm and arrow UP key The keyboard is unlocked Press Heat ON OFF and set point key Switches between temperature and time Temperature Alarm The temperature alarm indicates too high or too low temperature The alarm will be activated if the temperature rises or falls more than 0 5 C from the set point There will be a...

Page 11: ... initial temperature Heated Area T45 The specified temperature within an area defined by a 4cm limit from the edges is at set point 0 5 C It is recommend placing all items with a distance of 4cm from the edges of the warming plate T47 Our general recommendations Dark area only 0 3 C Whole area 0 8 C Please see picture below for T47 heated area 8 cm 8 cm Note If the nature of your work demands high...

Page 12: ...enter the menu The first option UNIT will appear in the display Press UP DOWN key to navigate within the Menu While holding the set point key in press either the arrow UP or arrow DOWN key to change values within the options Press and hold UP DOWN key for 3 seconds again to exit the menu The menu consists of the 10 options listed below For further detail see the description on the following pages ...

Page 13: ...unction 5 CooperSurgical Inc Overview of Options C F UNIT On S 1 S 2 Send Off RS232 0 05 0 05 TUNE 0 1 0 1 INT T M 1 H 1 Ti St M 1 H 1 St St On Off HEAT On Off A St On Off HOUR REST Software version Calib value Version 3 ...

Page 14: ...Action Key Display Press and hold UP DOWN key for 3 seconds to enter the menu The menu UNIT will appear in the display Press and hold set point key to change values While holding the set point key in press either the arrow UP or arrow DOWN key to select the required type of unit When the required type has been selected let go of the set point key Press and hold UP DOWN key for 3 seconds to exit th...

Page 15: ...o enter the menu The option UNIT will appear in the display Press DOWN key until the option RS232 appears in the display Press and hold set point key to change values While holding the set point key in press either the arrow UP or arrow DOWN key to select between ON and OFF OFF The RS232 function is turned off ON Data is send once every two seconds When the required setting is activated let go of ...

Page 16: ... hold UP DOWN key for 3 seconds to exit the menu Note Any change in the factory set calibration should always be based on very certain temperature measurements CooperSurgical only recommends the use of a high quality PT 100 sensor that is calibrated with the precision instrument used for measuring according to the manufacturers specifications Also ensure an optimal contact between the sensor and t...

Page 17: ...ss and hold UP DOWN key for 3 seconds to enter the menu The option UNIT will appear in the display Press DOWN key until the option Ti St appears in the display Press and hold set point key to change values While holding the set point key in press either the arrow UP to change minutes or arrow DOWN key to change the hour Press and hold UP DOWN key for 3 seconds to exit the menu ...

Page 18: ...ress and hold set point key to change values While holding the set point key press either the arrow UP to change minutes or arrow DOWN key to change the hour When the time is set let go of the set point Press and hold UP DOWN key for 3 seconds to exit the menu Note If the function Heat is set a dot will light up in the right side of display St St is connected with HEAT It must be chosen when the t...

Page 19: ...isplay Press and hold UP DOWN key for 3 seconds to enter the menu The first menu UNIT will appear in the display Press DOWN key once and the menu HEAT appears in the display Press and hold set point key to change values While holding the set point key in press either arrow UP or arrow DOWN key to select between ON and OFF When the required setting is activated let go of the set point key Press and...

Page 20: ...d UP DOWN key for 3 seconds to enter the menu The first menu UNIT will appear in the display Press DOWN key until the option A st appears in the display Press and hold set point key to change values While holding the set point key in press either arrow UP or arrow DOWN key to select between ON and OFF When the required setting is activated let go of the set point key Press and hold UP DOWN key for...

Page 21: ...ect between ON and OFF When the required setting is activated let go of the set point key Press and hold UP DOWN key for 3 seconds to exit the menu If you want to see the time on the display when the heat is turned on Follow these steps to switch between time and temperature Action Key Display Press and hold set point key While holding the set point key in press the HEAT key one time then let go o...

Page 22: ...ate in the REST option Action Key Display Press and hold UP DOWN key for 3 seconds to enter the menu The first menu UNIT will appear in the display Press DOWN key until the option REST appears in the display Press and hold set point key to change values While holding the set point key in press either the arrow UP or arrow DOWN key When the display shows let go of the set point key Press and hold U...

Page 23: ...ome visibly soiled 3 Allow to air dry 4 Visually inspect for the absence or presence of remaining soil While inspecting give particular attention to verifying soil has been removed from the hard to clean areas If soil is present then repeat the manual cleaning steps until all visible soil is removed Disinfection After the surface is clean and all visual soil has been removed proceed with the follo...

Page 24: ...l and electronic equipment WEEE Environmental implications WEEE contains materials that are potentially hazardous to the environment and to human health Therefore when this instrument has reached its end of life it must be collected and recycled separately from other waste according to national requirements Please contact a local CooperSurgical distributor for instructions Do not dispose of with n...

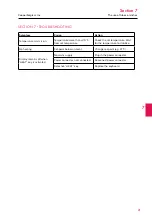
Page 25: ...ore than 0 5 C from set temperature Check the set temperature Wait for the temperature to stabilize No heating Set point below ambient Change set point e g 37 C Display remains off when HEAT key is activated No mains supply Plug in the power connector Power connector not connected Reconnect power connector Defective HEAT key Replace the keyboard ...

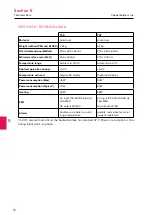
Page 26: ... Spot temperature accuracy 0 2 C 0 2 C Temperature set read Digital LED display Digital LED display Power consumption Max 45W 90W Power consumption Typical 30W 50W Heating 30W 88W PSU AC input 100 240V 50 60 Hz 1 6A MAX DC output 24V 5A AC input 100 240V 50 60 Hz 1 6A MAX DC output 24V 5A Alarms Audible and visible for out of range temperature Audible and visible for out of range temperature in 23...

Page 27: ...d by misuse improper care improper use of chemicals or cleaning methods loss theft servicing by non authorized personnel or negligent or intentional conduct on the part of the owner or user of the workstation nor do they cover normal wear and tear or general maintenance Any modifications or changes to a workstation will void that workstation s warranty CooperSurgical s warranties do not apply to a...

Page 28: ... products must be cleaned and sterilized prior to shipment A signed decontamination declaration may be required All products should be carefully and adequately packed preferably in original packaging Replacement items or additional repairs will be invoiced All packaging should be clearly labeled with the RMA number and statement Urgent Returned Items for Repair Return Address Research Instruments ...

Page 29: ...rgical Inc 10 Customer Service Contact Details Tel 45 46 79 02 02 Fax 45 46 79 03 02 E mail sales coopersurgical com fertility coopersurgical com US Only Customers Contact Details Tel 800 243 2974 Fax 800 262 0105 fertility coopersurgical com ...

Page 30: ... 79 02 02 Fax 45 46 79 03 02 New Purchases E mail sales coopersurgical com Service Related E mail service origio com fertility coopersurgical com US Service Representatives CooperSurgical Inc 95 Corporate Drive Trumbull CT 06611 USA Phone 800 243 2974 Fax 800 262 0105 International Phone 1 203 601 9810 Fax 1 203 601 4747 Service Related E mail serviceandrepair coopersurgical com fertility coopersu...

Page 31: ......

Page 32: ......

Reviews: