Standard Practices
Teledyne Continental Motors, Inc.
TM
C-18
IOF-240 Series Engine Maintenance Manual
29 November 2006
C-8.
Cotter Pin Installation
Cotter pins are not reusable. Replace used cotter pins with the specified new cotter pins
made of corrosion-resistant steel.
Procedure
1.
Install the nut on the bolt.
2.
Verify the nut where the cotter pin is to be inserted has been torqued to the lower
limit of the torque specification in Appendix B of this manual.
3.
If the slots in the nut do not line up with one of the holes in the bolt, continue
torquing until one does. Do not exceed the upper limit of the torque specification.
Change the nut if necessary.
4.
Insert the cotter pin through a hole with the head seated firmly in the slot of the nut.
5.
Spread the exposed ends of the cotter pin. Bend the ends over the flat on the nut and
the end of the bolt.
CAUTION: Do not use pliers with cutting jaws (side cutters, end
cutters, etc.) to bend back the cotter pin ends. The sharp edges cause
nicks, which will weaken the cotter pin to the extent that it can
become detached.
6.
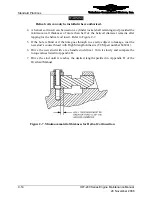
Seat the ends firmly against the bolt and nut (Figure C-11).
7.
Trim the protruding ends as necessary.
8.
All cotter pins must fit snugly in holes drilled in specific hardware. On castellated
nuts, unless otherwise specified, the cotter pin head must fit into a recess of the nut
with the other end bent such that one leg is back over the stud and the other is down
flat against the nut as shown in Figure C-11.
Figure C-11.
Cotter Pin Installation


