background image

Installing the DeviceMaster 500 and the SICK LMS Scanner (Windows): 

2000472 Rev. C

3

1-Port Enclosed (99439-8) Installation

pressure on the backside of the tabs at the bottom of both DIN rail clips.

2.

Connect the DeviceMaster 500 port labeled 

10/100 Ethernet 

to the 

same 

Ethernet network segment as the host PC

 using a standard Ethernet cable.

Note:

Comtrol Technical Support recommends connecting the DeviceMaster 
500 to a PC/laptop running Windows during initial configuration.

Do not connect the scanner until the port interface type has been 
configured in the NS-Link driver. The default serial port setting is RS-
232.

3.

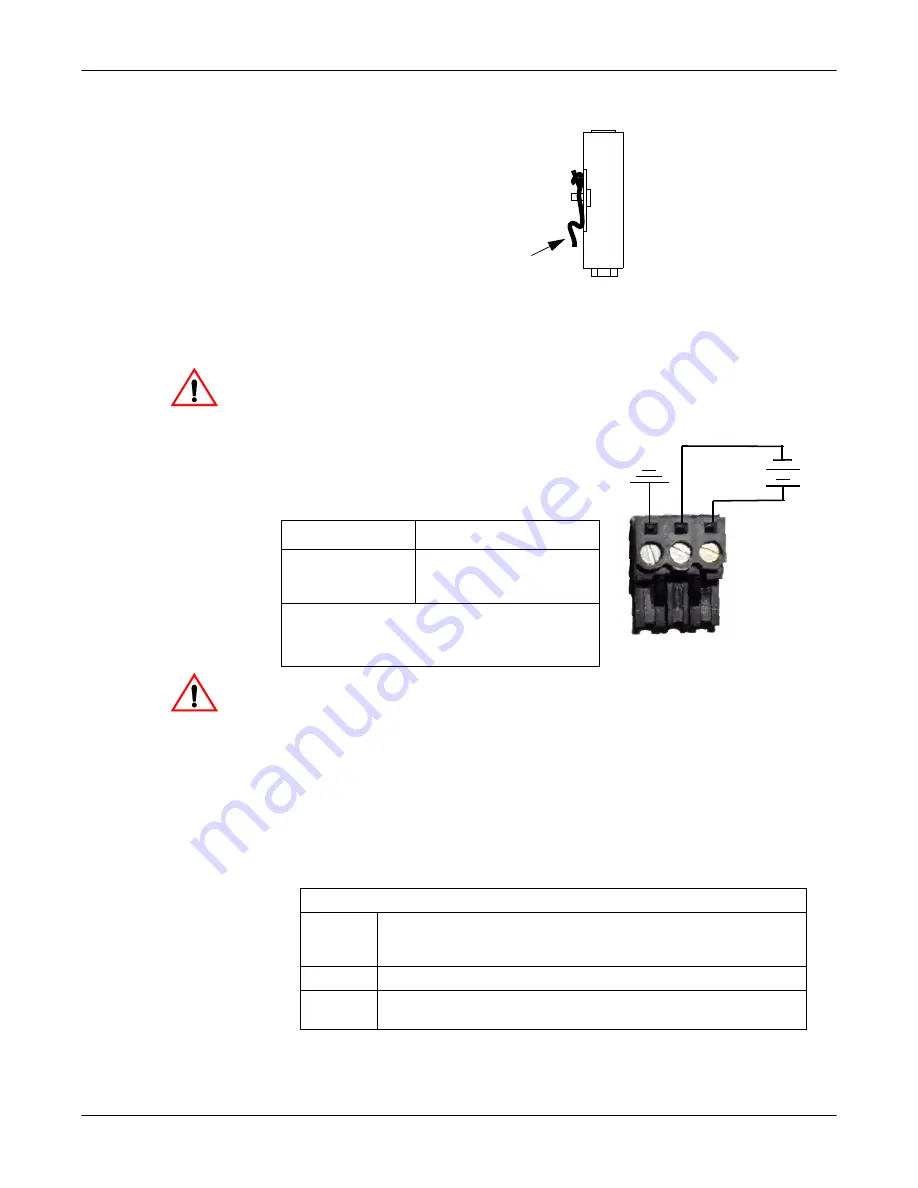
Apply power to the DeviceMaster 500 using the following steps.

a.

Connect the screw terminal power 
connector to the wires on the power 
supply as displayed. The power supply 
must conform to the specifications for the 
DeviceMaster 500. 

Observe proper ESD techniques when connecting and disconnecting 
the DeviceMaster 500.

b.

Use a small flat head screw to lock the wires into place.

c.

Plug the power terminal connector into the DeviceMaster 500.

Note:

Align the power plugs properly. The scalloped side of the screw 
terminal power connector should be aligned with the scalloped side 
of the power jack on the DeviceMaster 500.

d.

If necessary, connect the appropriate power cable to the power supply.

e.

Connect the power supply to the power source.

4.

Verify the 

Status

 LED has completed the boot cycle and network connection for 

the DeviceMaster 500 is functioning properly using the table below.

Side View

Press


here

Caution

Power Supply†

Specifications

Output voltage


Current


Power

5-30VDC


100 mA (Min.) @ 24VDC


2.5 W

Any power supply that meets current 
consumption, voltage, power, and connector 
pinouts requirements can be used.

Earth Gnd

Return

Positive

5-30VDC

+

-

Wire gauge:

AWG 12-22

Caution

LED Descriptions 1-Port Enclosed

100

If the 

100

 LED is lit, it indicates a working 100 MB Ethernet 

connection (100 MB network, only).  If the LED is not lit, it 
indicates a 10 MB Ethernet connection.

Tx/Rx

Displays transmit and receive activity.

Link/Act

When lit, it indicates a working Ethernet connection. The 
LED blinks several times during the boot cycle.

Summary of Contents for DeviceMaster 500

Page 1: ...etServer Device driver installation configuration and COM port configuration Note Optionally refer to the NS Link User Guide for Windows for detailed driver installation and configuration procedures or the help system Managing the DeviceMaster 500 Troubleshooting procedures Installation Requirements The following hardware is required for the installation SICK LMS scanner DeviceMaster 500 RS 422 ca...

Page 2: ...tion Use the following procedure to install the DeviceMaster 500 1 Port 1 Use the appropriate procedure Not DIN Rail Mounted skip to Step 3 DIN Rail Mount Pick up the DeviceMaster 500 so that the front is facing you Pick up a DIN rail clip The three tines should be on top and the M4 label should face you Slide the DIN rail clip behind the DeviceMaster 500 and line it up with one of the screw holes...

Page 3: ...ck the wires into place c Plug the power terminal connector into the DeviceMaster 500 Note Align the power plugs properly The scalloped side of the screw terminal power connector should be aligned with the scalloped side of the power jack on the DeviceMaster 500 d If necessary connect the appropriate power cable to the power supply e Connect the power supply to the power source 4 Verify the Status...

Page 4: ...lowing information to build a DB9 serial ribbon cable to connect to the DeviceMaster 500 1 Port embedded IDC10 connector J3 Status If the LED is lit it indicates that the DeviceMaster 500 has power and it has completed the boot cycle Note The Status LED flashes while booting and it takes approximately 15 seconds for the Bootloader to complete the boot cycle When the Bootloader completes the cycle ...

Page 5: ...er 500 for your environment using 1 4 stand offs to separate the DeviceMaster 500 from the base Non plated non grounded mounting holes 0 116 diameter 0 003 WARNING Holes in hatched area are not mounting holes Maximum component height above board is 0 55 Ethernet connection J2 J2 overhangs board edge by 0 14 and the height is 0 55 LED light pipe mounting holes The LED light pipes are not provided S...

Page 6: ...ve been tested and found to function Bivar Inc P N LP 230 and Ledtronics Inc P N LTP003 0CW 001 After mounting the DeviceMaster 500 you are ready to connect the cables Attaching the Network and Serial Cables Use the following procedure to attach the serial ribbon and Ethernet cables 1 If using a ribbon cable attach the cable built in Building the Serial Ribbon Cable on Page 4 to the header labeled...

Page 7: ...sing the table below The LEDs are located between the RJ45 connector and the power terminal block Go to Software Installation on Page 9 to complete the installation Power Supply Specifications Output voltage Current Power 5 30VDC 100 mA Min 24VDC 2 5 W Any power supply that meets current consumption voltage power and connector pinouts requirements can be used Caution LED Descriptions Status When l...

Page 8: ...to the DeviceMaster 500 by connecting the AC power adapter to the DeviceMaster 500 the appropriate power cord for your location to the power adapter and plugging the power cord into a power source 4 Verify the Status LED has completed the boot cycle and network connection for the DeviceMaster 500 is functioning properly using the table below Go to Software Installation on Page 9 to complete the in...

Page 9: ...xtract and install the NS Link device driver from the CD or download the latest version If necessary use the NS Link help system the NS Link User Guide on the CD or download the latest version for configuration procedures 4 Configure the appropriate COM port on the DeviceMaster 500 to use RS 422 mode Note If you do not require 500K baud and you are using an RS 232 cable do not configure the port t...

Page 10: ...iceMaster 500 COM port that you configured for the scanner by selecting the appropriate port from the File Open menu 10 Set the COM port to 9600 baud by using the Settings Port Settings menu Note The default baud rate for the scanner is 9600 Every time you power cycle the scanner you must reset this baud rate to communicate with the scanner 11 Set WCOM2 to view Hex data by selecting the View Hex D...

Page 11: ...menu to send the appropriate hex commands using LMS scanner manual to perform these steps a Send a request to the scanner to start measuring b Send a request to the scanner to stop measuring c Send a request to the scanner to set the baud rate to 500K d After you get the confirmation change the COM port setting in WCOM2 to 500K by using the Settings Port Settings menu e Repeat Steps a and b to mak...

Page 12: ...alexander sick com Trademark Notices Comtrol NS Link and DeviceMaster are trademarks of Comtrol Corporation Microsoft and Windows are registered trademarks of Microsoft Corporation Portions of SocketServer are copyrighted by GoAhead Software Inc Copyright 2001 GoAhead Software Inc All Rights Reserved Other product names mentioned herein may be trademarks and or registered trademarks of their respe...

Reviews: