FP-75 Setup and Operation
Data I/O Port
1.
Open the battery door on programmer box and insert new 9 volt
alkaline battery (Eveready 522 or equivalent).
2.
Connect the programming cord to the programmer.
3.
Plug the micro-mini plug of the programming cord into
the Data I/O port of the PR-75 receiver and then switch
“on” the programmer. (Ensure that the plug is in all the way.)
Note: When the programmer is turned off, it retains the
last program used.
To read the current channel program in the PR-75
receiver you must push the read button.
4.
To choose or remove a desired channel or channels,
push the channel button on or off. The illuminated LEDs
above the channel switches indicate the channels
that will be programmed when the write button is
pushed. When the write process is complete, the
programmed channels’ LEDs will re-illuminate.
5.
Since the programmer retains the last program
used, it is convenient to program multiple PR-75
receivers to the same program very quickly.
Program the first PR-75 receiver to the desired
channel or channels. Then turn off the power switch
and remove the micro-mini plug from the receiver. Plug
the micro-mini plug into the next receiver to be programmed.
Turn on the power switch and wait for the LEDs to illuminate on
the programmer, and then press the write button. Wait for the
LEDs to re-illuminate to verify programming. Turn off the power
switch and continue this process for the remaining PR-75 receivers.
6.
To resume operation in the AutoSmart-Tuning
TM
program mode,
all ten channels A-J must be programmed.
For more information on the FP-75
Field Channel Programmer or
COMTEK's comprehensive line of high
quality wireless sound products, give
us a call. Our applications engineers
will be happy to assist you!
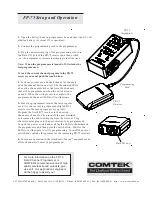
PR-75
Receiver
Programming
Cord
FP-75
Programmer
357 West 2700 South • Salt Lake City, Utah 84115 • Phone: (800) 496-3463 • Fax: (801) 484-6906 • http://www.comtek.com


