


2–8
SAN Switch Integrated/32 and Integrated/64 Installation and Hardware Guide
2–8
SAN Switch Integrated/32 and Integrated/64 Installation and Hardware Guide
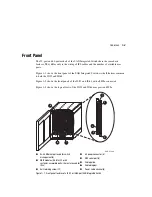
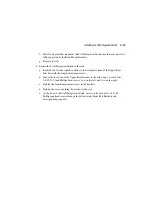
Installing the SAN Integrated Switch
The procedure below describes how to install the SAN Integrated Switch.
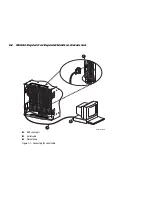
1. Transfer the SAN Integrated Switch from the pallet to the lift device, and set aside.
WARNING:
Three people will need to work together to transfer the SAN Integrated
Switch to the lift. Make sure the wheels of the lift cannot roll as you transfer the SAN
Integrated Switch to the lift. Move the SAN Integrated Switch slowly and carefully onto
the lift to prevent back and hand injury. Dropping the SAN Integrated Switch could
injure personnel or damage the equipment.
a. Position the lift device adjacent to the SAN Integrated Switch.
b. With a pallet jack, raise the pallet on which the SAN Integrated Switch is mounted
to the same height as the top surface of the lift device.
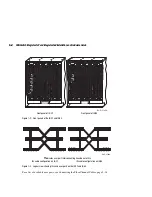
c. Remove the eight screws holding the SAN Integrated Switch to brackets on the
pallet. See Figure 2–2.
d. Slide the SAN Integrated Switch across from the pallet to the lift device.
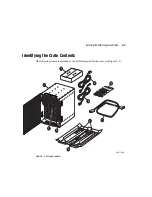
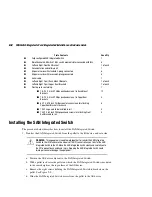
Crate Contents
Quantity
1
Fully configured SAN Integrated Switch
1
2
Fibre Channel SAN Switch 16-EL switch elements interconnected with ISLs
6
3
Left and Right Front Rail Bracket
1 of each
4
Documentation and software kit
1
5
AC power cords with standard 3-prong connectors
6
6
AC power cords with recessed 3-prong connectors
6
7
Serial cable
1
8
Left and Right 2-part Rack Mount Brackets
1 of each
9
Left and Right 2-part Upper Rear Brackets
1 of each
-
Plastic pouch containing:
1
■
1/4-20 X .5 inch Phillips panhead screws for Rack Mount
Brackets
12
■
1/4-20 X .5 inch Phillips panhead screws for Upper Rear
Brackets
4
■
8-32 X 5/16 inch Phillips countersunk screws for attaching
Upper Rear Brackets to chassis
8
■
10-32 cage nuts to be installed in rail
4
■
10-32 X .63 inch Phillips panhead screws for attaching Front
Rail Brackets to rail
4